


Minigames in Final Fantasy VII Rebirth | Game Analysis #31
September 2023 was a treat! Besides a litany of new impressions and information about this highly anticipated game, nine minigames were shown off, one of which completely new to the FFVII universe.


Table of Contents
Introduction
In September 2023, trailers and showcases in Sony PlayStation's State of Play stream and at Square Enix's stage presentation at Tokyo Game Show1 were treating Final Fantasy VII fans to a fancy 5-star dinner, not to mention hands-on impressions through a demo preview many influencers and the games media got to play and present a few days before Tokyo Game Show 2023. Besides the world, more about the combat, and even menus, we received glimpses on several minigames present in Final Fantasy VII Rebirth. Nine in total, to be exact, with one of them being somewhat novel and another one that’s a completely new addition to the Final Fantasy VII universe. These are:
Official information on some of them can be found in this Square Enix blog post.
It’s also good to know that we will be able to play those minigames and enjoy side content in general at any point in the story according to the following quote by Rebirth’s director:
Naoki Hamaguchi: “Accordingly, it has also been structured so that none of the side content becomes cut-off and you never lose the opportunity to go back and play it, regardless of how far you progress in the story. That means that you can always take a detour and explore the expansive and vibrant world whenever the mood takes you.“
Reading this makes the completionist inside of me smile brightly and widely. No missables, no forced cut-off point, no tight windows for completing anything, just full freedom to tackle any content in any order and at any time we want. At least in theory.
Enough gushing. Thanks to almost all of those minigames being shown in action with a complete UI, we can deduce their mechanics and how they will most likely feel to play. And this is the main purpose of this analysis article. So without any further ado, let’s go through them in order of appearance across trailers and presentations.
Welcoming Ceremony March

First, we’re treated to one a sizable portion of fans had doubts about even making it into Rebirth because it was already very silly in the original game and broken to boot. If you tried to follow the game’s instructions, got perfectly into the line and matched the other troopers’ rhythm, you’d most likely do poorly and were sent some bombs (Grenade x6) as a reward. To drive up the ratings, it’s sufficient to only vaguely get into line and then just keep spamming the rifle button. Watch this explanation video and this short strategy video for more details.

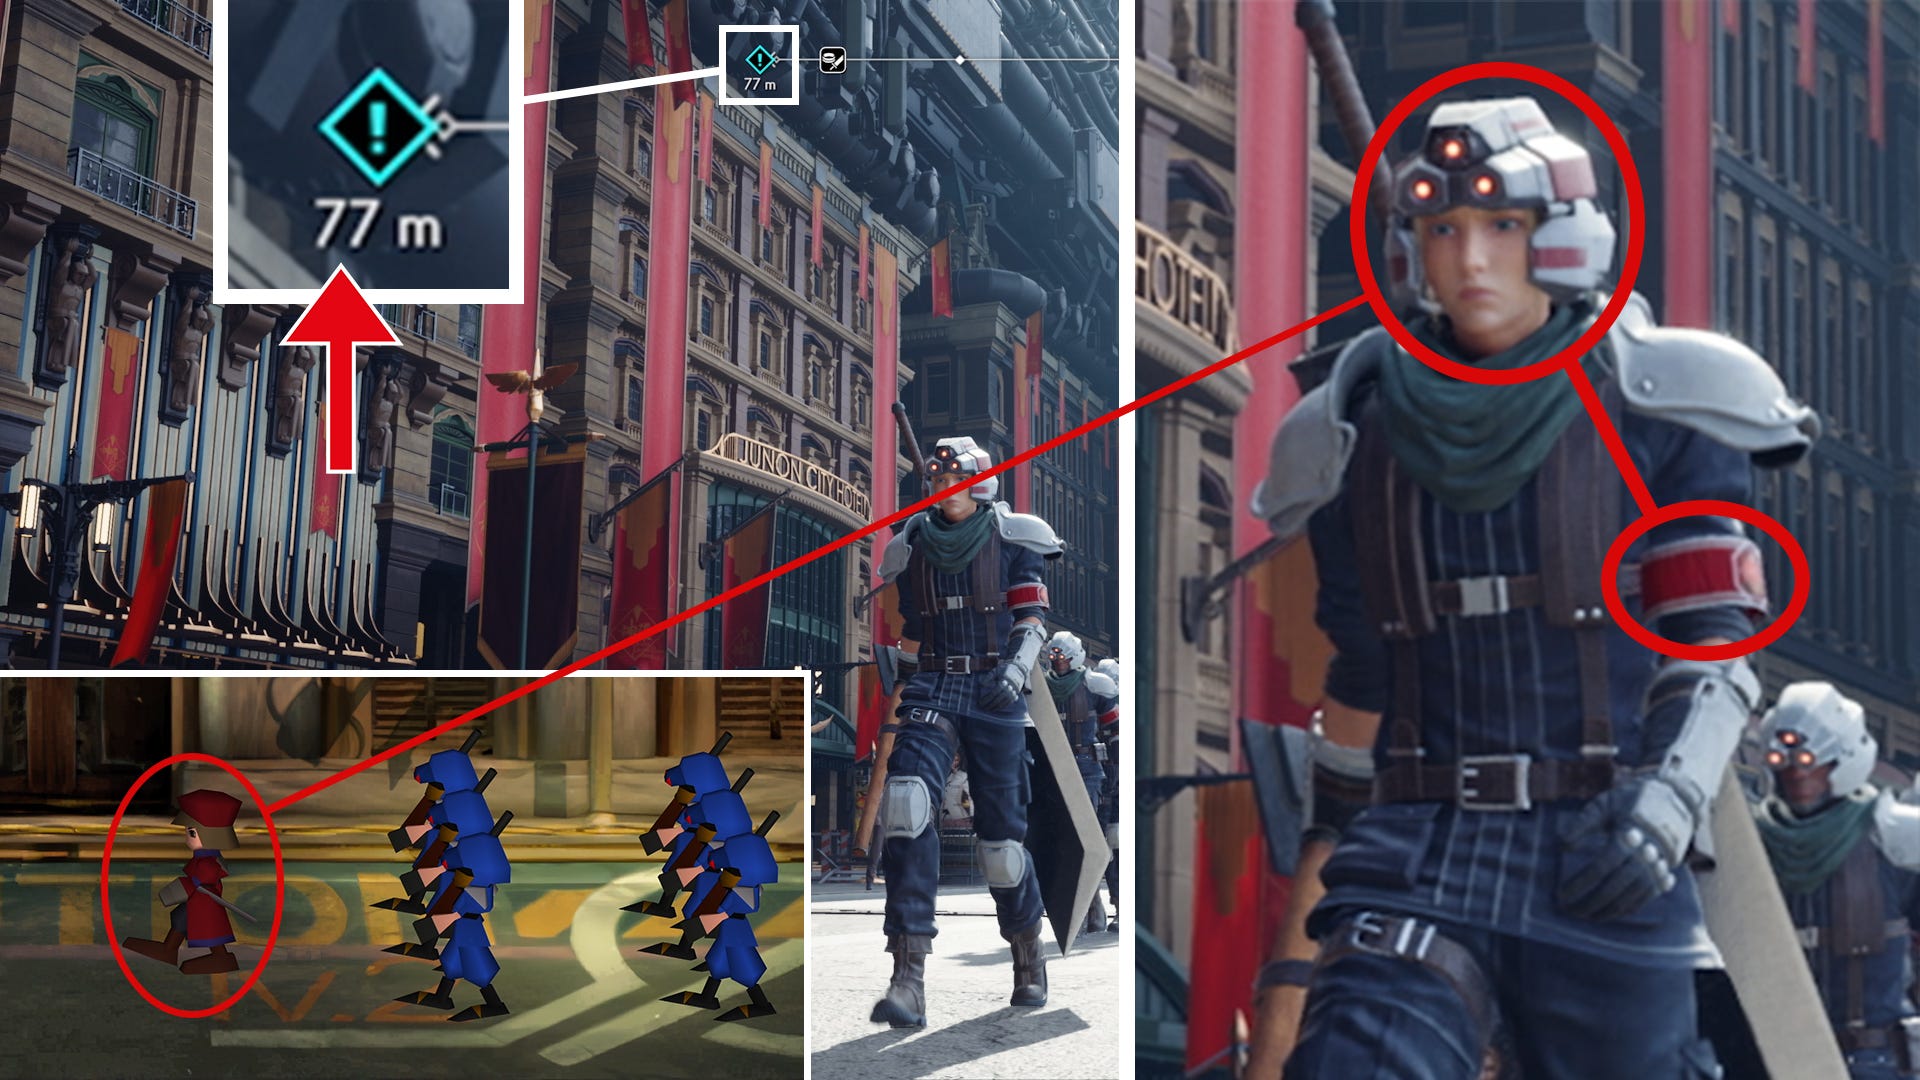
Even if they included this in Rebirth, it would need a huge overhaul. And that’s exactly what happened! In the State of Play trailer and the official screenshot, we can see that Cloud is leading his own platoon,2 taking on the role of the red Shinra guard in the above screenshot of the original version. This looks already promising, but there’s a bit more to it. By pressing L2, you can even command your troupe to change their formation, which likely contributes to your score.
Official Information on the Parade
But that’s about the extent of what we can glean out of the trailer footage as there’s barely anything shown off. However, Square Enix developers elaborated further in interviews following the trailer’s release. One from Gameinformer and the other from Inverse, with the former revealing only part of Hamaguchi’s quote.
Naoki Hamaguchi: “If you remember the Rufus Inauguration Parade, in the original, you may recall that there was that minigame where you press the button in time with the parade. Within Rebirth, Cloud is now leading this parade. Here he’ll be able to collect the soldiers that will join the parade, seeking out soldiers within the crowd, then set up a specific unique configuration. This then determines the difficulty of the minigame and the results, and there's unique happenings that occur depending on which soldiers Cloud selects.“
From this short description alone, it sounds much more involved than its predecessor in the 1997 PlayStation 1 game. You don’t just join the parade and press some buttons anymore but actually take on the role of a leader, assemble your troops, and are responsible for how the parade is conducted. No pressure or anything.
So, instead of merely running around Junon’s street, entering numerous interiors to pester citizens and other guards, go shopping, visiting the second Beginner’s Hall, and even catching the Turks drinking in a bar, Cloud needs to additionally find and recruit participants for the parade. Even the minigame’s difficulty depends on which units your recruit, next to some unique “happenings” for certain soldiers. So, we better search every nook and cranny in this place to find them all!
Other Findings
Besides the minigame itself, we can find a few other interesting details in the clip from the trailer and the official screenshot.
As mentioned above, Cloud has taken the place of a platoon commander, which was represented by this distinct model in a red coat and helmet in the original game. While Cloud is still wearing a standard security officer’s uniform, his commander status is designated by red segments on his helmet and an additional red armband.
Maybe it’s a coincidence, but the destination distance indicator on the compass line shows 77m in the official screenshot. Very fitting to this game’s numbering, don’t you think? Two sevens for it being the second entry of the Final Fantasy VII remake trilogy? Ok, I’ll see myself out…
If somebody still does not know in which Stamp continuity we’re in here, maybe this stamp poster on the side of a souvenir cart can help you out. Spoilers: it’s a beagle.
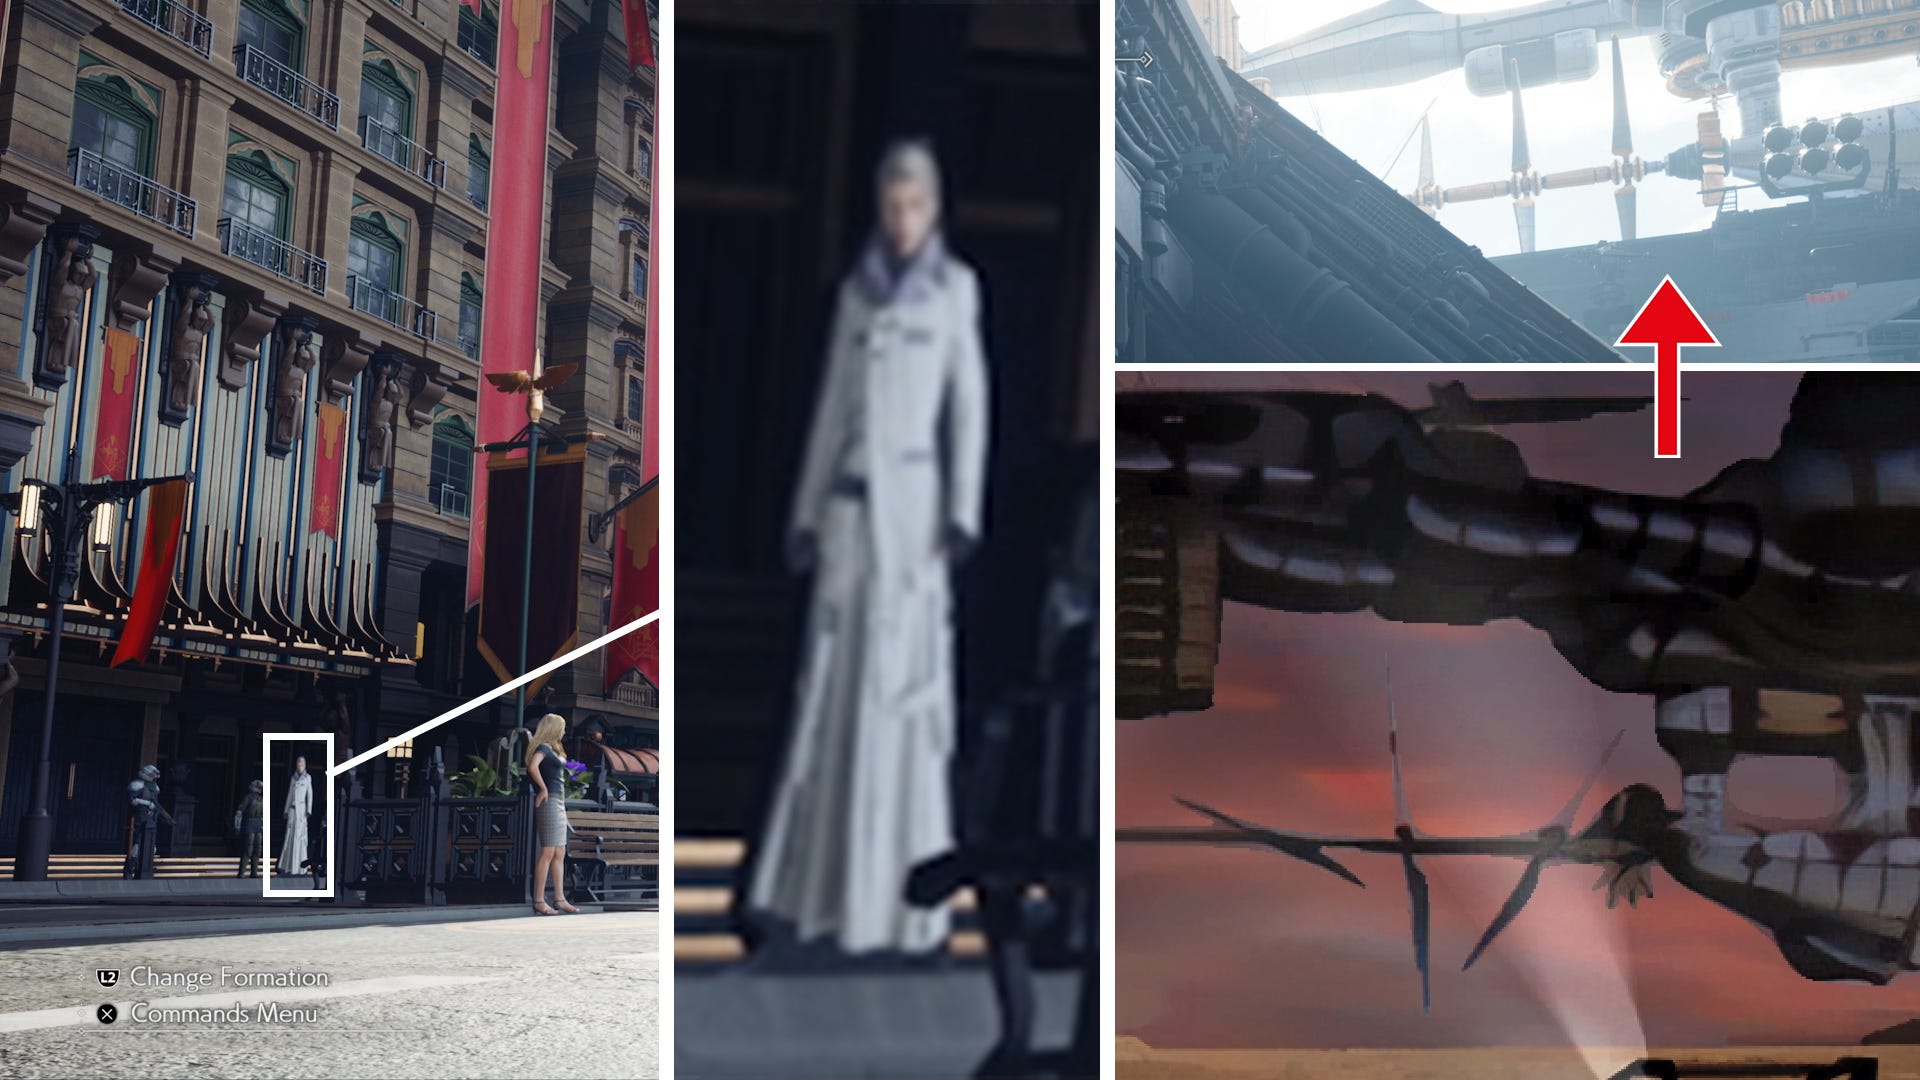
This next observation might probably be a bit of a reach, but it does feel like this female parade traffic attendant’s blue uniform has been inspired by the red commander model from the original game. On the other hand, it does look pretty much like your standard Japanese traffic attendant uniform.

Lastly, one cool and one silly finding. In the top right, we can spot part of our beloved Highwind airship, which seems to have been faithfully recreated. I might post a better comparison on Twitter (X) at some point.
In the bottom right, however, a random cardboard cut-out of Rufus is standing at the border of the street. I can almost smell the narcissism just by looking at this image. I hope we can tip all of them over and earn the “Rebellious property damage“ trophy.
Chocobo Racing

This next minigame was played to death by many players, especially completionists, who wanted to obtain every single piece of Materia, equipment, and breed a Golden Chocobo. For those goals, you had to play this game over and over again. Prizes like the Precious Watch and Chocobracelet Armor pieces, the Cat’s Bell accessory, as well as the Enemy Away and Sneak Attack Materia were all only obtainable by winning Chocobo Races. To successfully breed differently colored chocobos with new abilities, you had to enter the chocobo race with the previously bread and newly caught chocobo mates several times.
The original version of this minigame is a bit wonky in its controls and camera behavior, and hard to win if Joe’s black chocobo Teioh was a part of the race. Luckily, there’s a built-in cheat which lets you sprint with your Chocobo while barely losing any stamina, leading to easy wins.
How the Original Version Works
When comparing the original version to this remade one in Rebirth, it’s evident that they vastly improved it to bring it to a modern standard and then added the cherry on top of it. Here’s a screenshot of the original for reference.

It does not just look old but is also bare-bones in the gameplay department. The Chocobo runs automatically, thought you can control its average speed using the cross and square buttons on a PlayStation controller. The faster the chocobo runs, the faster its stamina, the red meter on the left, is drained. While holding the circle button, your chocobo would start sprinting but drain stamina even faster. When stamina runs out, the chocobo can barely move anymore and if you’re not already very close to the finishing line, you’re very likely to lose the race.

Holding down R1 and R2, however, continually restores stamina resulting in no stamina loss while racing at full average speed. This trick leads to a sure victory. If not, sprinting occasionally would do the trick.
You’re also able to move left or right if you so desire, which might be helpful while overtaking your opponents during the beginning. Other than that, it’s just a matter of holding down buttons and watch your bird cross the finishing line in first place. You might have noticed or even remember the large button in the bottom right corner. It lets you switch between manual and auto mode using the select button. If you’re feeling lucky, you could try auto mode and just hope for the best, but that’s not advisable.
The rest of the UI holds a representation of the current track and the contestant’s positions in the top right, while the current ranking and the state of each bird—running normally, sprinting, panting, or even already across the finishing line—takes up the rest of the upper area. Quite bare-bones as mentioned before.
To summarize: you can steer your bird, control its speed, sprint, lose stamina the faster you go, can slowly restore stamina, and barely move when stamina reaches zero. Now let’s have a look at the remade version.
How Rebirth’s Version Works
To see the immediate upgrade, let’s compare both version to each other.
The inspirations from other more modern racing games become immediately apparent. Current total time, lap times, proper icons moving along the track representation, intuitive ranking, and the current lap number. While most of this is not new, laps certainly are. The original version had none. You raced for the goal and that was it. Now, you need to run around the track 3 times. At least on this one. Though this can be regarded as mere modernization still.


Thinking further, I would not be surprised if a lap and total time leaderboard makes its way into this minigame to basically letting you race against your friends or even the whole world by comparing your best times to others. But again, that’s nothing to write home about. Speed handling on the other hand is where the actual juice is served.


In the bottom left corner, we see two more displays in addition to Rebirth’s version of the stamina meter, which is now laid out horizontally and yellow instead of red. Like in the original version, we can increase and decrease the chocobo’s normal running speed, as seen in the button control display, as well as temporarily sprint faster using Speed Burst by pressing L1. However, the original’s stamina meter as such does not exist anymore as it only depletes when activating Speed Burst. It’s more fitting to call it a resource gauge.
Furthermore, Speed Burst differentiates itself from merely accelerating and decelerating by displaying a haste spell effect around the chocobo. As long as it’s visible, the gauge depletes. The reference to the haste spell got lost in the English localization, unfortunately. In Japanese, It’s called Chocohaste (チョコヘイスト) instead.

According to the trailer footage, L1 can only be pressed once and then it remains grayed out and deactivated until the footage cuts away. Upon pressing L1, the Speed Burst meter gradually depletes and when reaching zero, the speed boost ends, the chocobo returns to normal running speed, and the Speed Burst meter might begin to slowly fill-up again, likely slower than it depletes. Although it’s also possible that we need to collect red Gysahl Greens on the track to fill up the Speed Burst meter again, just as we need to collect speed fruits, but more on them in a bit. We can assume that activation can happen at any time as long as the meter is not empty, as this would provide a bit more strategizing, risk-taking, and flexibility. Otherwise, you’d be stuck with a partially full bar until it’s filled up again.
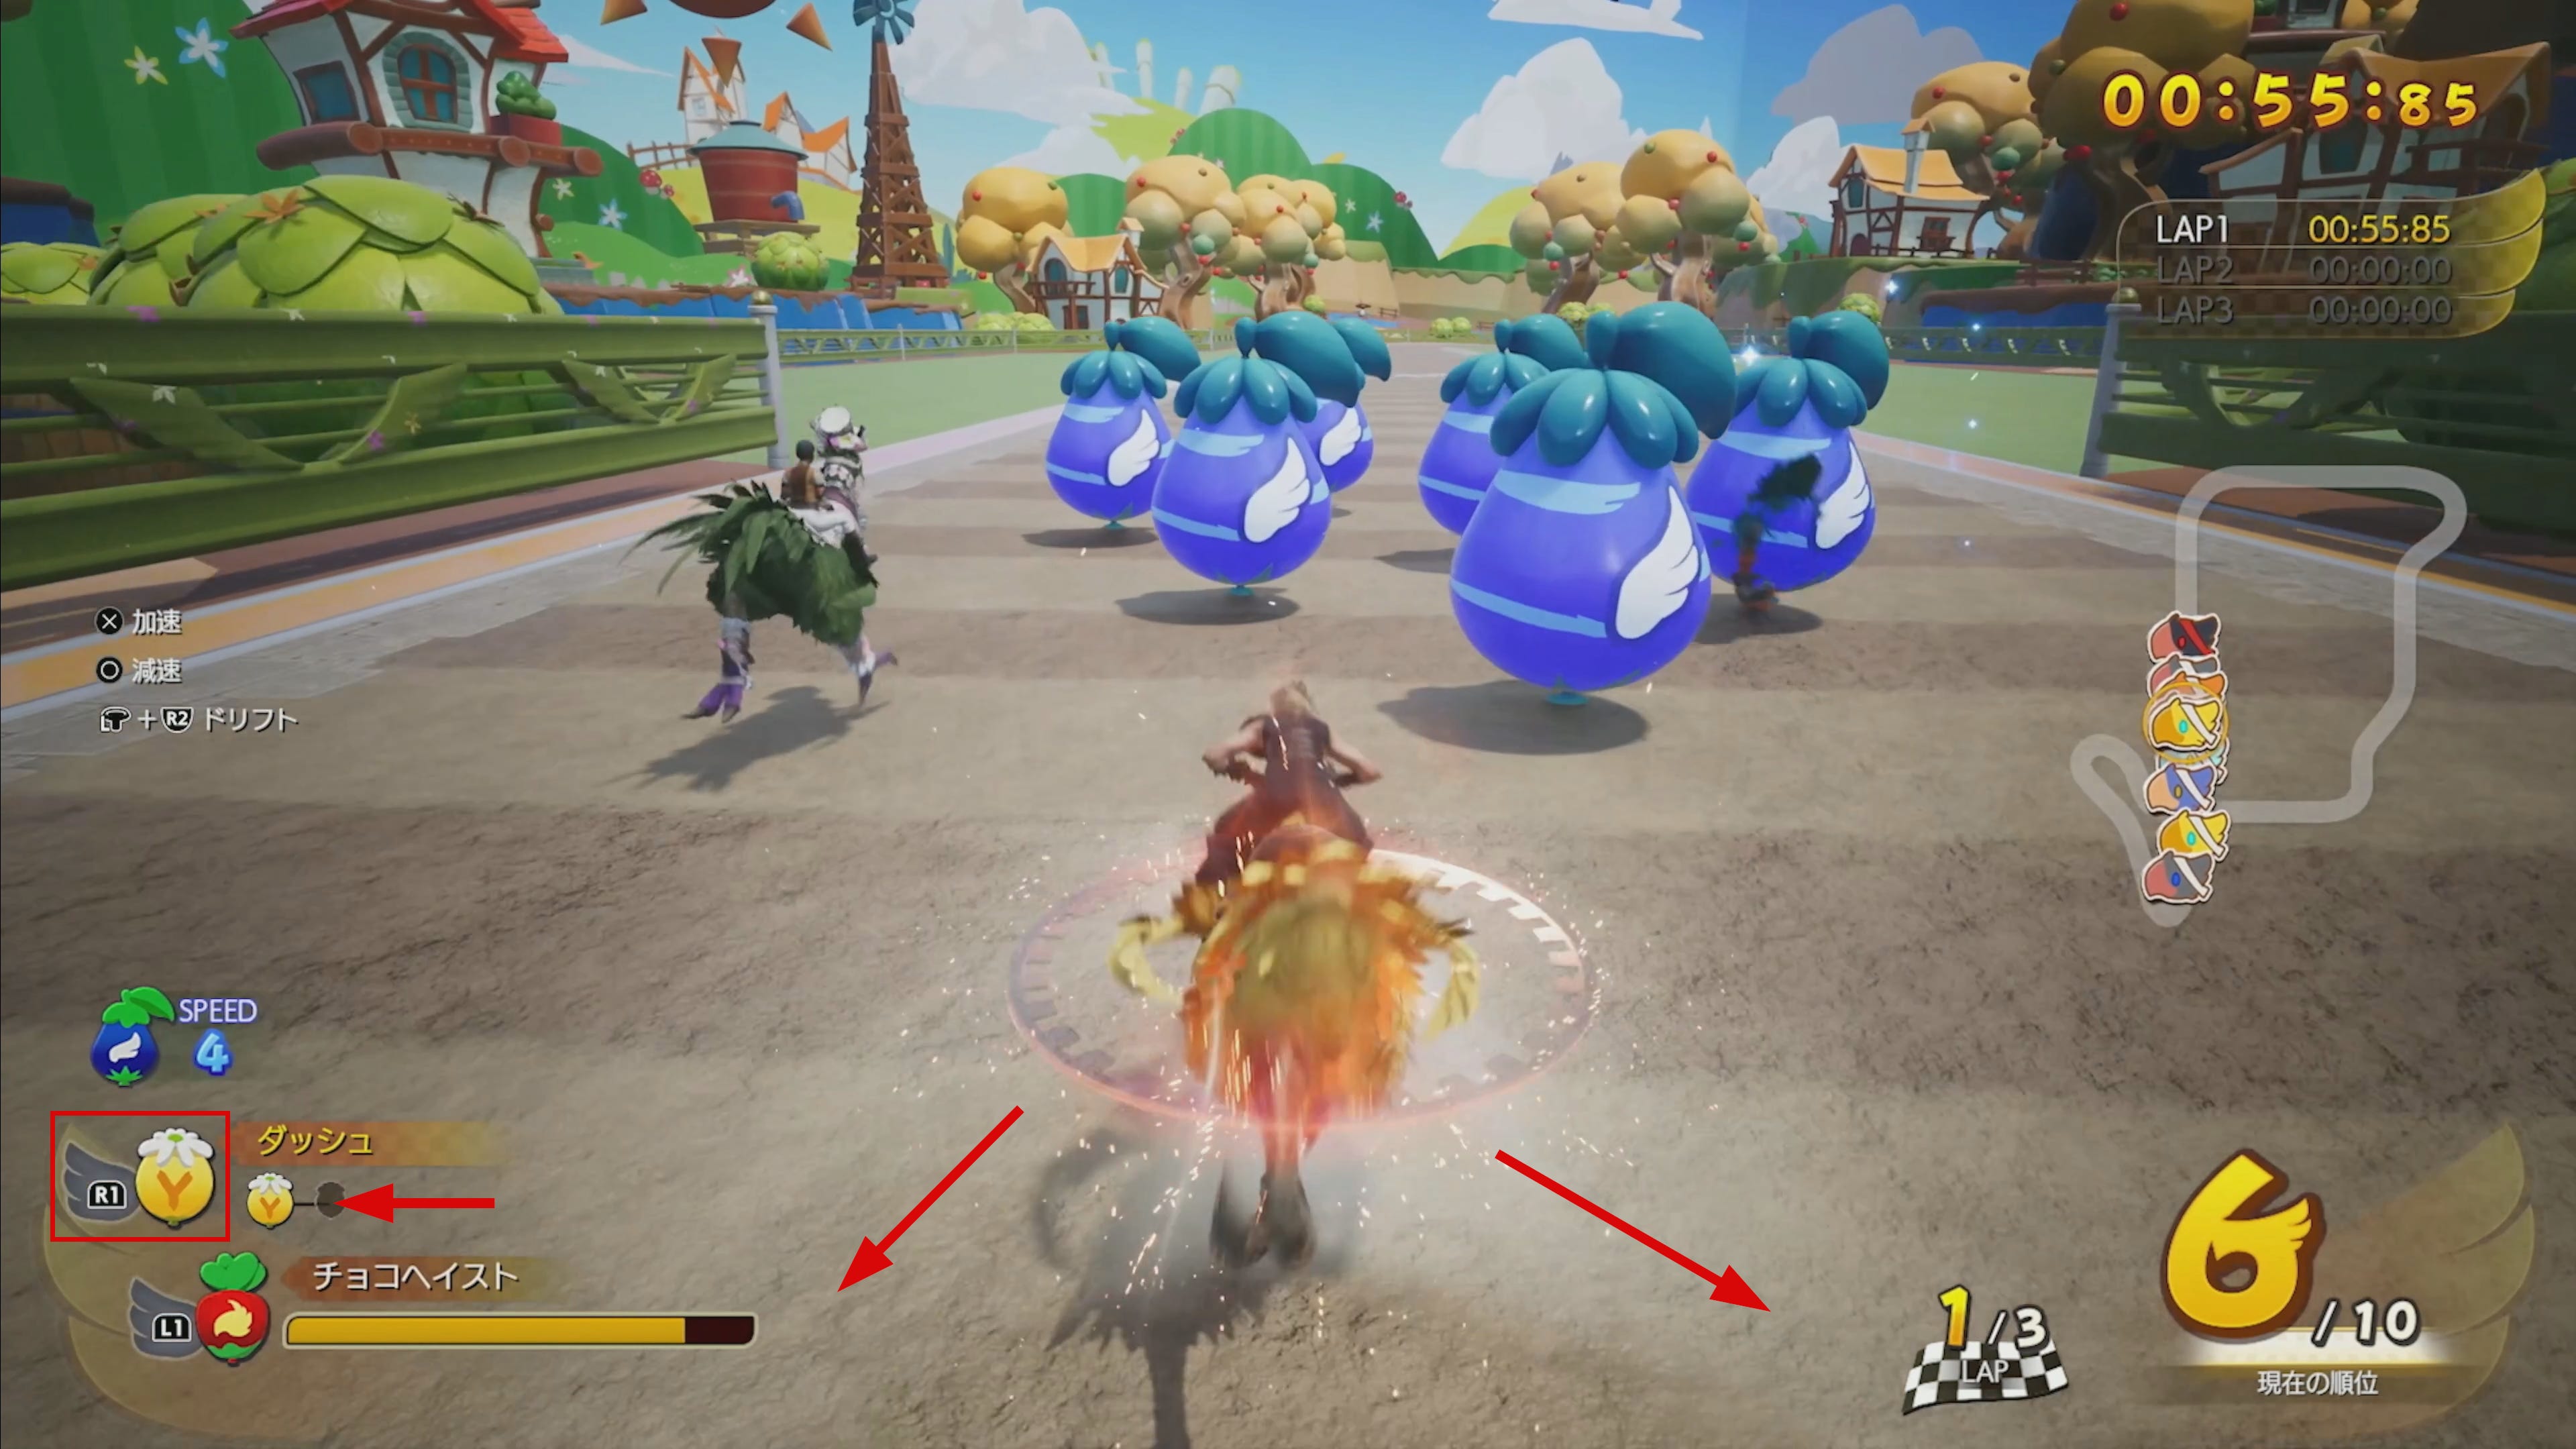
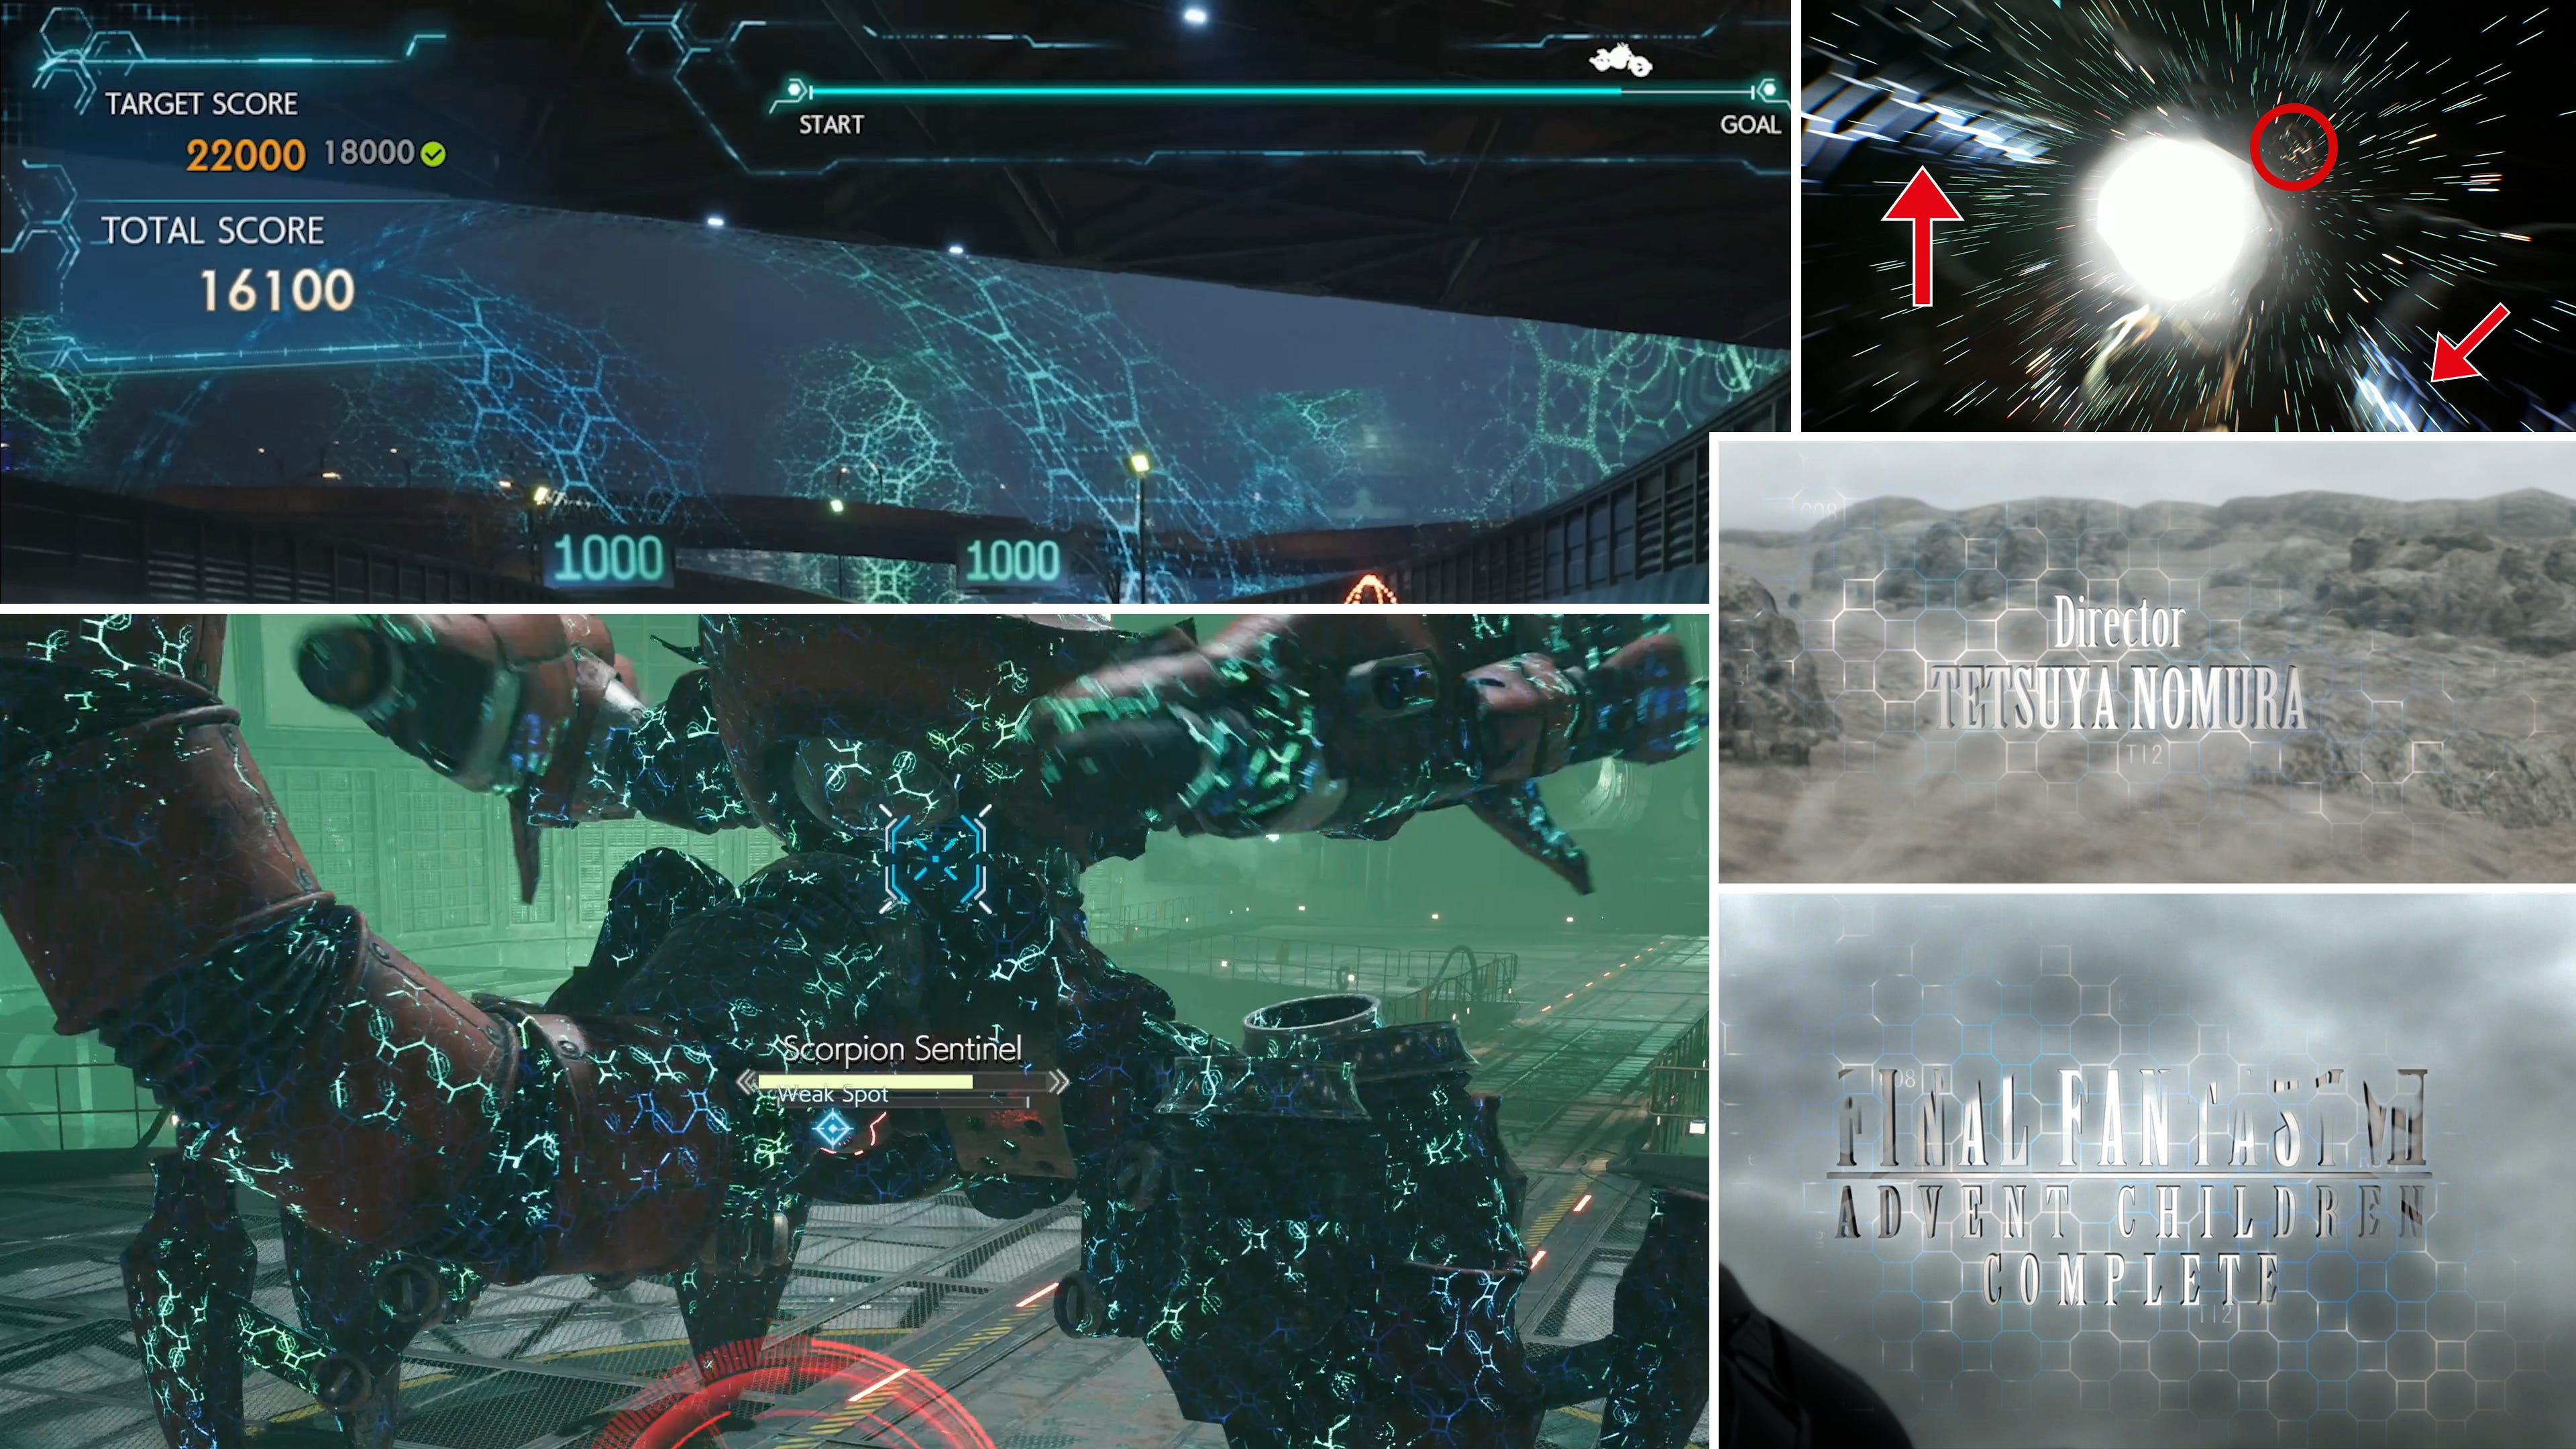
The Dash function above Speed Burst is entirely new. According to the UI, you only have two dash charges available in total. Though it might be possible to collect more Y fruits on the track. Anyway, pressing the R1 button consumes such a Y fruit and sends you into dash mode for a set amount of time and you likely cannot use Dash again until the effects wear off (grayed-out button). As with Speed Burst, Dash adds an effect to your bird, albeit much less visible as it is represented by white dust flowing in its wake (See red arrows above), similar to the “clouds” high-speed military aircrafts leave behind when breaking the sonic barrier, just less pronounced. I wonder what the speed difference between Speed Burst and Dash is. According to the Japanese trailer footage, you can activate Dash even while Speed Burst is active.

Lastly, we have the blue speed balloons who look somewhat similar to eggplants. Every time you run into one of those speed balloons on the track, the balloon pops and your Speed value increases by 1. In the example below, Cloud just collected 2 fruits which made the Speed value increase from 4 to 6. This value seems to represent the current maximum speed your bird can run. More specifically, the speed you reach when fully accelerated by pressing cross on your controller. Meaning, the more you collect, the faster you can run without having to rely on Speed Burst or Dash. Collection is also represented visually. Your chocobo receives a temporary blue glow around it and leaves a trail of blue particles in its wake.

Another detail to mention is that collected speed fruits re-spawn around half a second later—as seen in the Japanese version of the trailer—which means that everybody can collect the same ones unless other contestants try to collect them at the same time. Thus you are advised to not directly tail your opponents when attempting to collect some speed fruits.
Last but not least, chocobos can drift! We cannot see it in the trailer, but by tilting your left stick into the drift direction and then pressing R2 performs a (hopefully) sick drift around a tight turn. I hope this lets you master tight curves without having to decelerate if you time it correctly.
Official Information on Chocobo Racing
That’s it for the gameplay mechanics, but I have a few more things to show and tell you. First off, you can enter the chocobos you’ve caught in the wild into the races at the Gold Saucer, as confirmed in this official interview on the Square Enix blog.
Naoki Hamaguchi: “You can also enjoy the chocobos you have collected in another way: by entering them in the Gold Saucer chocobo races!“
On top of that, the chocobo gear you can acquire at Chocoboutiques at Chocobo Ranches can also be used to improve your chocobo’s stats at the chocobo races at Gold Saucer as revealed in an interview with IGN.
Naoki Hamaguchi: “And in terms of the breeding system that you mentioned, something like that does not exist in rebirth. However, for the Rebirth chocobos, each of them has their own unique name and they are able to enter the gold saucer races. There's also equipment that is specifically designed for chocobos to equip that will enhance their stats and it will affect their performance in chocobo races.“

In the same interview, he also talks about the scope of this minigame.
Naoki Hamaguchi: “So there are several race tracks that are available and just within the chocobo racing contest, there's many varied courses that one could challenge. So, in terms of play hours that can be devoted, it's quite, you know, copious amounts of hours that one could spend on chocobo racing.“

Instead of just this one race track in the original which offered a shorter variant using a shortcut, Rebirth contains a multitude of tracks with different challenges for each one. Even if chocobo breeding is not included—which I personally never expected until game three—we are most likely spending just as much time racing chocobos as we did in the original.
Neat Details
Before we end this segment, let me show you two cool details I found by looking at the trailer footage and screenshot.
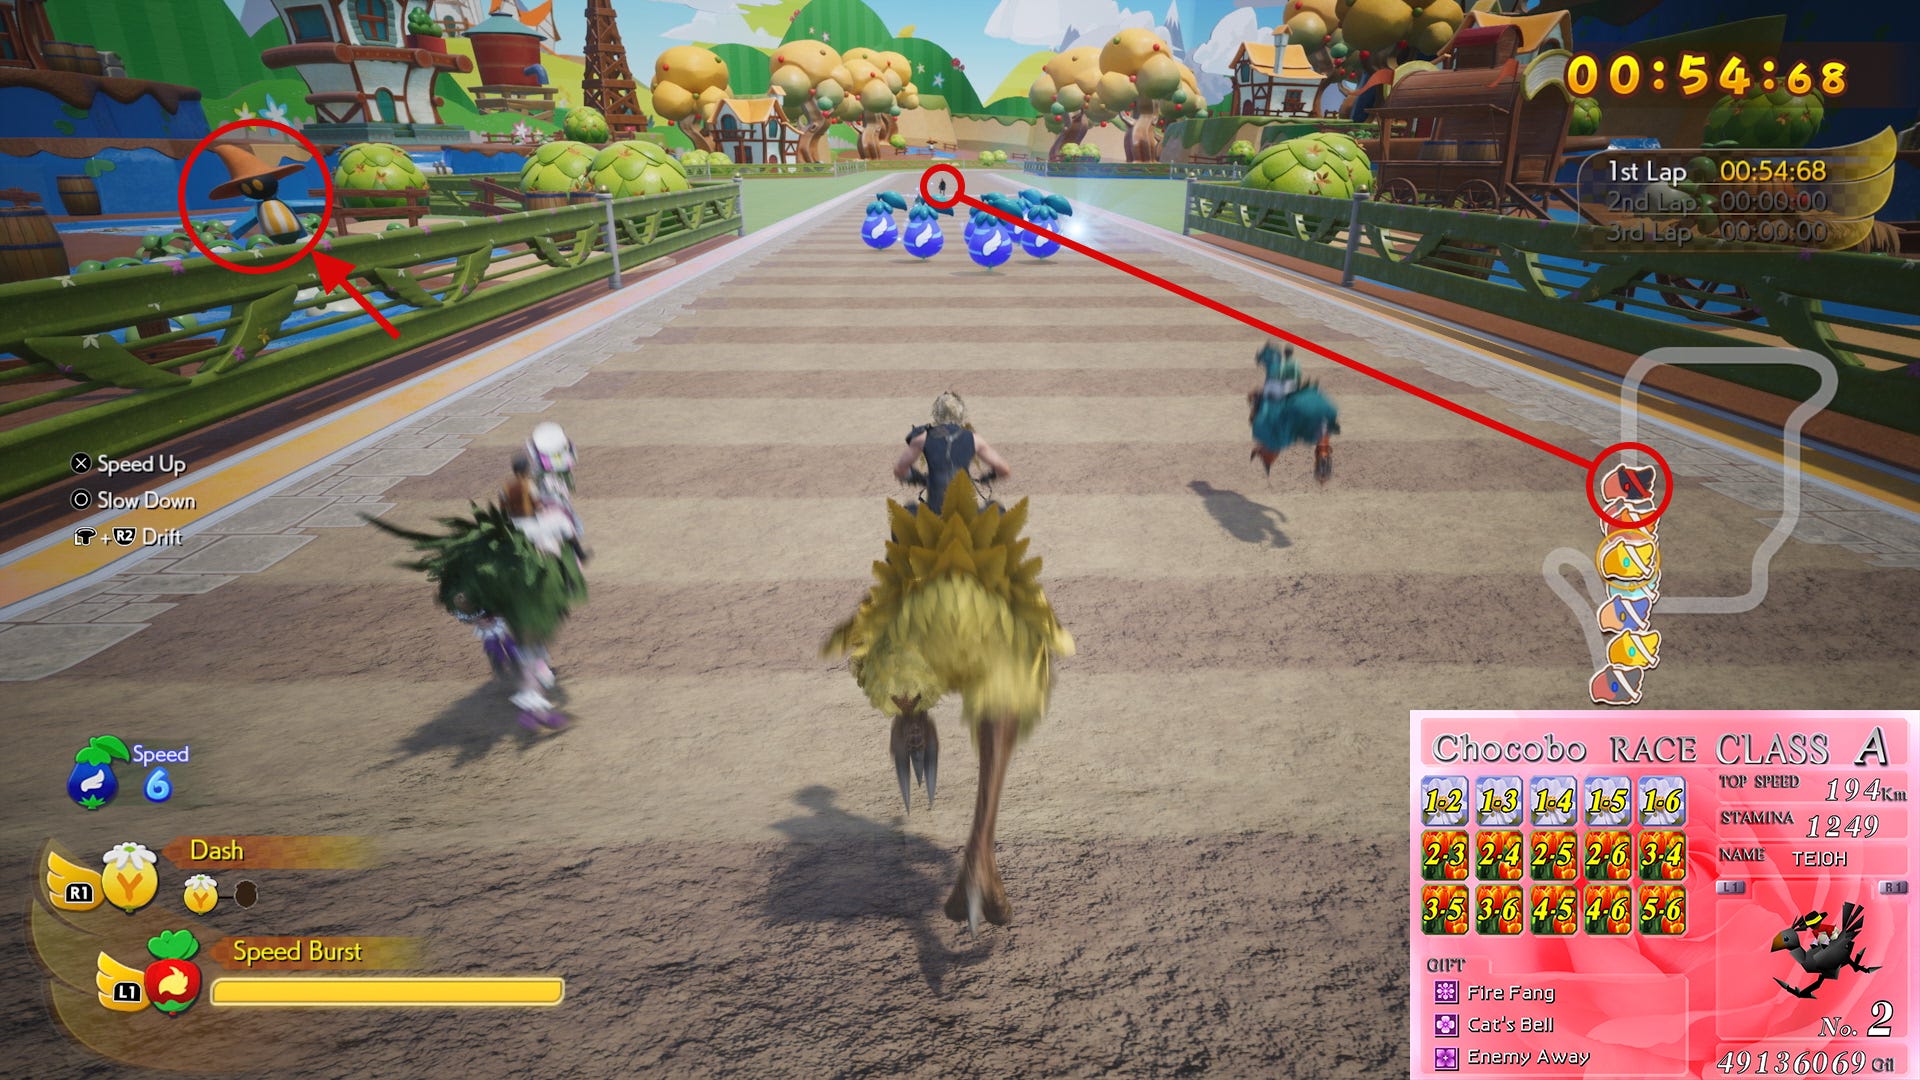
First, the famous and speedy black chocobo Teioh seems to be a part of this race and, as always, is in the pole position. It’s also the only chocobo with a red bandana in its track position icon, possibly to signify an elite chocobo and jockey. Will we meet more of them? Do we need to beat all elite chocobos for a special reward?
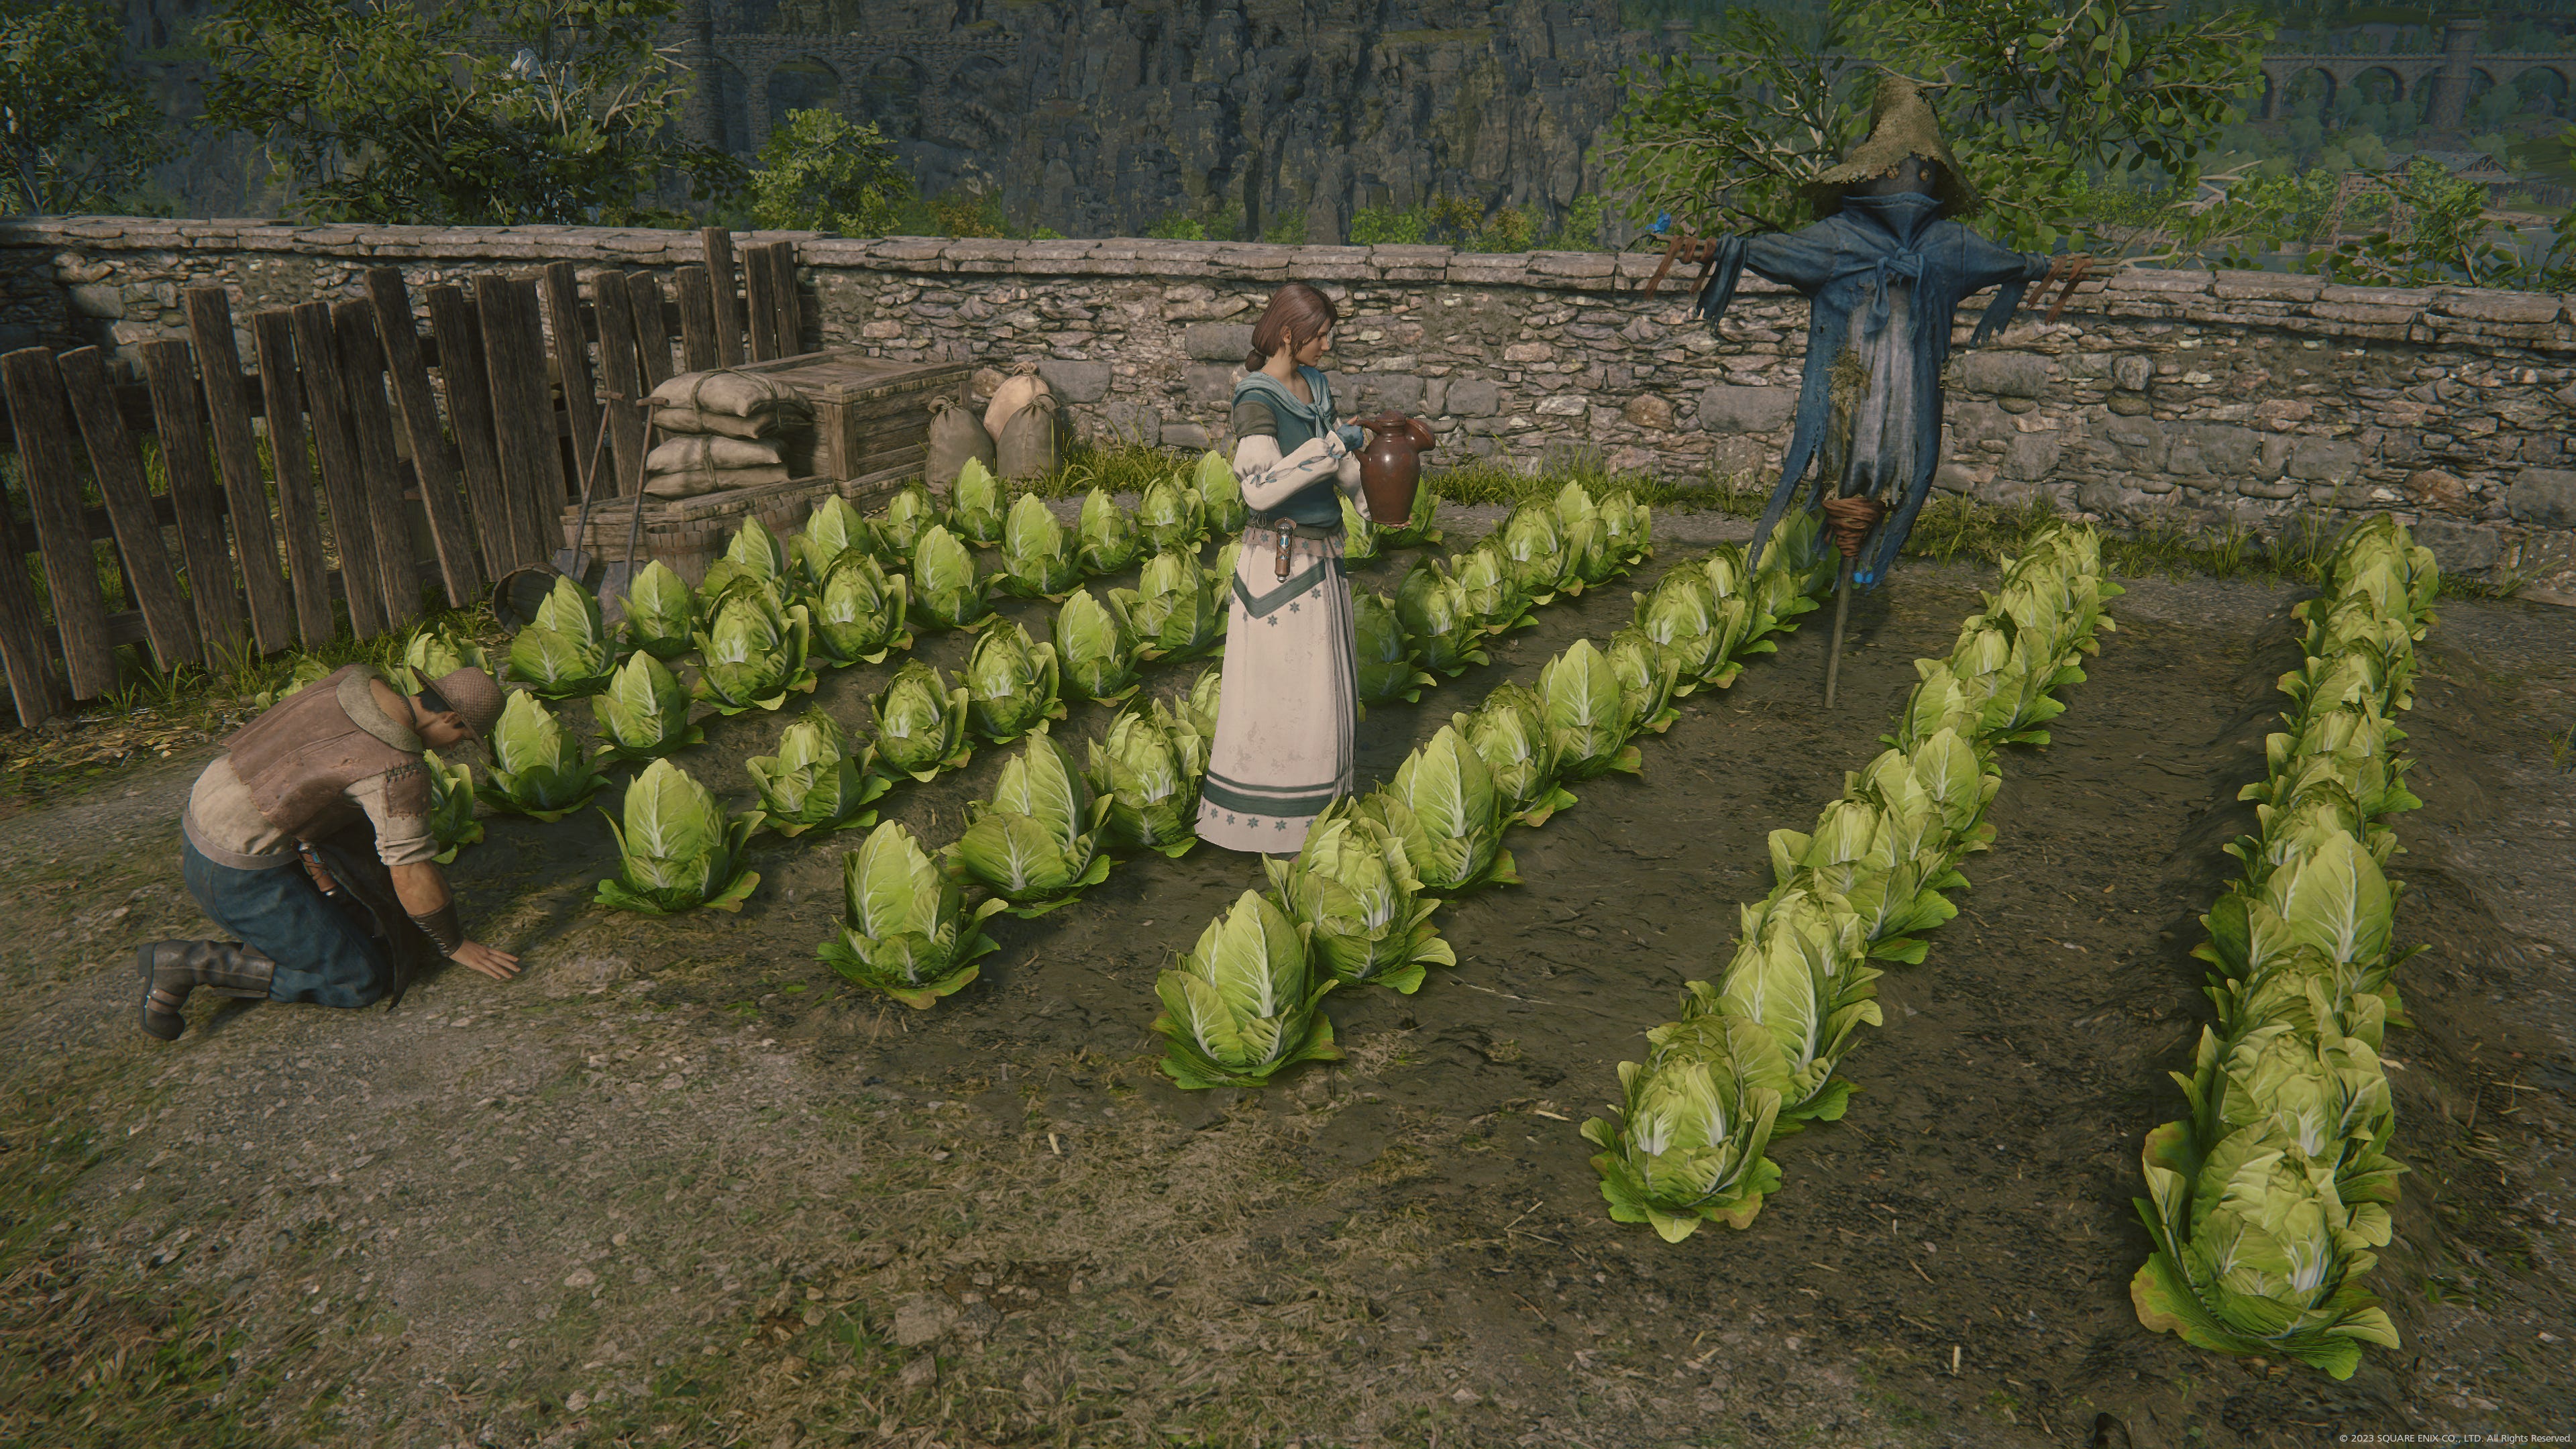
Second, did you spot that cute little black mage scarecrow on the left side of the track? It reminds me of their more realistic counterparts in Final Fantasy XVI. I wonder which developer team came up with this idea first…
3D Battler

This minigame was not talked about at all in any interview or article, which means we only have the State of Play trailer footage to go on and don’t have an official name yet either, so we will call it “3D Battler” as it is called in the original game.
Original 3D Battler
Before we dive into Rebirth’s re-imagination of this minigame, let’s drive down memory lane and have a look at it’s original counterpart from 1997.3
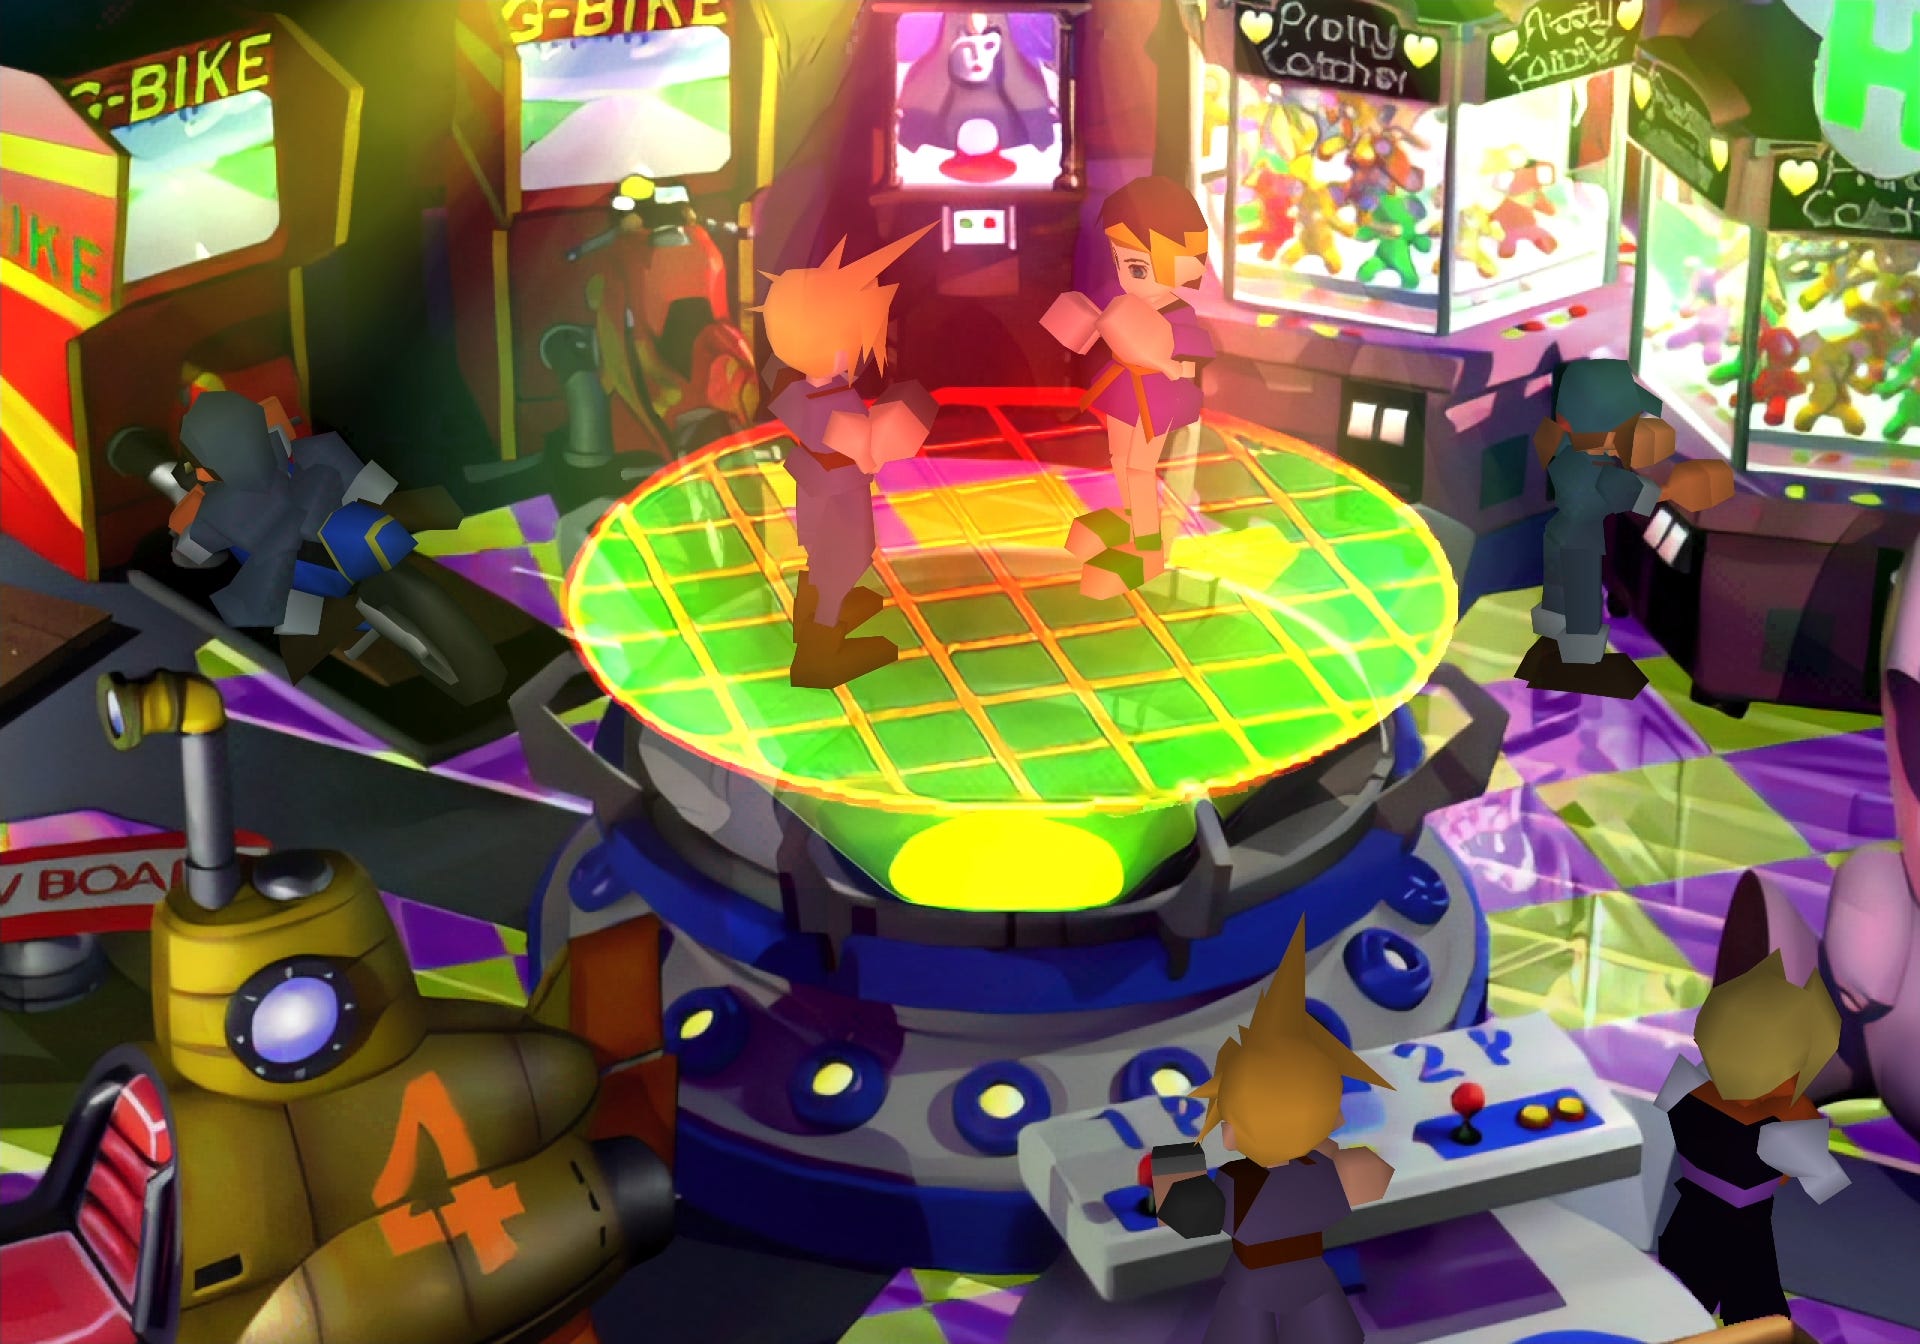
This holographic attraction is found in the center of the arcade room in Gold Saucer’s Wonder Square and after paying 200 gil, Cloud has to face off against five foes in direct succession. When either combatant takes the 10th hit, he goes down. If Cloud goes down, the game is over and you’ll have to start again and pay the 200 gil cost. If Cloud’s opponent goes down, the next one appears immediately after.
This boxing match is turn based, so whenever you throw a punch, your opponent does, too. You have to choose between a low, mid, or high punch, executed by pressing cross, square, or triangle respectively. Which one of you gets hit depends on a rock-paper-scissors principle. High trumps low, low trumps mid, and mid trumps high. Your opponent’s counter punch is chosen randomly, though the probability for a hit thrown, hit taken or a tie changes with each opponent against Cloud’s favor, decreasing your chance of winning each time. It does therefore not matter which one of the three punch options you choose, so you can press the same button over and over with the same result.
Modernized and Re-Imagined

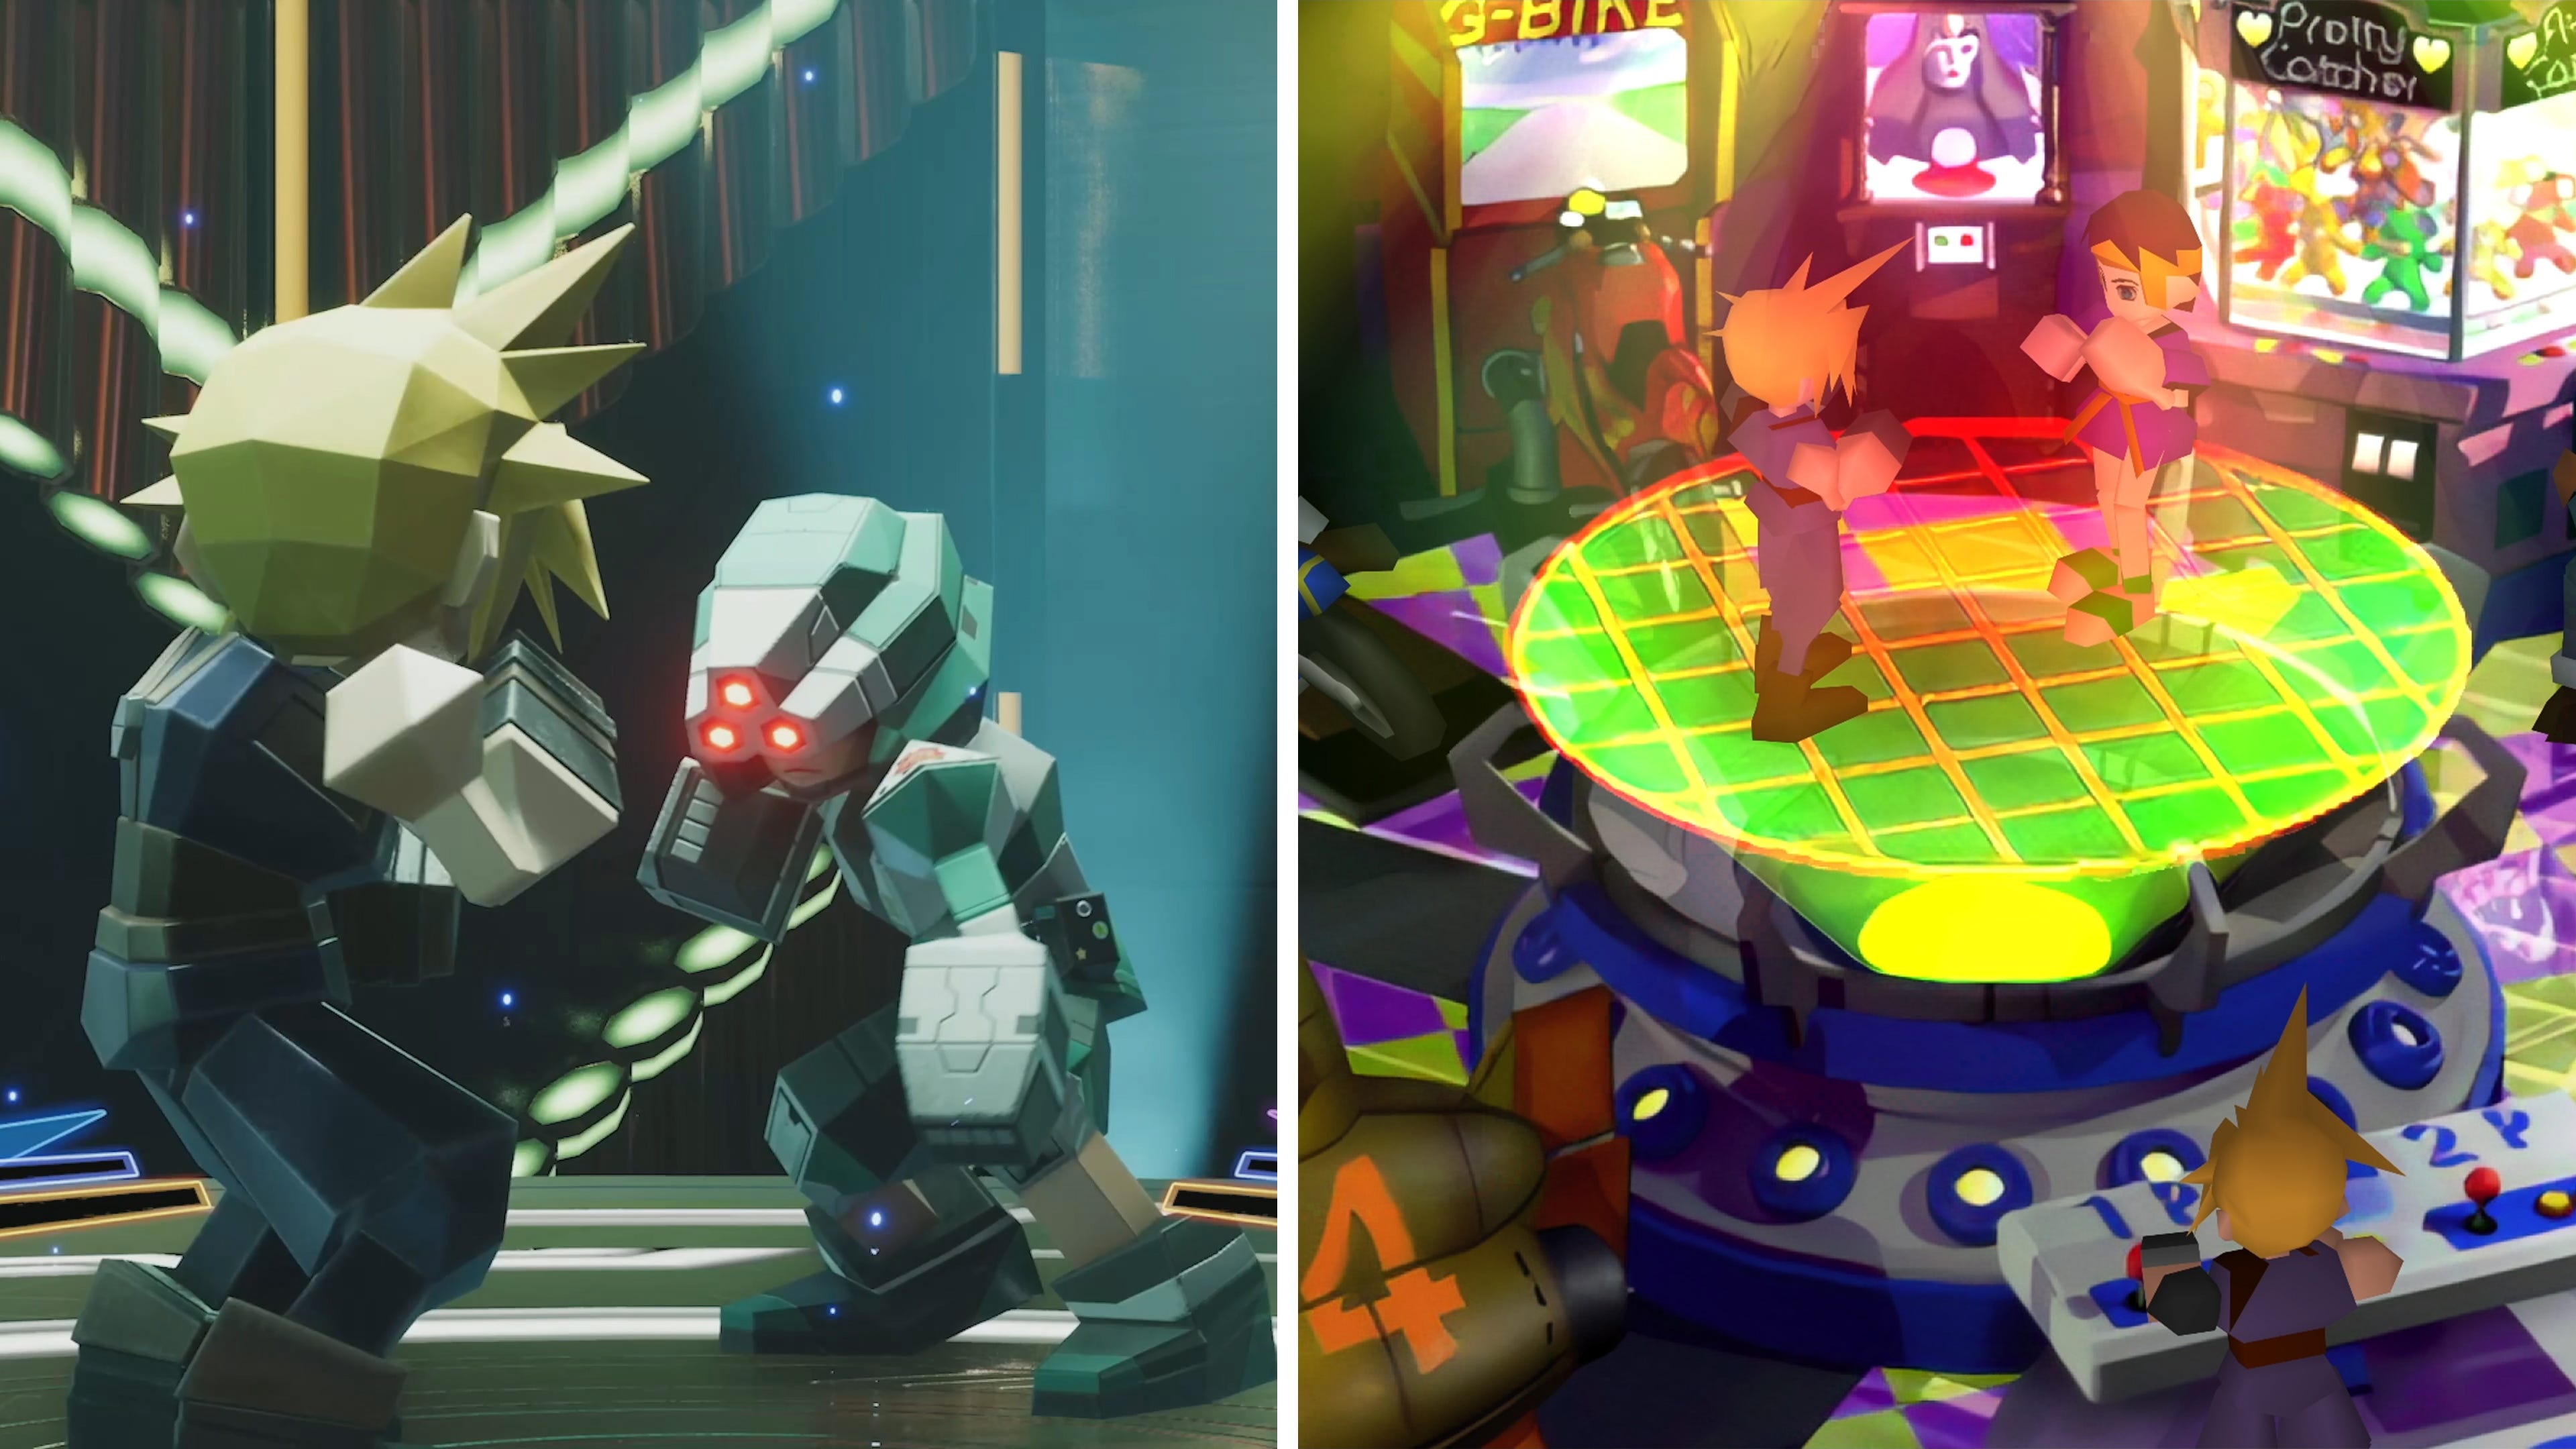
By looking at the re-imagined version of this minigame, we can immediately see that the game rules have changed drastically. It evolved from a mindless probability match to an involved and actually skill-based brawler. The rock-paper-scissors ruleset has made room for a simple left and right hook and guard moveset. And instead of turn-based it’s now ATB-based and even provides an additional Limit Break feature.
As we can see in this short trailer segment, throwing a punch empties a combatant’s ATB gauge. We then need to wait until it’s filled up again. However, whenever the opponent throws a punch, we can dodge/guard to avoid getting hit at any time. During such a dodge/guard maneuver, ATB regeneration is halted, as we can see in the Japanese version of the trailer.
A hit points gauge or display is nowhere to be seen. It seems like the developers decided to keep it hidden akin to the original version. Unless there is some other way to read how far away your opponent is from a K.O.—or Cloud, for that matter.
The addition of the Limit Break feature is unexpected but very welcome. Each time you manage to hit your opponent, your Limit gauge fills up by 20%,4 which means that you will be able to deploy your Limit Break every 5 hits. This applies to your opponent as well, however. I find it interesting that they chose to use the L2 and R2 trigger buttons for executing attacks instead of the L1 and R1 bumpers which would lead to more precise inputs. Will they make use of the PS5’s tactile features to increase immersion while throwing a punch or executing a Limit Break?
Another question mark relates to the increased difficulty for each subsequent opponent. Faster ATB? Harder to read animations to trick you into dodging into or guarding on the wrong side? Shorter punch wind-up? Two punches per full ATB gauge? Only time will tell.
While everything about the game mechanics and UI has been modernized, the polygonal look of the models remain, which I think is the perfect way to capture this specific minigame and retain the original’s look and feel, even if the textures and lighting are miles better than any model in any PlayStation 1 game.
G-Bike

The third Gold Saucer minigame that has been revealed in the State of Play trailer on September 14th 2023 is G-Bike, one of the more popular ones and the first of three in total5 acting as virtual representations of story-based minigames to be replayed ad infinitum in Gold Saucer to earn GP.6
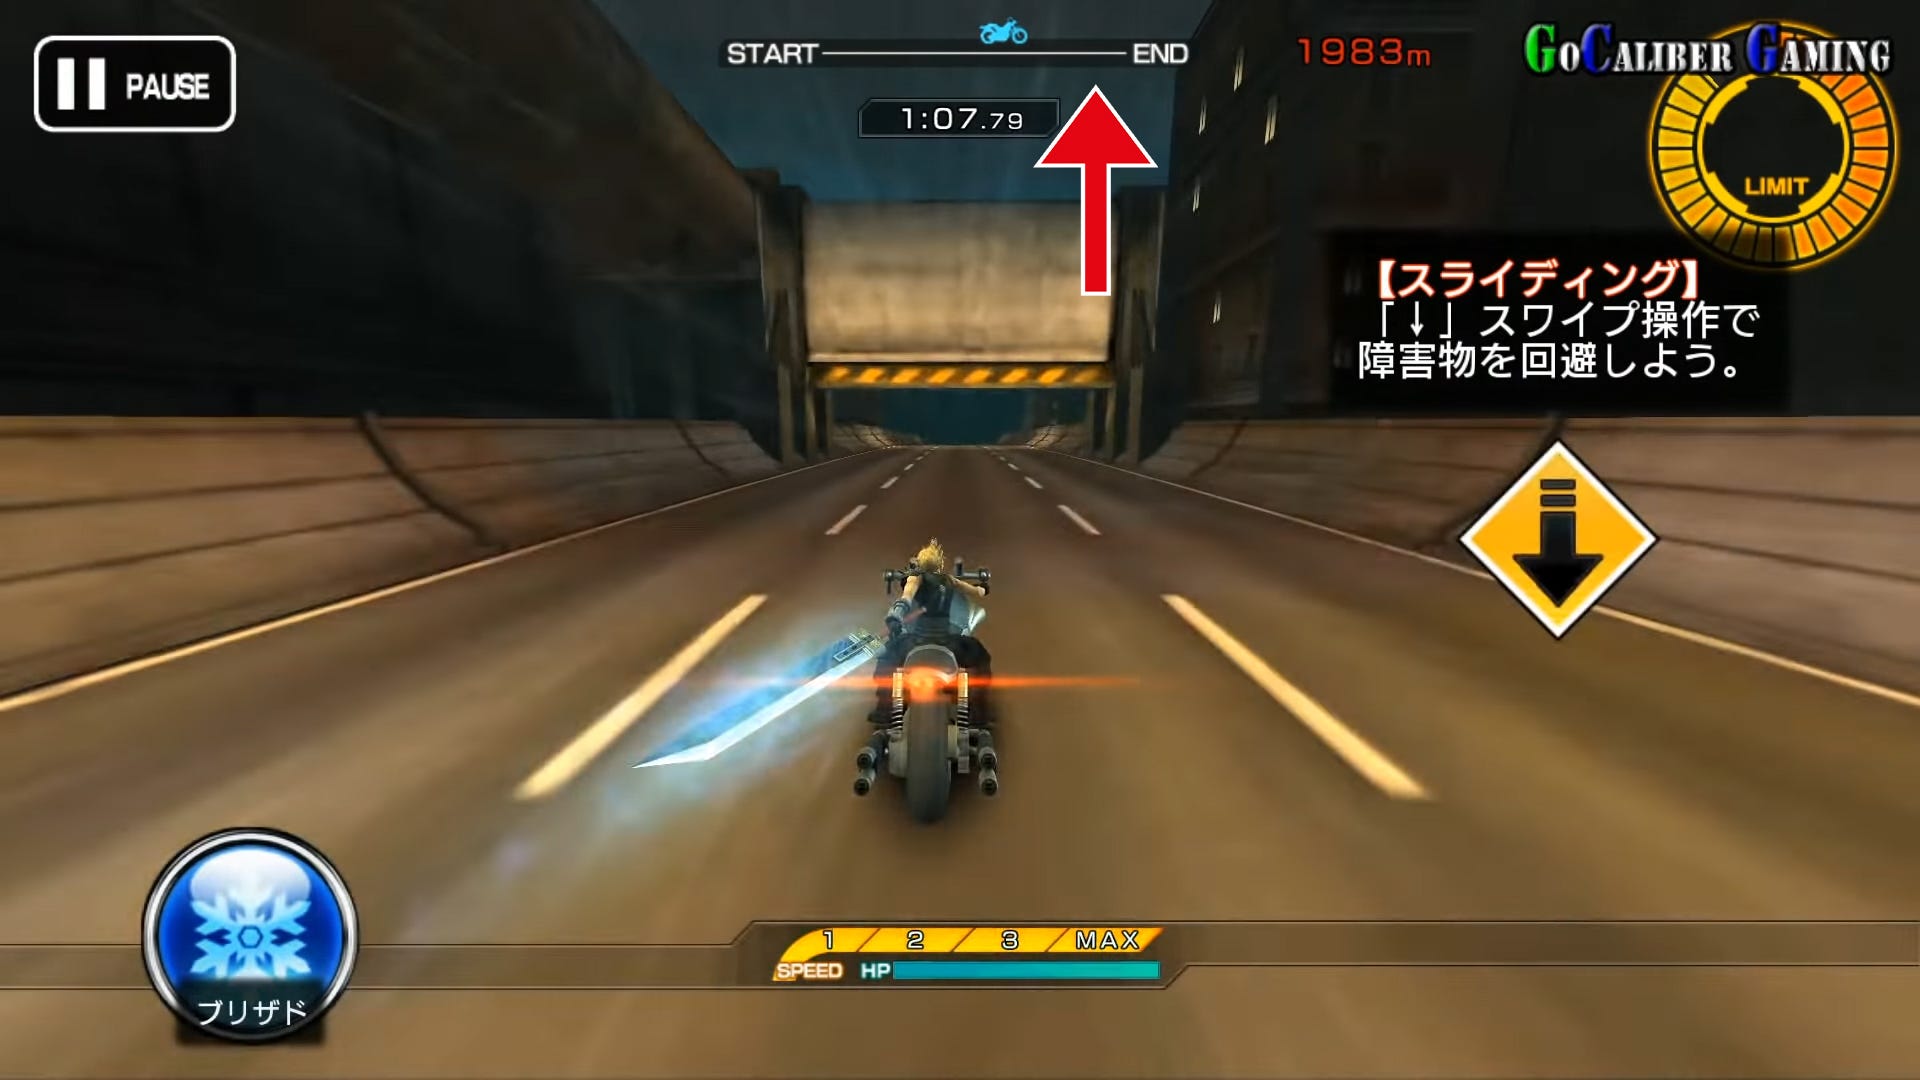
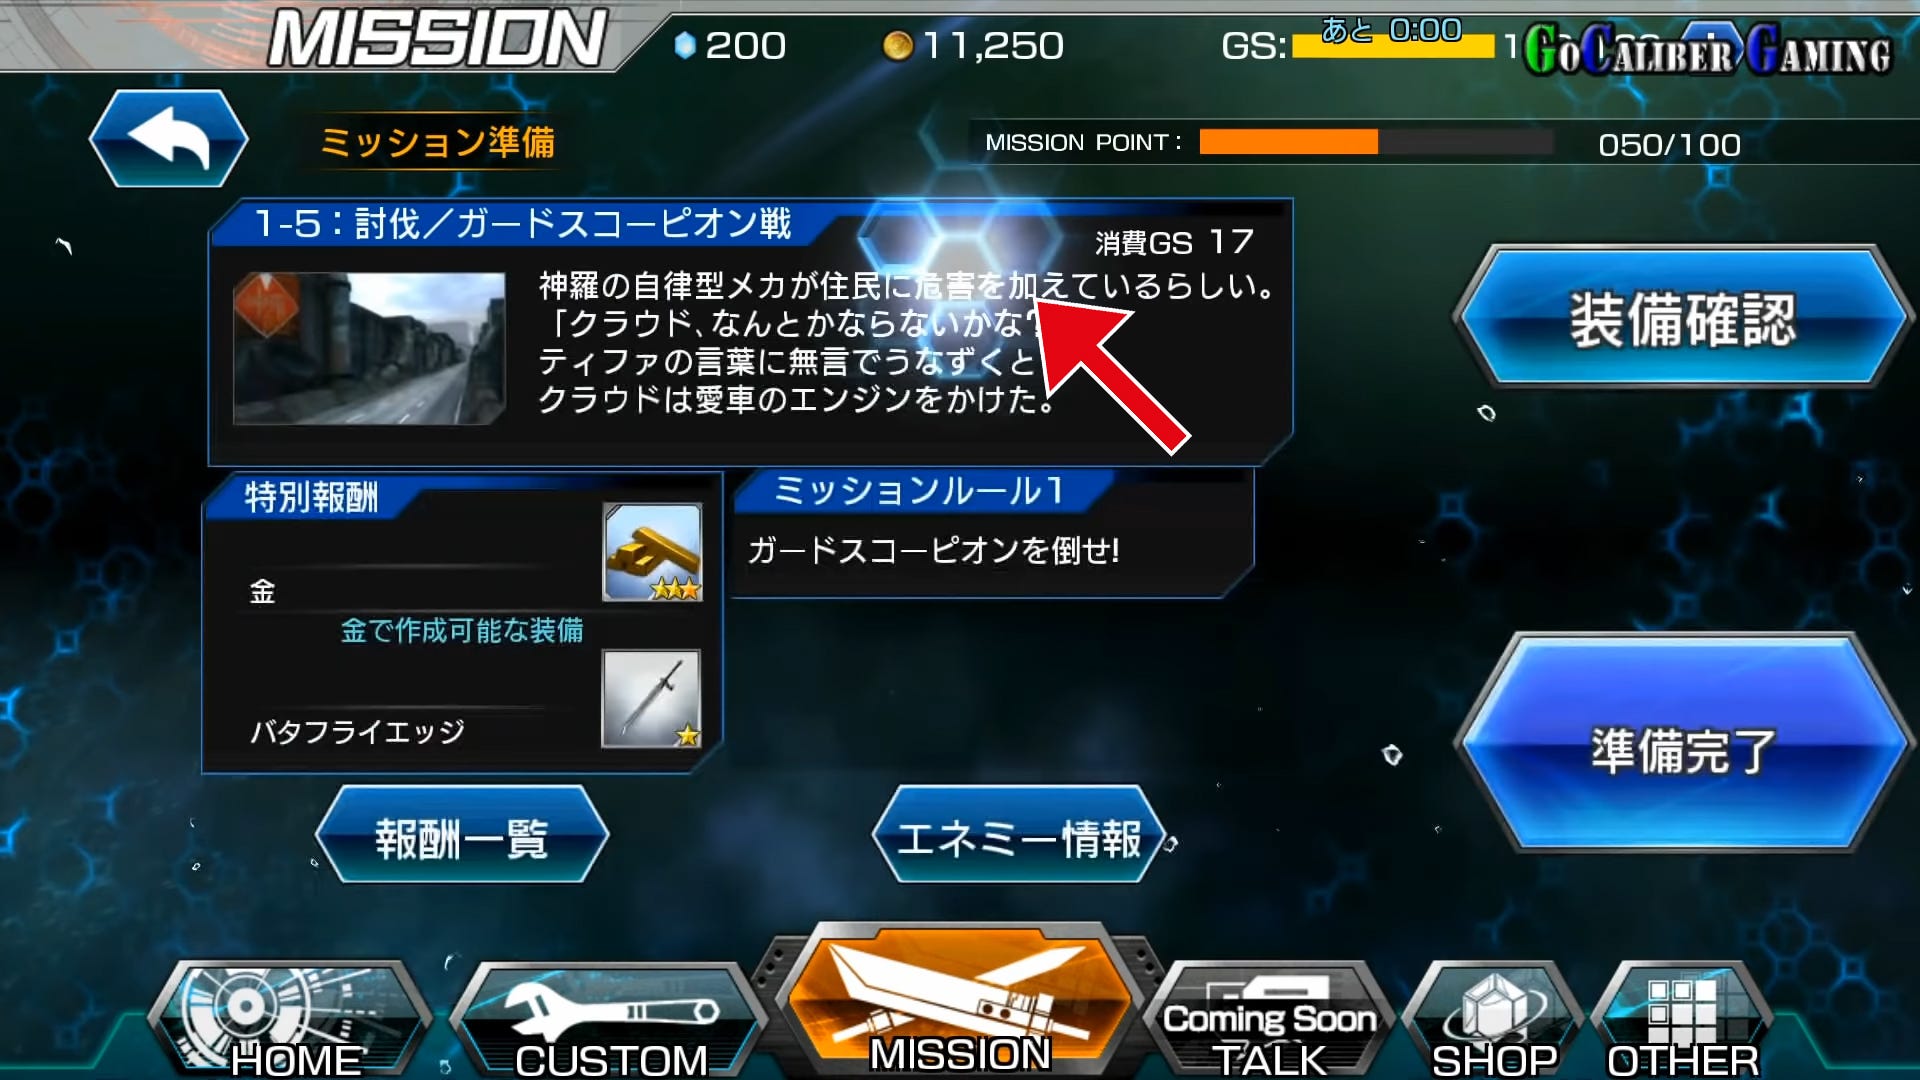
It was so popular that Square Enix decided to create and release a mobile phone version of it on October 30th 2014 boasting more modern graphics and many more gameplay mechanics like sliding, jumping, and additional attacks to defeat more bosses like a Behemoth or even a Guard Scorpion. Unfortunately, it was discontinued only 15 months later on December 15th 2015. To get an idea for how it looks and plays, you can watch the official trailer of it on YouTube below.
For a more detailed look at some of its mechanics, you may want to check out some gameplay videos. Fun fact: this mobile game was also developed by CyberConnect2, the company Square Enix outsourced Final Fantasy VII Remake to during the first 2 years of development, before they took everything in-house to ensure efficiency and a high quality standard.
Back to the original version. While escaping from Midgar, we need to protect the other party members riding an sA-37 type motor tricycle from Shinra’s motorized pursuers. Each hit taken deals HP damage to a random party member on the tricycle. The more hits they take, the lower their HP at the start of the Motorball boss encounter at the end of the highway. The same goes for Cloud.


Remake even added another instance of this minigame in chapter 4 where Cloud, Jessie, Biggs, and Wedge ride their bikes topside to the sector 7 plate where Jessie’s parents live and a Shinra warehouse is located—their actual target.
Original G-Bike
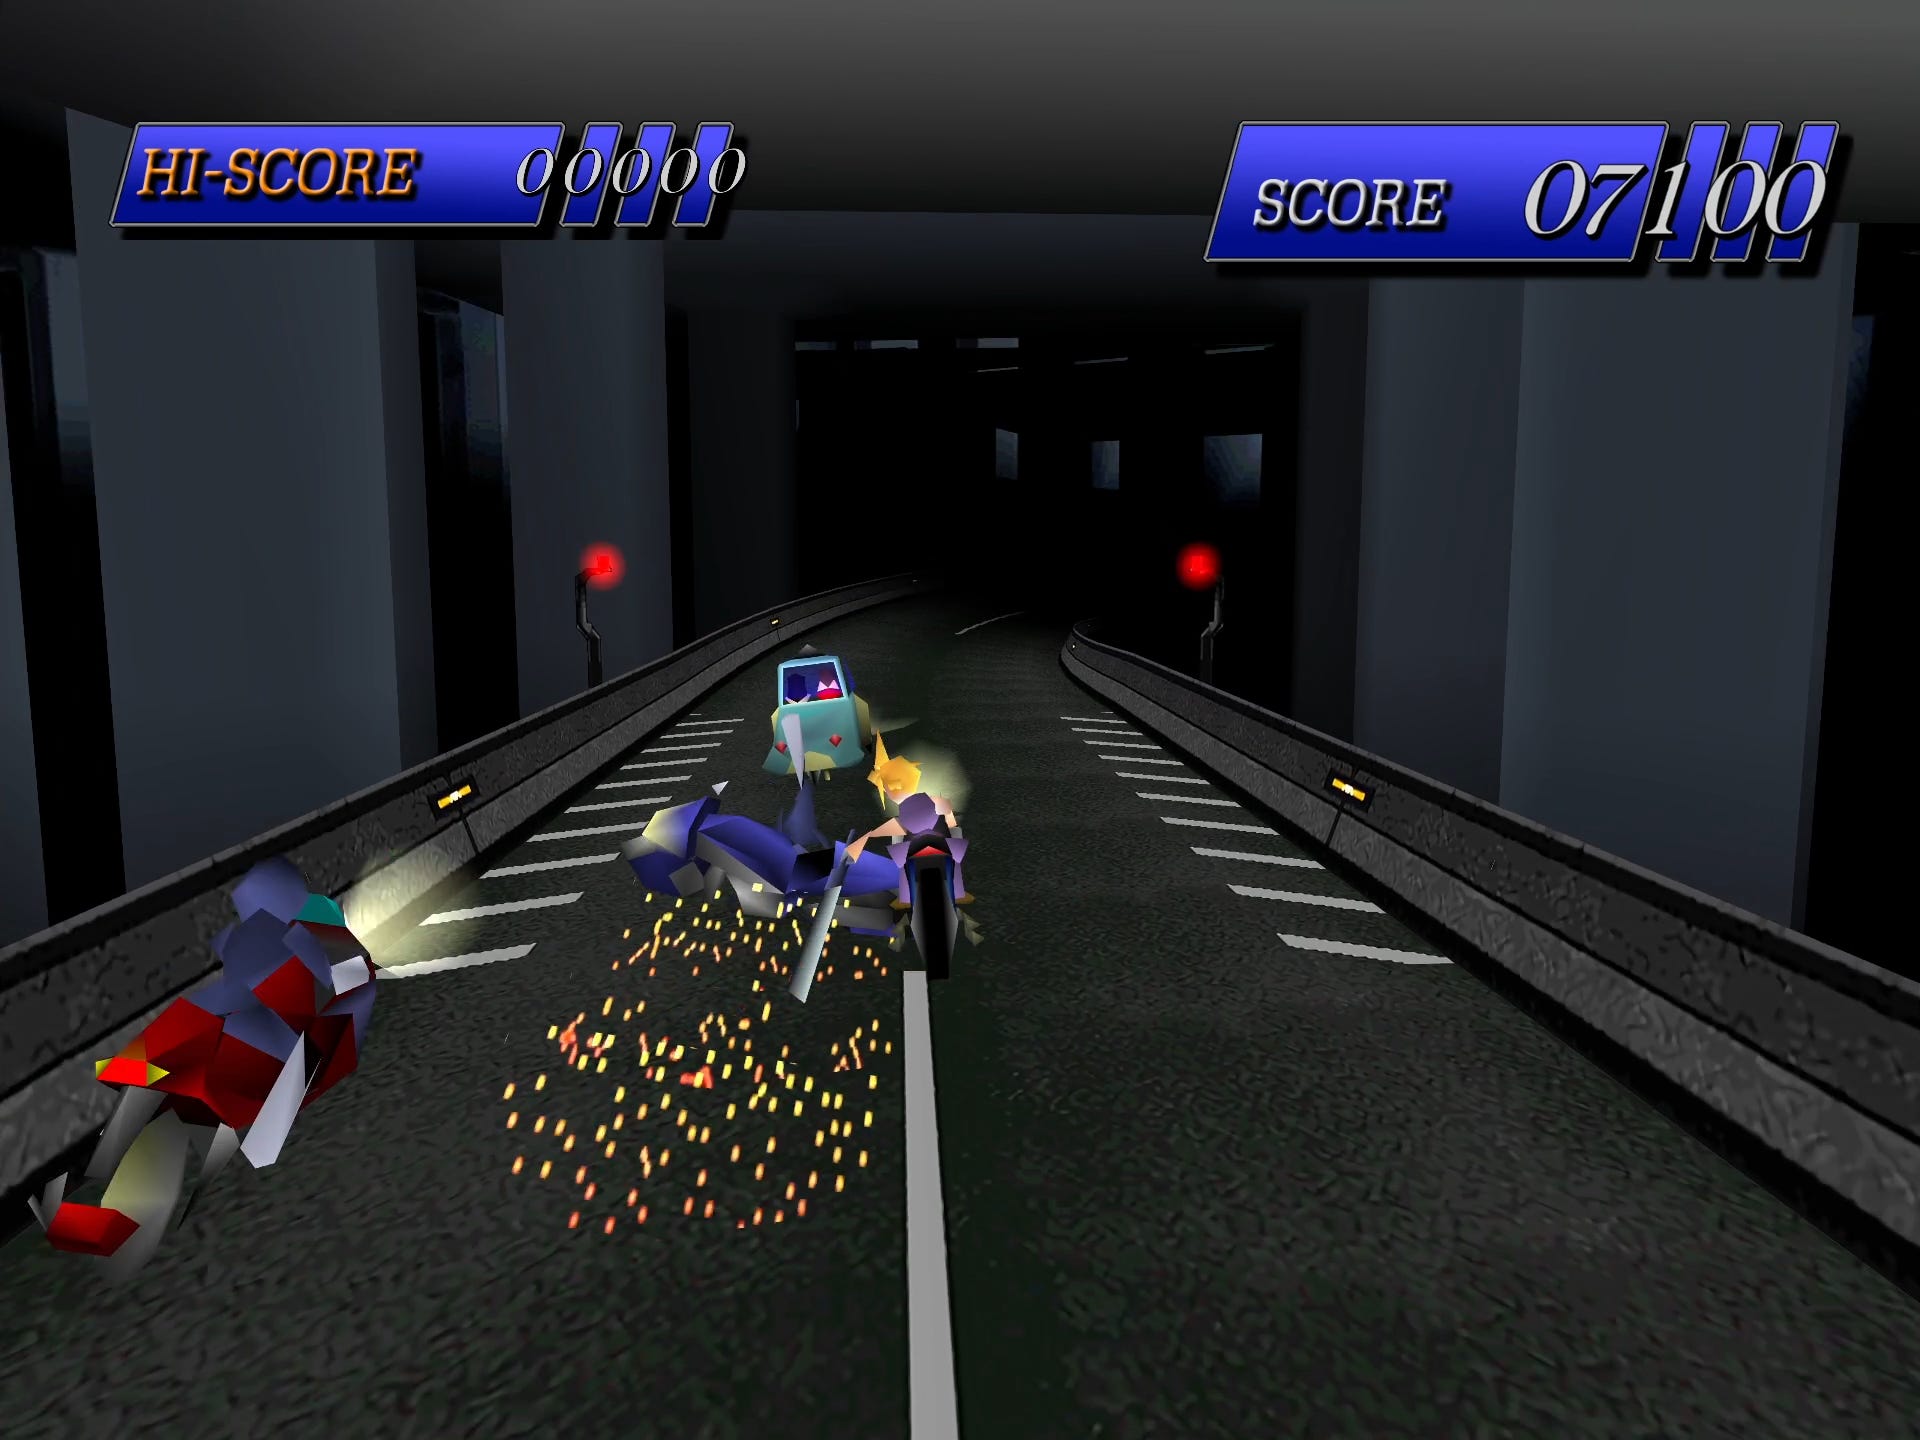
The Gold Saucer version in the original game is basically identical to the version we play during the story. Cloud can move around on the highway and attack pursuers on either side by pressing square or circle on the PlayStation—or [Switch] or [OK] on the PC version—to prevent them from tackling the Shinra Hauler vehicle with Cloud’s friends on board. That’s about it.

The only difference between the main story and the Gold Saucer version is the scoring. Instead of losing HP when tackled, we merely lose points gathered by defeating Shinra pursuers with our sword. +500 points for a kill, -50 points for a hit on the Shinra Hauler. Whenever you finish with 5000 points or more, you receive 2 GP and when exceeding 10’000 points, you are rewarded with 10 GP upon crossing the finishing line.

In terms of UI, it only displays your current score in the top right and your all-time high-score in the top left. That’s it. Very simple.
Remade and Re-imagined

Contrary to the original game, Remake’s story-based mingame and Rebirth’s Gold Saucer attraction counterpart show quite numerous differences.
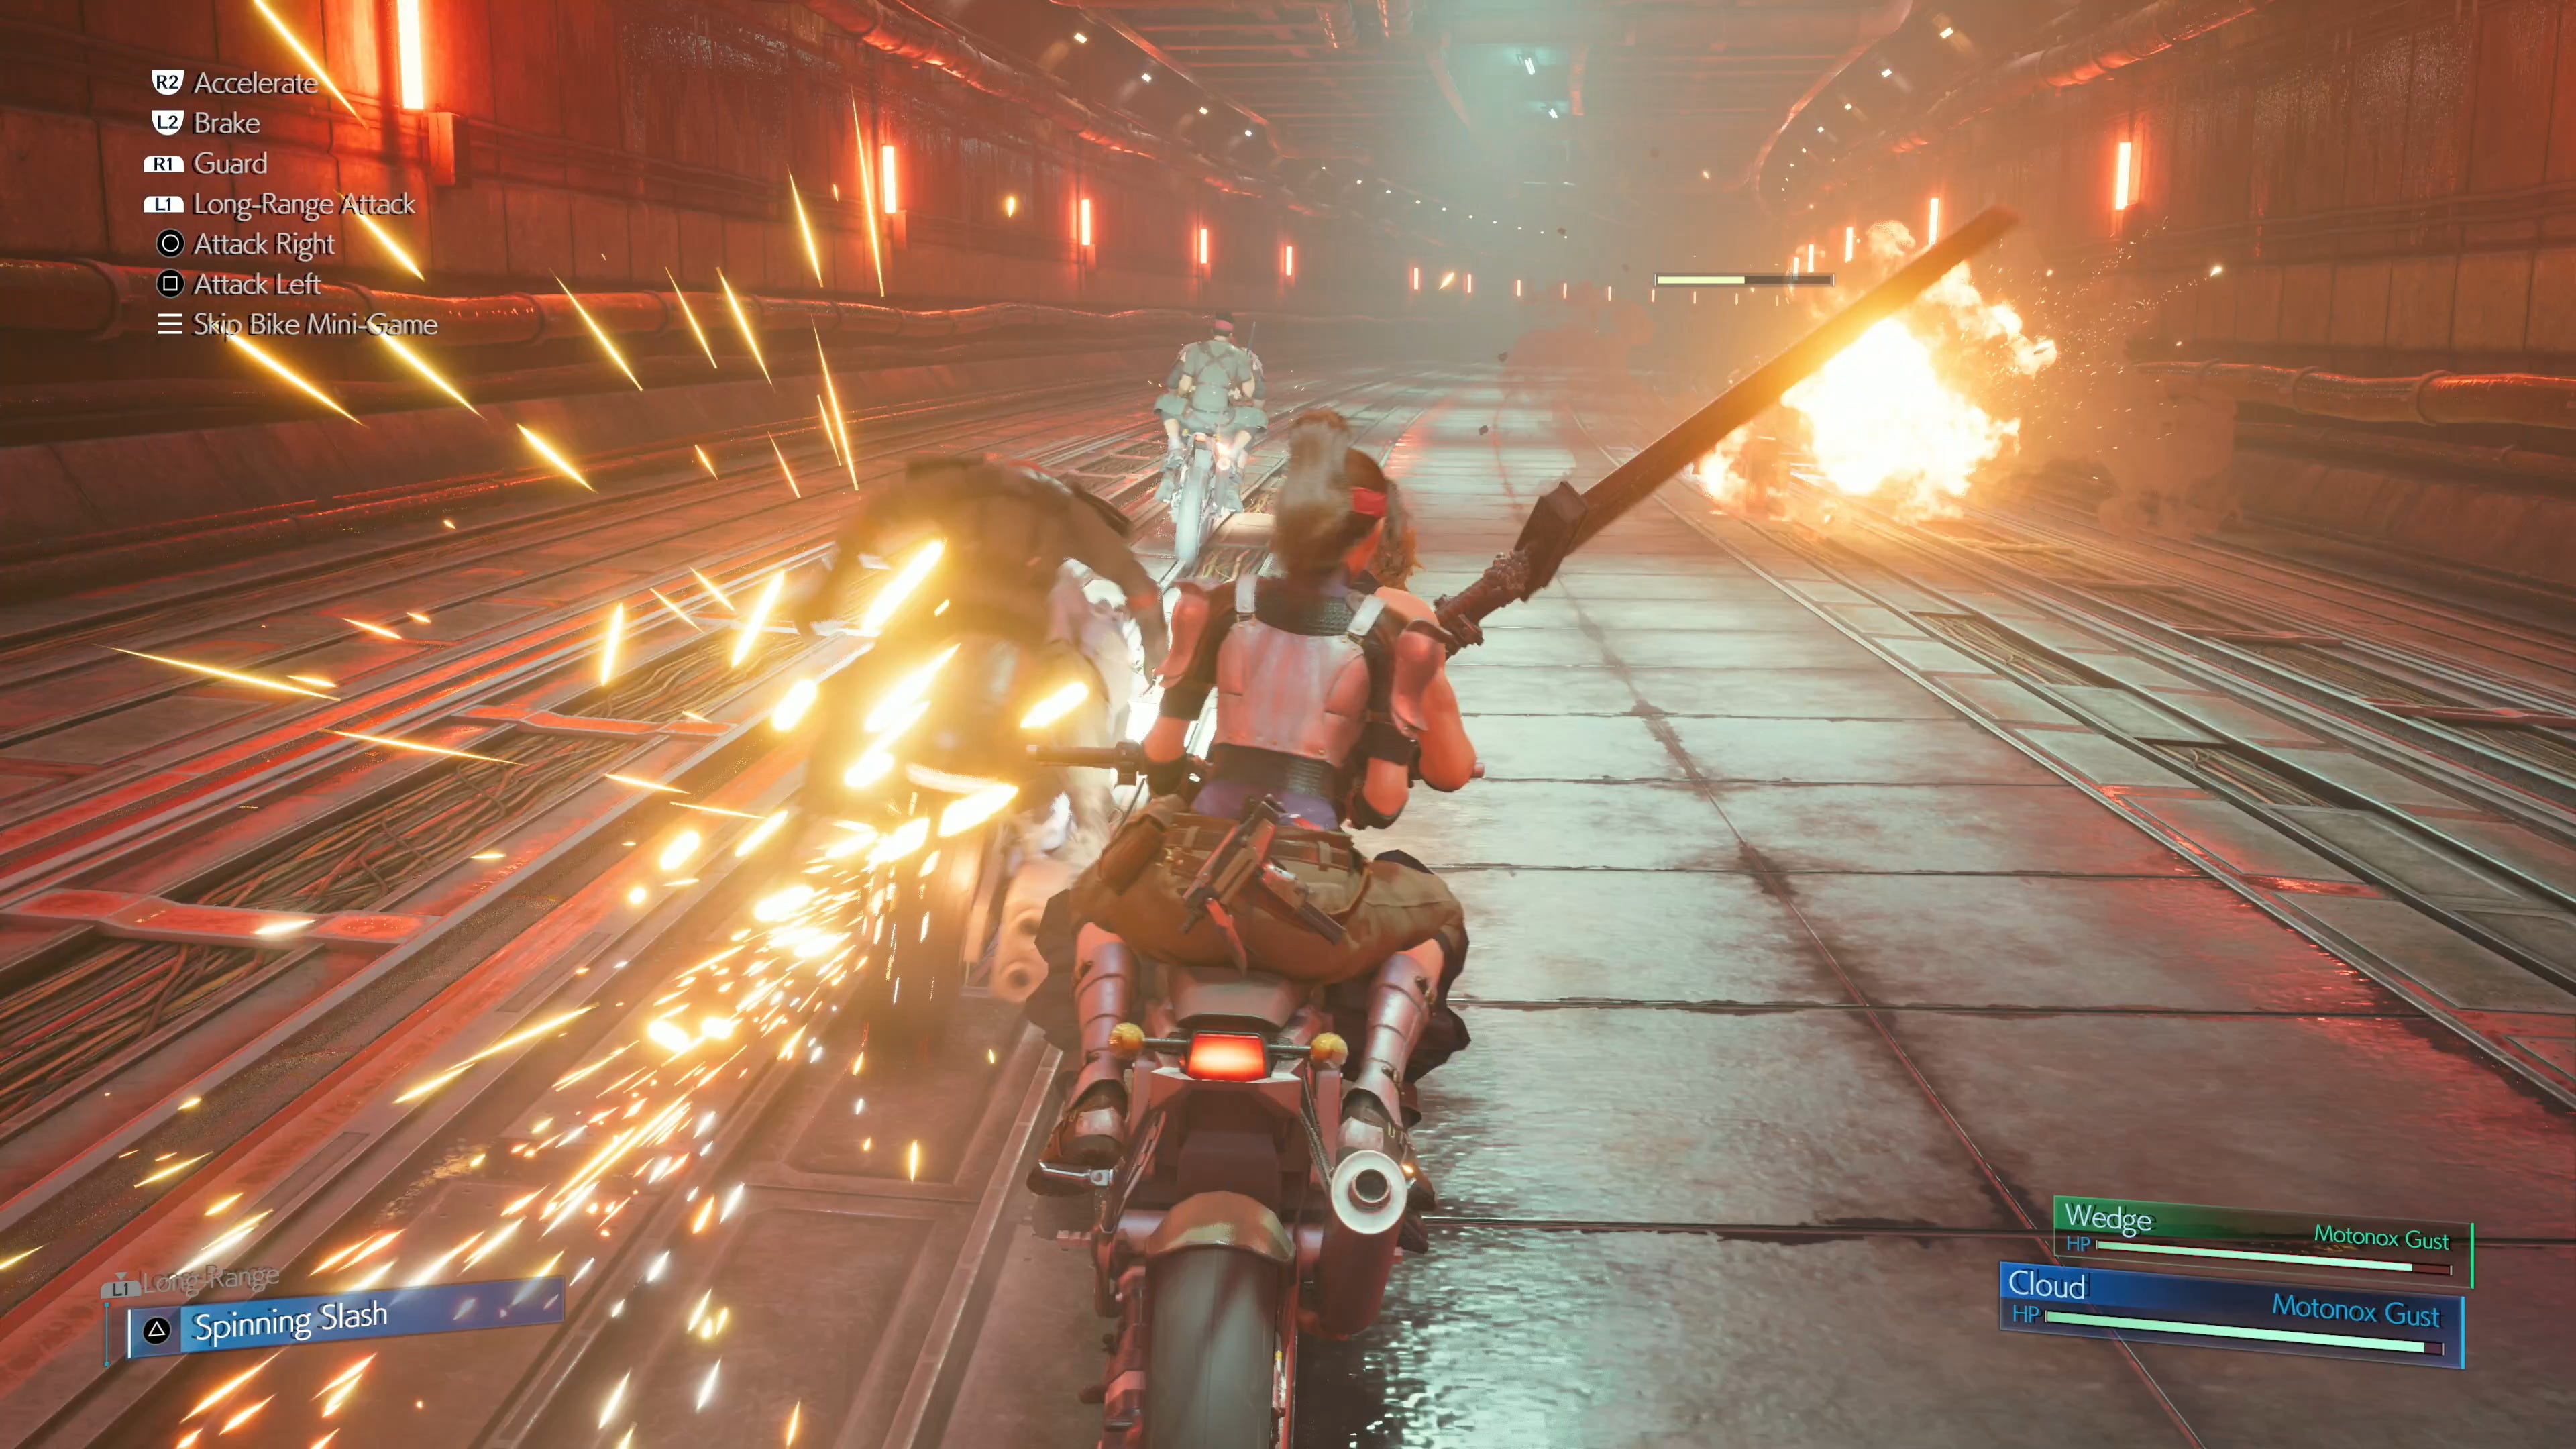
Let’s have a look at the identical parts first, however. Naturally, the controls have been retained. R2 and L2 to accelerate and break, R1 to guard, and square and circle to attack on the left and right respectively. Triangle unleashes the special attack Spinning Slash, which was already a new addition to Remake compared to the original version. Thus, the core of the minigame remains intact. However, the L1 button indicator for switching to a long-range attack is now missing, which means it’s either not available anymore for balancing reasons or we’ll have to unlock it first. As seen in the screenshot further below, it still requires some warm-up time before using it for the first time and again later on. The only difference is the orange color scheme of the warm-up gauge for better visibility.
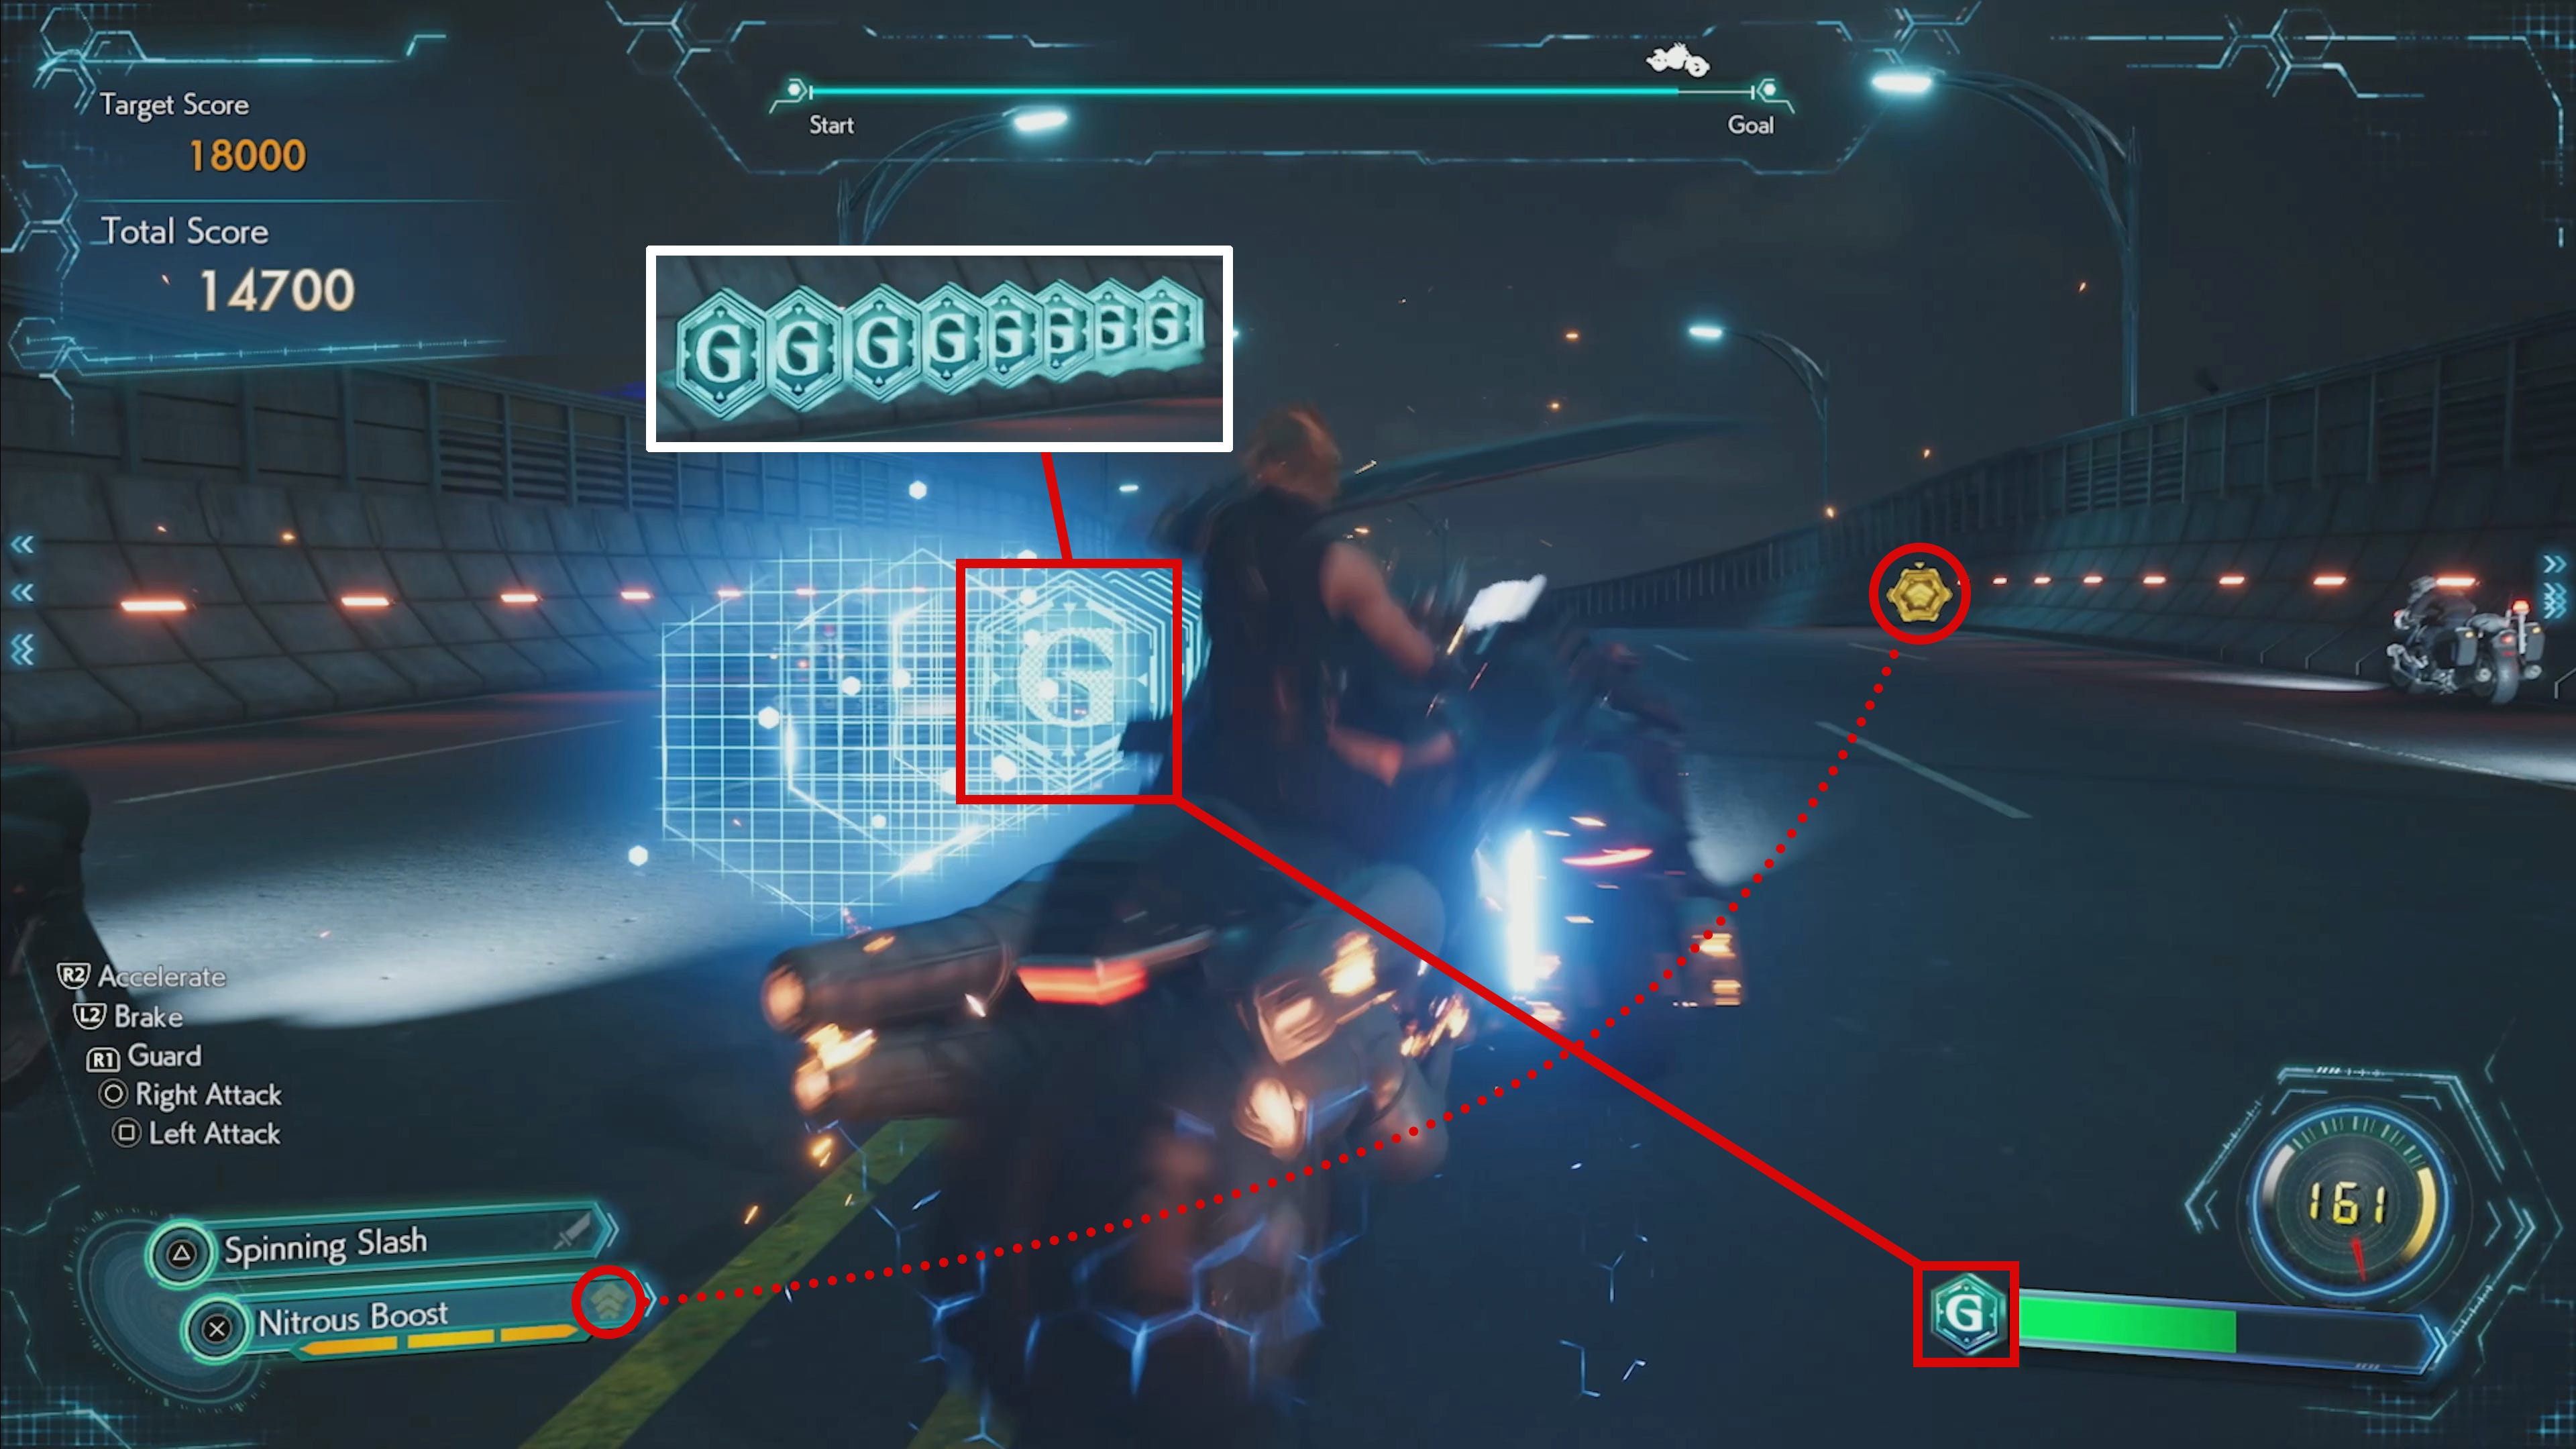
Since it’s now an actual in-universe video game, a score had to be added, the same as in the original game. However, instead of a mere personal high-score, Rebirth’s version takes inspiration from Whack-a-Box in Remake and Episode INTERmission where we must meet three different target scores to obtain three different rewards. The official screenshot below heavily hints towards this concept making a return. In it, the target score of 18’000 has already been met during previous attempts, as signified by the green tick icon. The next one to meet is 22’000 as indicated by its orange color.
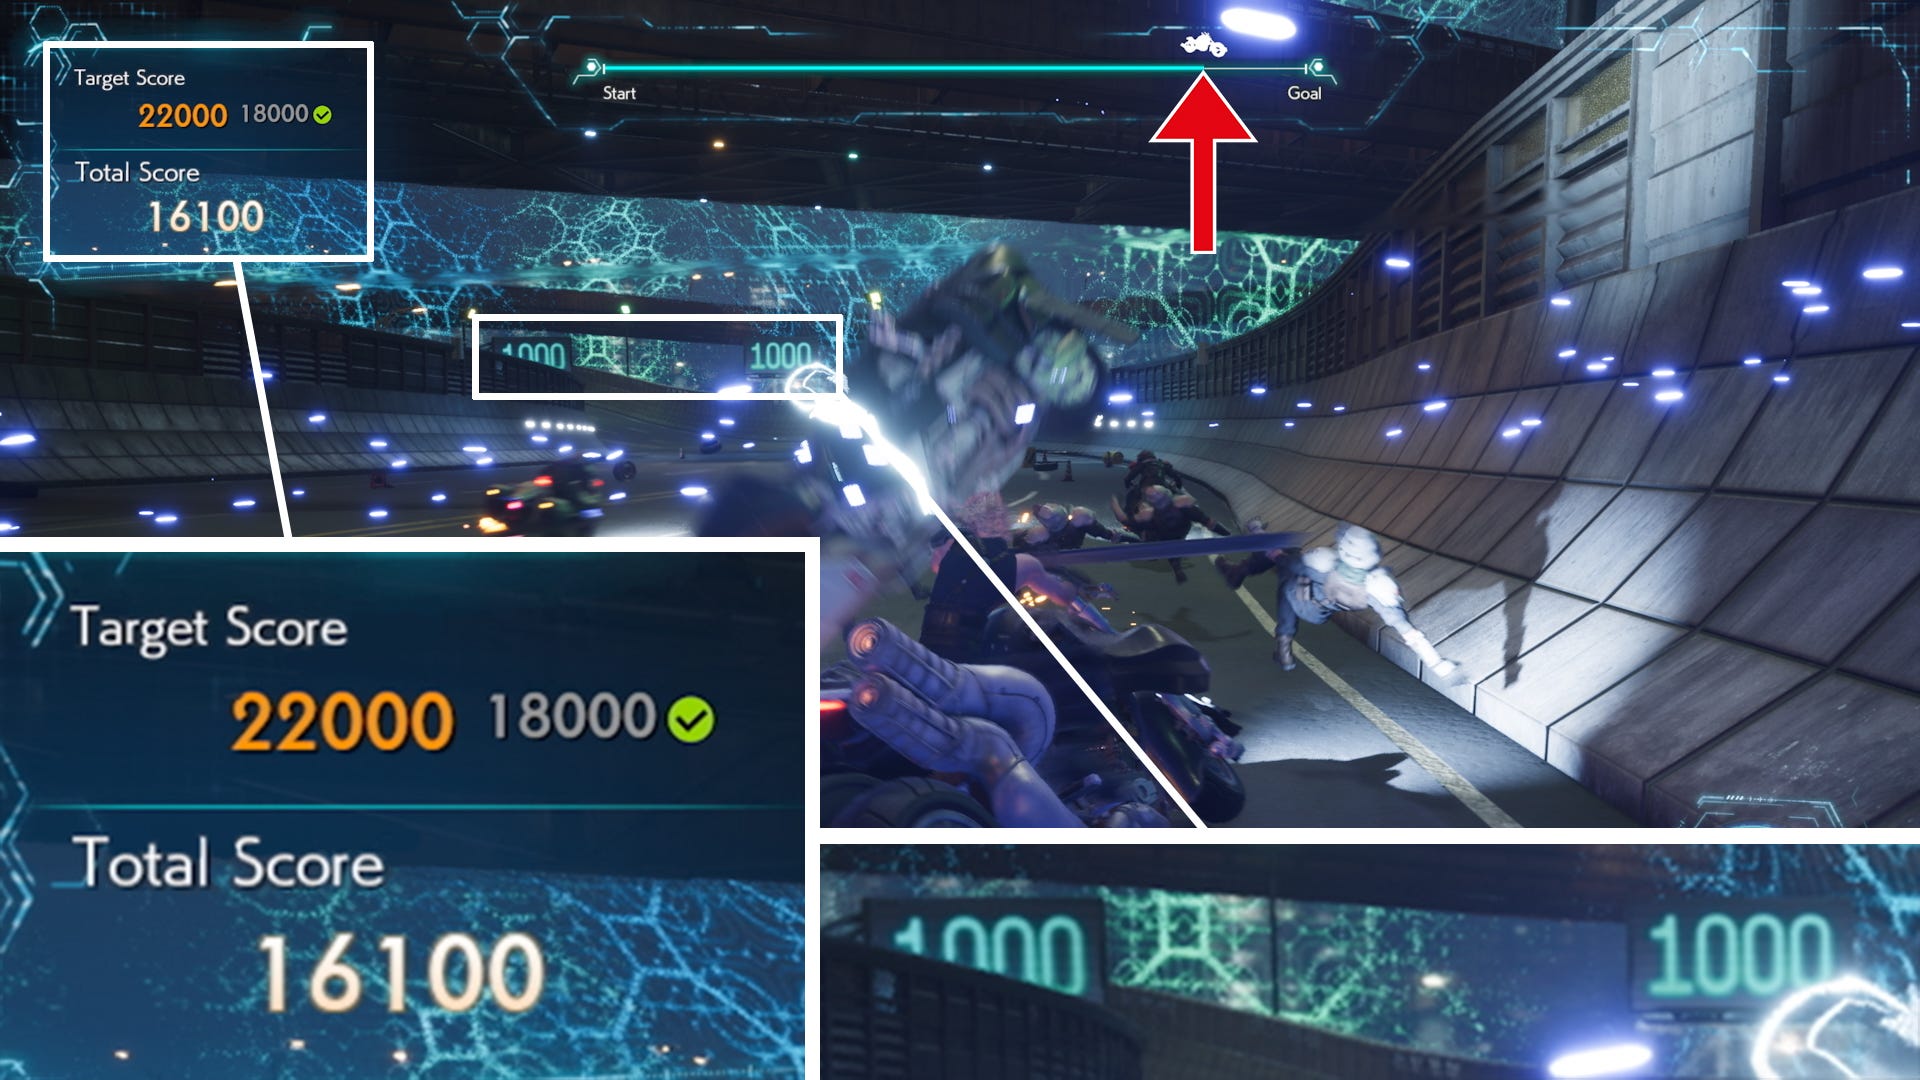
The total score currently lies at 16’100 and there is not much road left until the finishing line, as the position gauge in the top middle reveals, which is a new addition to the remake trilogy version, although it was already present in the G-Bike mobile game we talked about earlier (see screenshot below). However, we can make out two signs displaying the number 1000 hovering on either side of the expressway ahead. It’s possible that we receive bonus points for reaching certain distance milestones along the way, increasing the likelihood of reaching those target scores. The only thing throwing me off is how the Total Score never increases in neither the English nor the Japanese trailer despite Cloud mowing down several enemies. Maybe it’s counted per wave?
Interestingly, the Shinra Hauler SA-37 with the rest of the party on board is nowhere to be found. Instead, Cloud is swarmed by many more enemies. Instead of protecting your friends, it seems that we need to not get hit ourselves in order to avoid point loss and can thus entirely focus on Cloud. But what about that health bar in the bottom right? That gauge represents something else but more on that shortly.
A completely new addition is the Nitrous boost, which presumably exists to quickly close the gap to opponents farther ahead, to avoid being swarmed, or to reach the goal more quickly. It’s also possible that tacking opponents with an active Nitrous Boost will bring them down more easily. According to the UI, we can hold three Nitrous Boost charges at a time. Pressing cross will consume a charge and speed up our bike for a short amount of time.
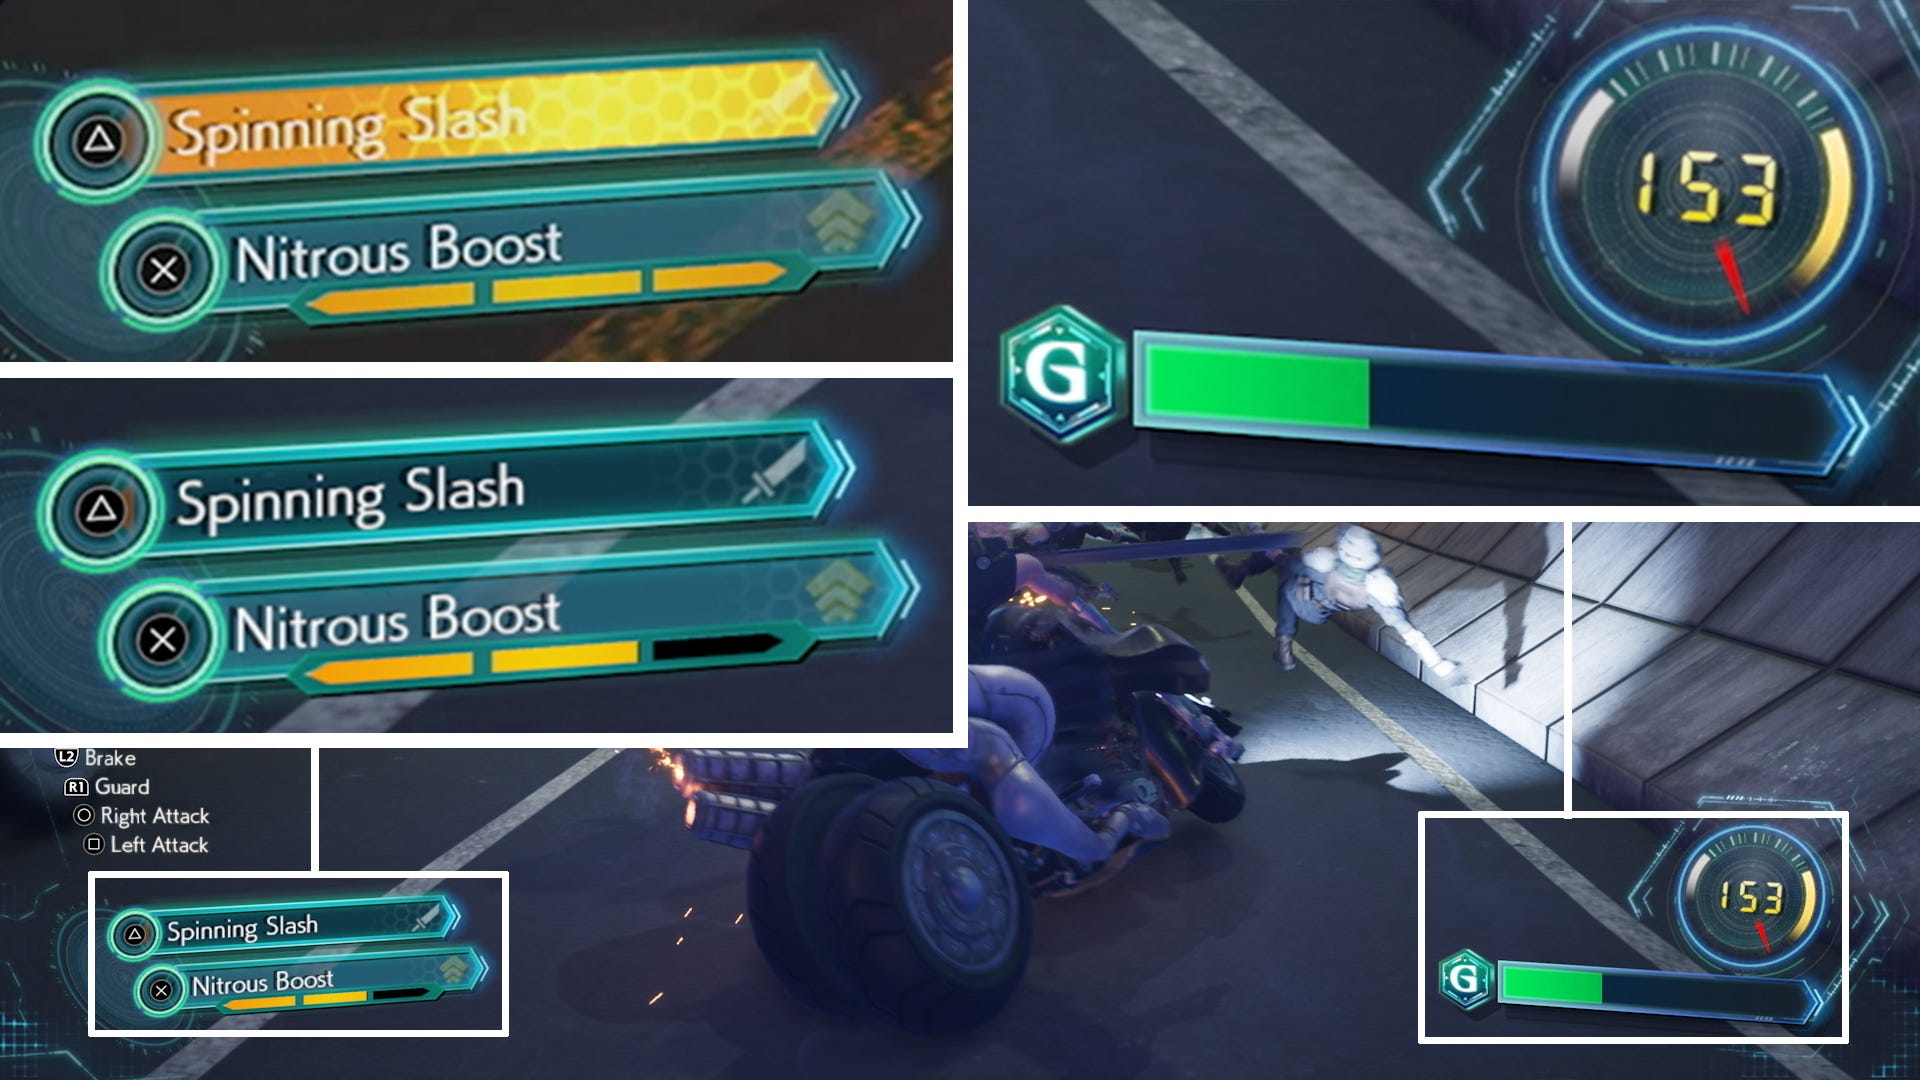
Speaking of speeding up, we are now able to check our current speed in what I presume to be mph.7 I don’t think it has direct gameplay significance beyond numerical feedback and a reference point. The gauge below on the other hand certainly does hold gameplay significance. The story-based versions of this minigame showed our vehicle’s health in that corner. Now, it seems to be the fuel gauge. If you pay close attention, it ever so slightly but continually depletes during its short trailer segment. If it reaches zero, the minigame most likely ends prematurely. It thus represents a de-factor health bar. The faster we drive, the faster it depletes.
Can we refuel on the way to the goal? Yes we can! Along the expressway, several strings of hexagonal G tokens can be seen and collected by Cloud when close enough which then greatly increases the fuel gauge. Nitrous Boost tokens also exist and represent themselves in the form of golden hexagonal tokens holding the same triple arrow-up icon as seen on the Nitrous Boost UI element.
Curious Patterns
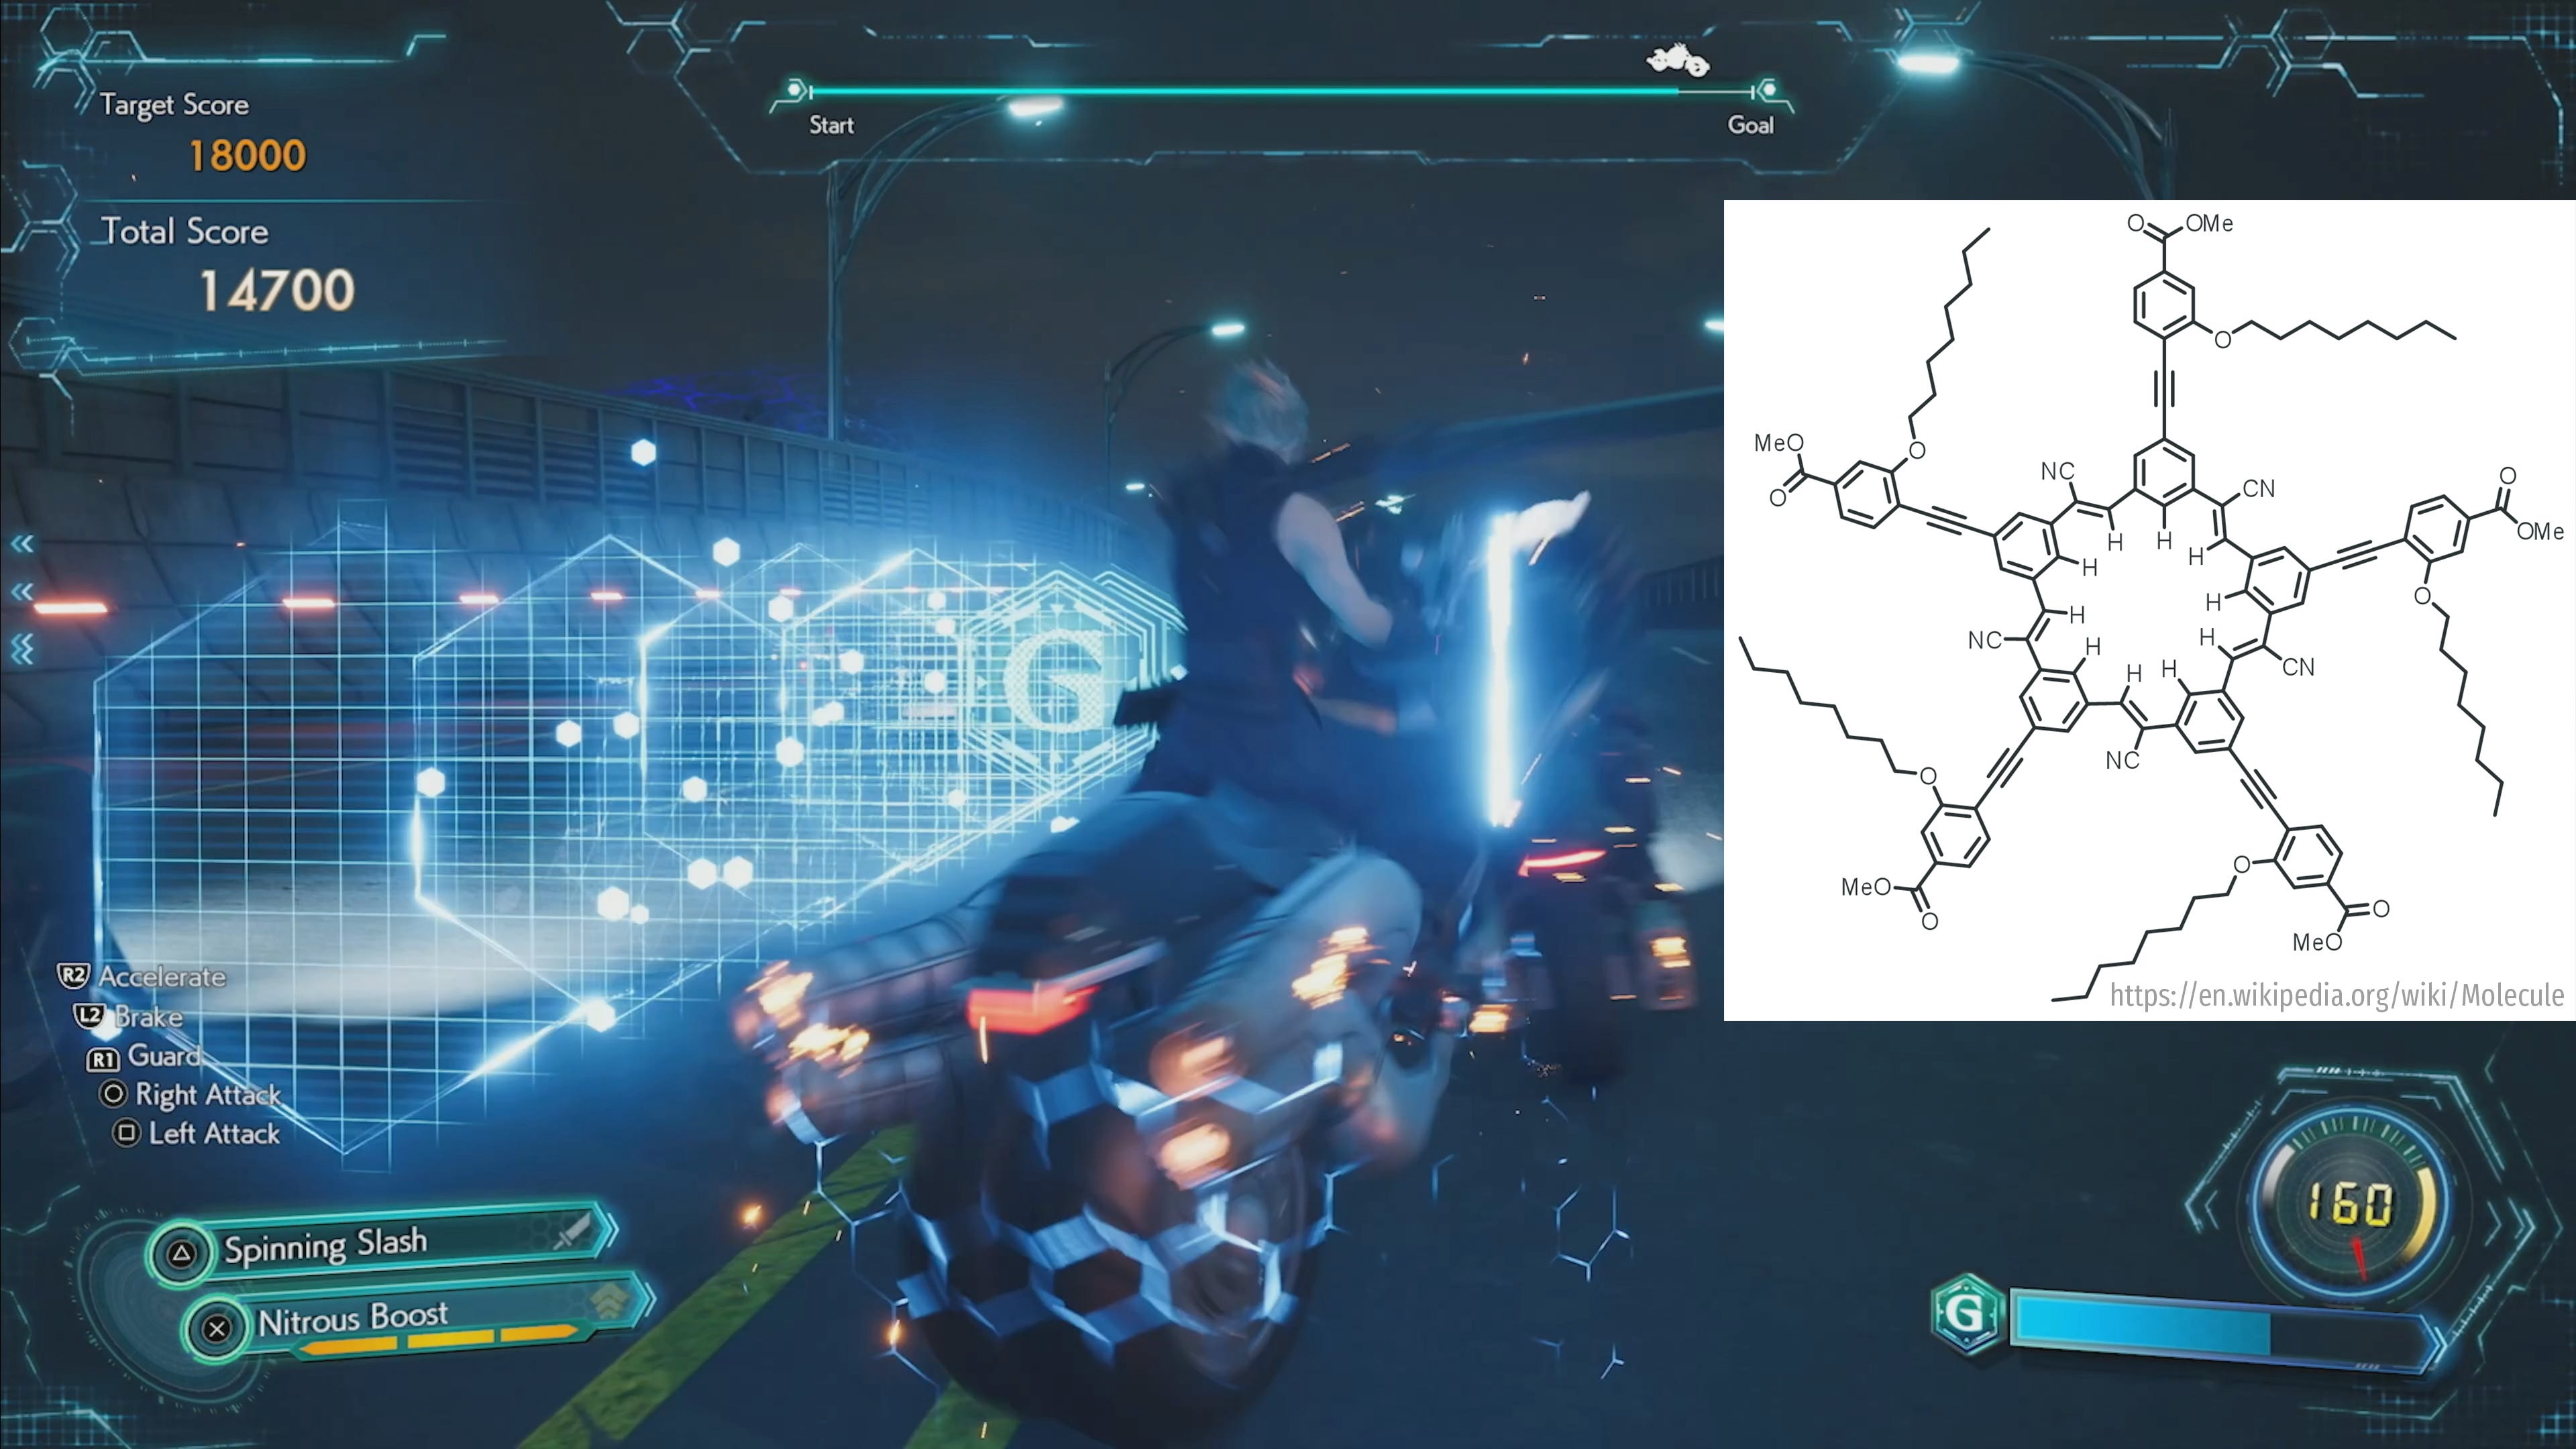
So much for the minigame itself. But there’s more. The UI is mainly made of hexagonal structures, G and boost tokens included, as seen above.
When collecting G tokens, a blue shield-like hexagon pattern appears briefly around Cloud’s bike, too. Those hexagonal structures which many UI elements are laced with are largely incomplete and connected to lines, which heavily reminds of 2D representations of molecules. Curious.
The hexagon shape is also prominently featured in the discontinued G-Bike mobile game detailed earlier. Many menu elements and buttons bear this shape as well as the visual screen tap effect.
What’s even more interesting is the well-known tessellation pattern seen above the certain parts of the race track, almost enveloping it. As if it was shielding this memory representation of the bike chase sequence or containing it. When enemies erect a damage shield around them, like the Scorpion Sentinel for example, it is represented in the very same tessellation pattern. A pure square-octagon variant is also a prominent pattern in the movie Advent Children, which appears alongside the movie title and credit names. Furthermore, countless tessellation fragments can be seen flying by in Remake’s chapter 18 during Cloud’s memory dive towards Sephiroth at the Edge of Creation.8
Additionally, this square-octagon tessellation pattern permeates all of Crisis Core Reunion. It graces many UI elements like the battle start indicator, the DMW9 area in the top left, during activation of mini-memories in the DMW and the big ones covering the whole screen, DMW bonus displays like Limit Breaks and level-ups, menus like the home status screen or the zone map, or even the loading screen. Since Zack is a SOLDIER bathed in Mako and injected with Jenova cells and everything connected to the DMW operates in the context of memories, this tessellation pattern is strongly tied to those concepts.


It’s worth noting that this tessellation pattern was much less prevalent in the original PSP10 release of Crisis Core as it mainly only appeared in the battle start indicator, the targeted enemy name background in the top right, and the DMW when it is moved into full-screen mode (see screenshots below). All other elements shown above do not bear any such tessellation pattern in the PSP version. This speaks to it holding much more importance in this modernized canon due to Crisis Core Reunion increasing its presence this drastically.


In any case, it’s fascinating how all abstract forms and patterns in this minigame are connected to nature,11 chemistry, memories, and Jenova’s legacy. All concepts connected to the Lifestream and treatment of SOLDIER through Mako showers and Jenova cells,12 as Crisis Core clearly shows.
Catch a Chocobo

This minigame has been shown in full at Square Enix’s stage presentation of Final Fantasy VII Rebirth at Tokyo Game Show 2023 on September 21st, which means we don’t need to cover it in detail, though I will provide a summary and a comparison to how the original game handled it, as well as some thoughts about its full integration into the game.
But first, here’s a timestamped embed of said presentation where Naoki Hamaguchi shows off and explains the whole process. It was live-translated into English, so a few details may have been lost in the process, but the essence should still remain.
Alternatively, you can watch a brief explanation by Schrodingersbabyseal accompanied by English footage.
For those who would like to watch the full Grasslands demo in English, here’s an uncut version showing a very similar playthrough.
Summary
For those who do not want to watch videos and prefer reading text, here’s a summary of this minigame’s mechanics.
Be silent and don’t let them spot you. Crouch and slowly walk by other wild chocobos—out of their view so they cannot alert our target, Piko. If a chocobo is looking into your direction, take cover in a patch of tall grass until it turns around. You can also perform dodge rolls to bridge the gap to the next hiding place quicker. To make it more accessible, this minigame provides automatic checkpoints to prevent you from starting over from the very beginning when spotted.


Once close to Piko, throw a rock to a spot behind him to distract him and make him turn away from you, which enables you to sneak up on him from behind, jump on the saddle, and rodeo Piko into submission. This last step happens automatically after pressing triangle to mount Piko. Throwing a rock is necessary as Piko tracks your position in the tall grass with his gaze. He’s clearly more attentive than his wild brethren. There are multiple rocks lying around in your hiding place in case you miss once or twice.


Once Piko calms down and accepts you as his friend, he automatically gets treated with his favorite food: Gysahl Greens.

Those who played Horizon Zero Dawn and/or its sequel Forbidden West should have not a single problem with this minigame as it essentially functions the same as taming and/or mounting certain types of machines. You sneak up on them by crouching through patches of tall grass, distract them by throwing a rock away from you if necessary, and then approach to override the machine by pressing and holding triangle. The tamed machine then fights on your side and some of them can even act as mounts, as showcased below by Gavin Dsz.
This parallel is not surprising as Hamaguchi-san revealed in the past that Horizon Zero Dawn left a huge impression on him and therefore greatly influences his own works. And this chocobo catching minigame is far from the only element which draws obvious inspiration from the Horizon games.
Capture through Battle
When comparing Rebirth’s version to how we capture chocobos in the original game, barely any gameplay element has been retained besides following chocobo tracks and having a chocobo’s favorite food at hand. In Final Fantasy VII, we first need to buy the Chocobo Lure Materia from Chocobo Billy for 2000 gil and purchase some greens before we can even attempt to catch one.


After placing it into any equipment slot of an active party member, we need to run around chocobo tracks on the world map and hope to encounter an enemy formation containing a chocobo.


If that’s the case, we immediately need to use one of the previously purchased greens on the chocobo so it doesn’t run away after a few seconds which is easier said than done. While the chocobo is feasting on its greens, we need to dispatch the enemies around it as fast as possible without hitting the chocobo in the process, which makes multi-target attacks and spells a no-go. If the chocobo finishes eating before that, we need to immediately feed it more greens before it flees from battle. If all enemies are defeated before this happens, we managed to catch ourselves a chocobo!


We can then ride it around the world map until we dismount, after which it runs away and we need to capture another one. There’s more to this whole chocobo business, of course, but that’s out of scope for this article.
Further Thoughts
Hamaguchi-san summarized aspects about chocobos pertinent to this analysis in the following interview published on the Square Enix blog:
Naoki Hamaguchi: “We wanted to pay homage to the original FINAL FANTASY VII - there were many different types of chocobo in that game, such as the river chocobos or the mountain chocobos!
One of the big draws of FINAL FANTASY VII REBIRTH is that you can explore the vast world map, so we re-imagined the different chocobos to become important features of that exploration. You can use them to fly through the air, climb mountains or speed across water surfaces.
You can also enjoy the chocobos you have collected in another way: by entering them in the Gold Saucer chocobo races!”
I haven’t heard or read specifics on captured chocobos anywhere yet—besides being able to ride, equip, and race with them—but according to the information above, we can surmise that we need to capture each type of chocobo in each area only once to gain access to it. As seen in trailers and the gameplay demo in the Junon area, we can call and mount the chocobo type home to the current region at any time.
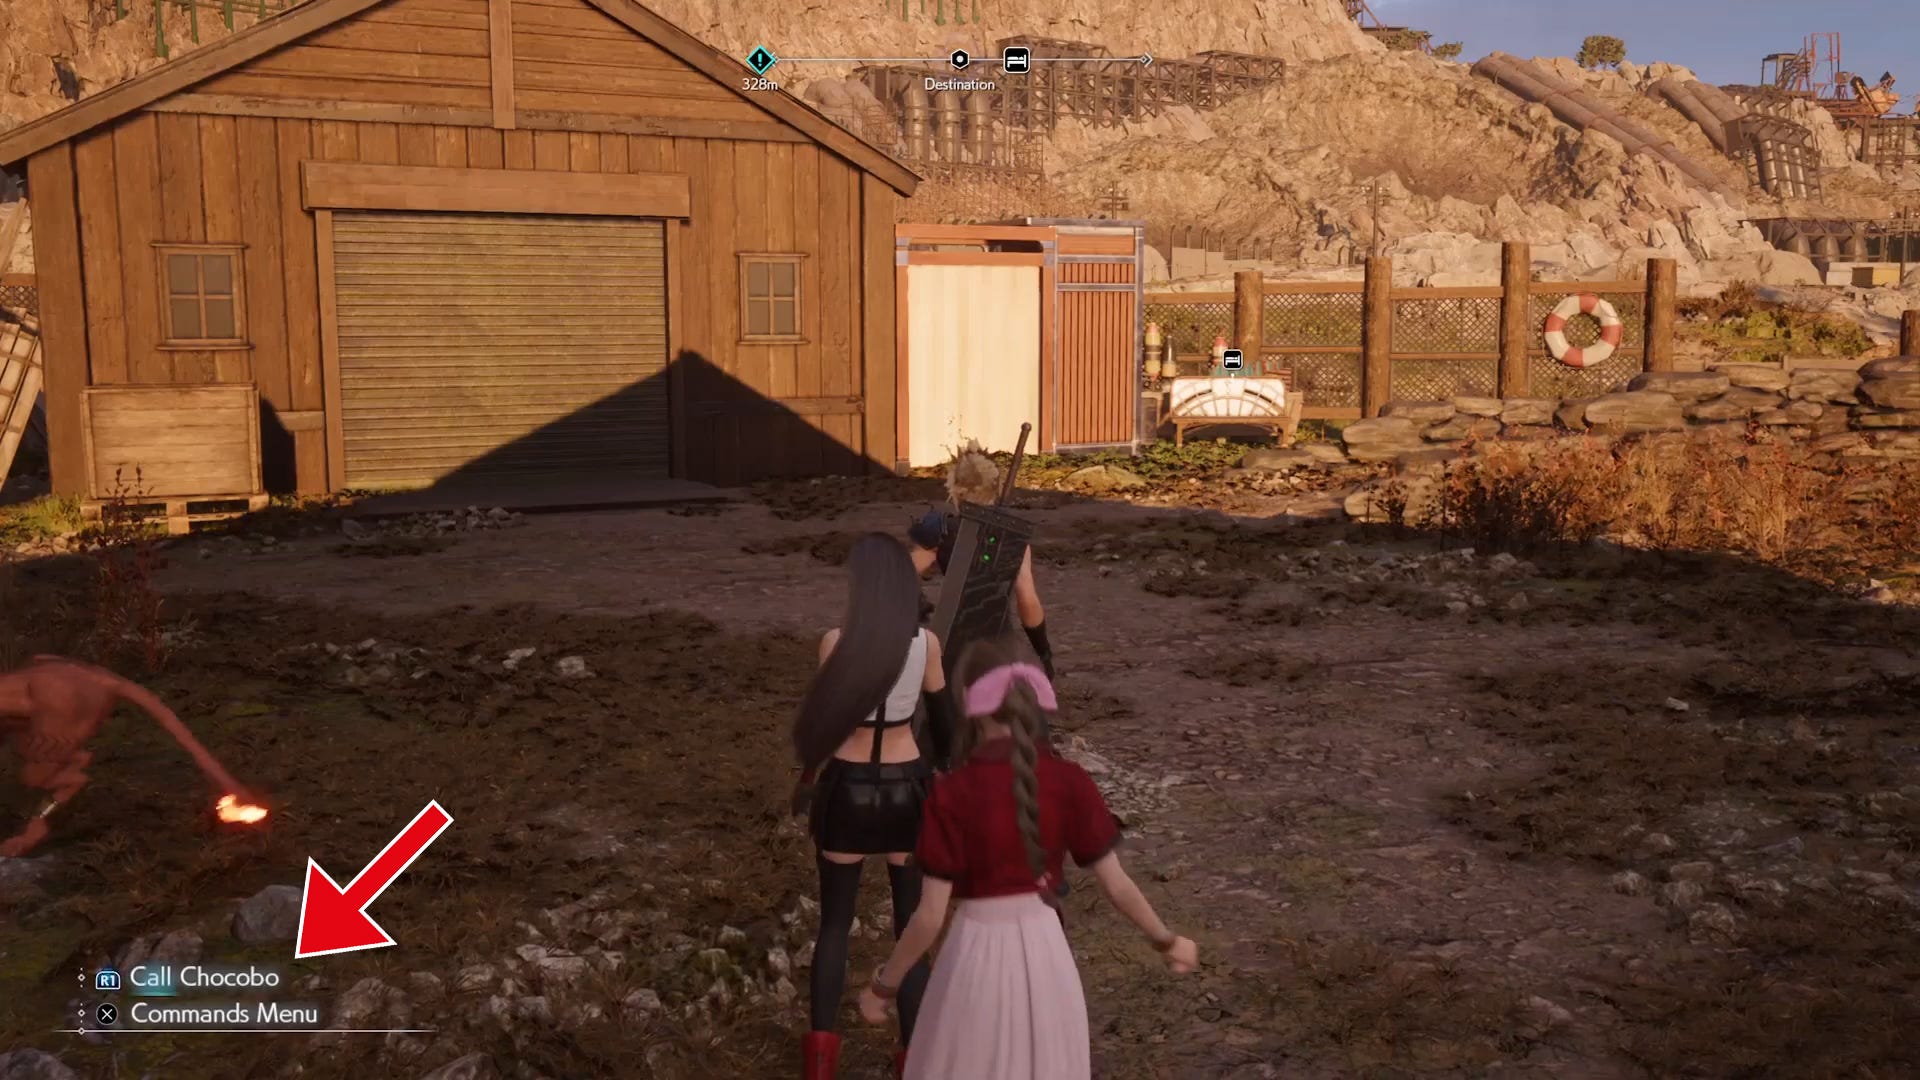
However, there could be region-specific side or even main quests tied to it. According to the English version of the Grasslands demo, Chocobo Billy will gift us the runaway chocobo Piko if we manage to catch him, which makes catching the normal yellow chocobo a part of the main storyline.

We need to cross the swamp to progress, after all. Once caught, we’ll be able to call upon the yellow chocobo at any time while running around in the Grassland area, which encompasses this section of the world map shown below.

We know of four types of chocobos thus far: standard (Yellow) for the Grasslands, mountain (black) for the Junon area, sky (teal) for at least the Cosmo Canyon and Nibel area, and river (probably some shade of blue) for an either yet unknown area or possibly the whole world to connect all three continents—excluding islands like Wutai and Mideel.
This means we will need to sneak up on a new chocobo type at least three more times and I assume it will be different, more difficult, and more involved each time.


I sincerely hope for a legendary gold chocobo for full freedom of movement across Rebirth’s world and catching one could be quite a difficult and possibly world-spanning endeavour.
Moogle Mischief

The Mog House is back! But in a completely different form than in the original game where it was a mere game machine in Gold Saucer’s Wonder Square. Before we dive into both versions, here’s what the official Square Enix blog post about Rebirth’s world reveals about this minigame:
A minigame to bring mischievous Moogle kids back to their mogstools. The Moogle kids will attack you in every possible way, so be careful not to be caught off guard by their cute smiles.
Sounds completely differently than what we remember about the Mog House minigame, doesn’t it?
Help Mog Fly
Before we take a closer look at how this Mog House minigame has changed, let’s refresh ourselves on the original version.

In the back of Wonder Square’s arcade machine room stands a conspicuous gaming terminal in the shape of a Moogle. If you pay 100 gil, you can play Mog House and attempt to find Mog a mate by helping him fly. If you succeed, you can talk to the person behind Cloud who has been watching him play. This onlooker seems impressed and gifts Cloud 30 GP as a one-time reward for beating the game. Otherwise, this minigame provides no tangible rewards.


As for how this minigame works: all you have to do is feed Mog the right amount of Kupo Nuts twice. Once to make him fly on his own and once to have him fly again in front of his potential mate Meg to impress her. To do that, just throw a nut in front of him by pressing the confirmation button as many times as needed until Mog makes a different sound. five times for his first attempt at flying and 3 times to impress Meg. That’s it.

Afterwards, you can watch both mates exit the house with 12 children in tow. Congratulations! You’ve ensured the survival of the Mog lineage!
At least virtually.
Mischievous Offspring
In Rebirth, it seems that Mog has already found his mate Meg and founded a family with five offspring. As if this remake trilogy was a sequel to the original game’s continuity or something…
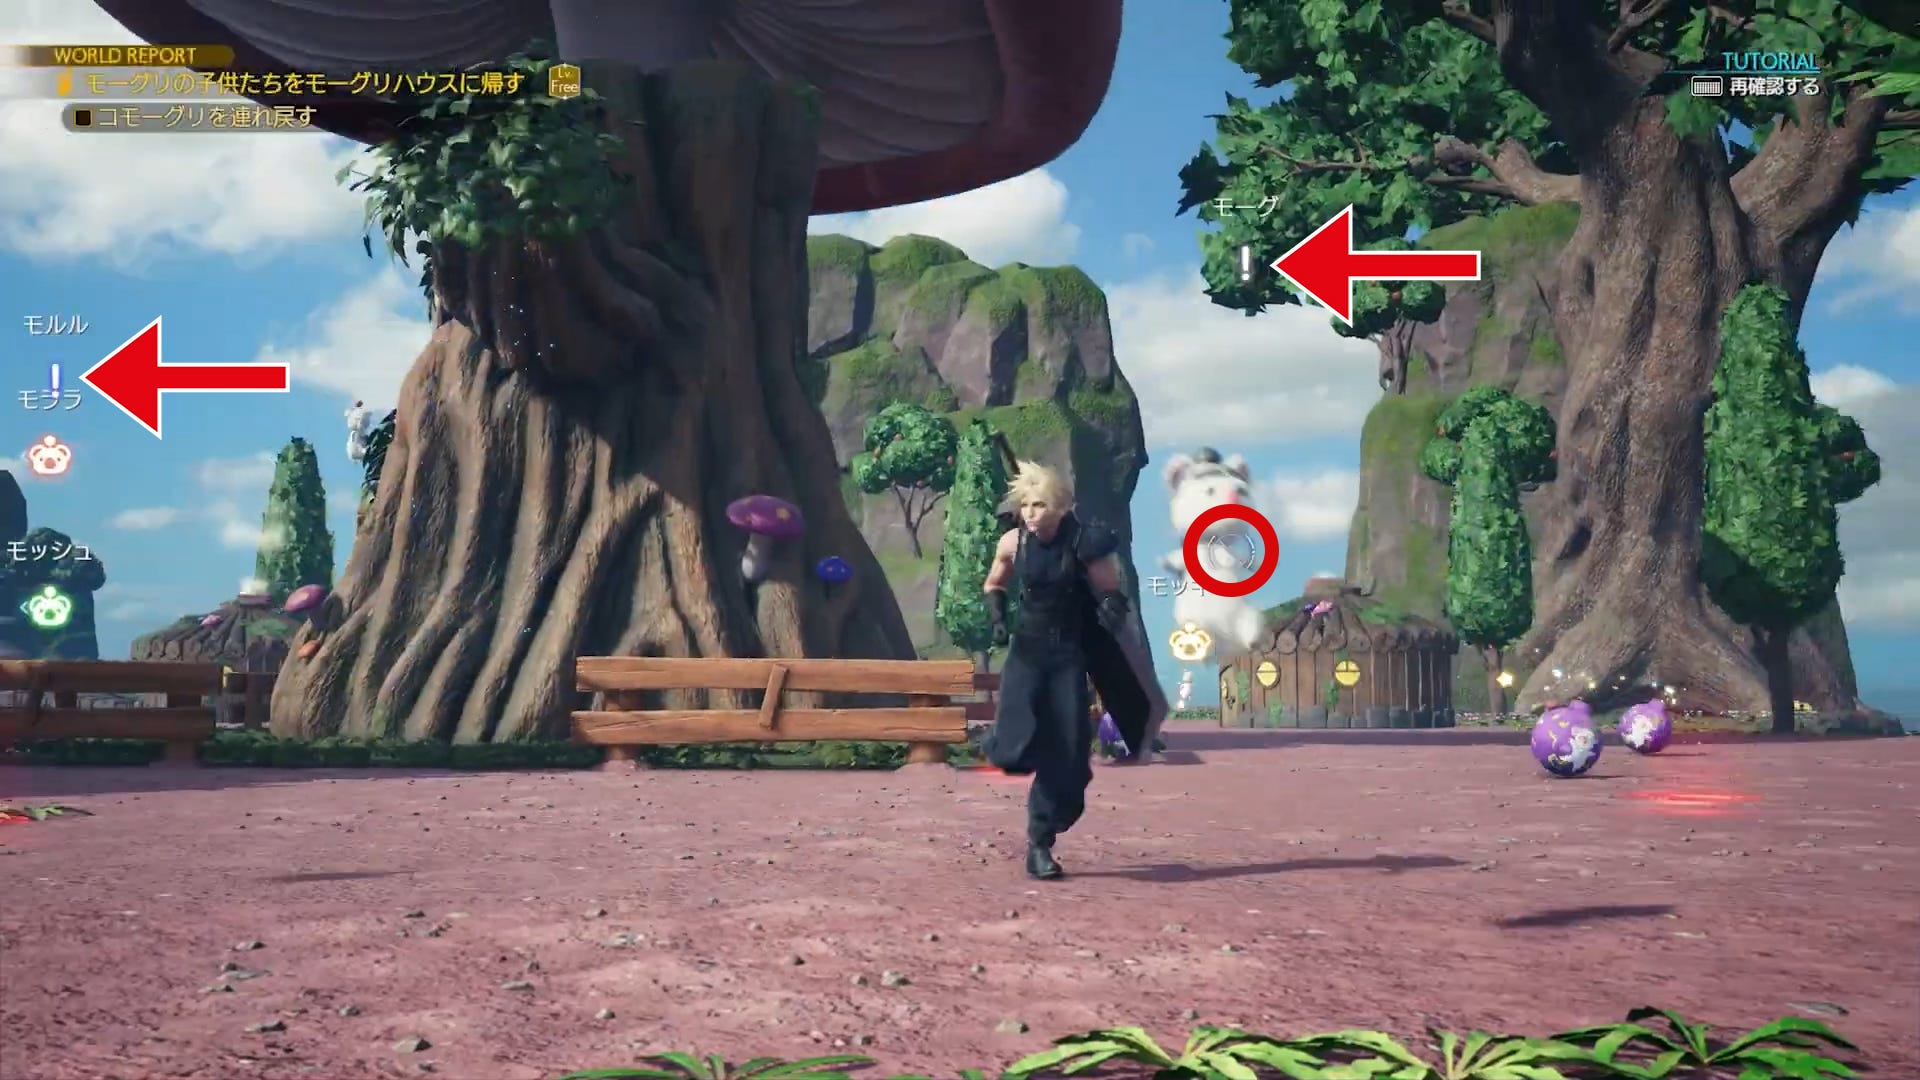
Anyway, once in this magical space of the Mog House—more on that in a bit—we need to return all five Mooglets to their mogstools and it seems that this is much easier said than done. It looks like we need to catch them by pressing the interaction button when close, but in the screenshot below, that interaction is blocked as seen by the greyed out 🚫 symbol on the Mooglet. We probably need to somehow catch them off guard so that they don’t fly away and attack. Moog (モーグ) and Molulu (モルル) show a white exclamation mark instead of a colored Mooglet head icon below their names which could signify an escape mode during which they cannot be caught.
It’s likely that we need to dodge and endure attacks by them until they are exhausted and we can finally interact with them to see them home.
Speaking of attacks, we can witness three different types being thrown at Cloud in this trailer. One lets energy blasts rain from above which explode upon impact. Luckily, a red reticle on the ground shows those impact points, making them easier to avoid. Another attack comprises of several bombs being tossed towards you, though they do not immediately explode when hitting the ground as the fuses need to burn off first, leaving you a few seconds to get away. The third type of attack involves flinging rotating wind sickles in a straight and horizontal trajectory towards Cloud. This one seems to be the hardest to dodge.


It’s very likely that those 5 Mooglets deploy a different type of attack each as Mokey (モッキー) and Molala (モララ) are chilling out in the background and do not attack.
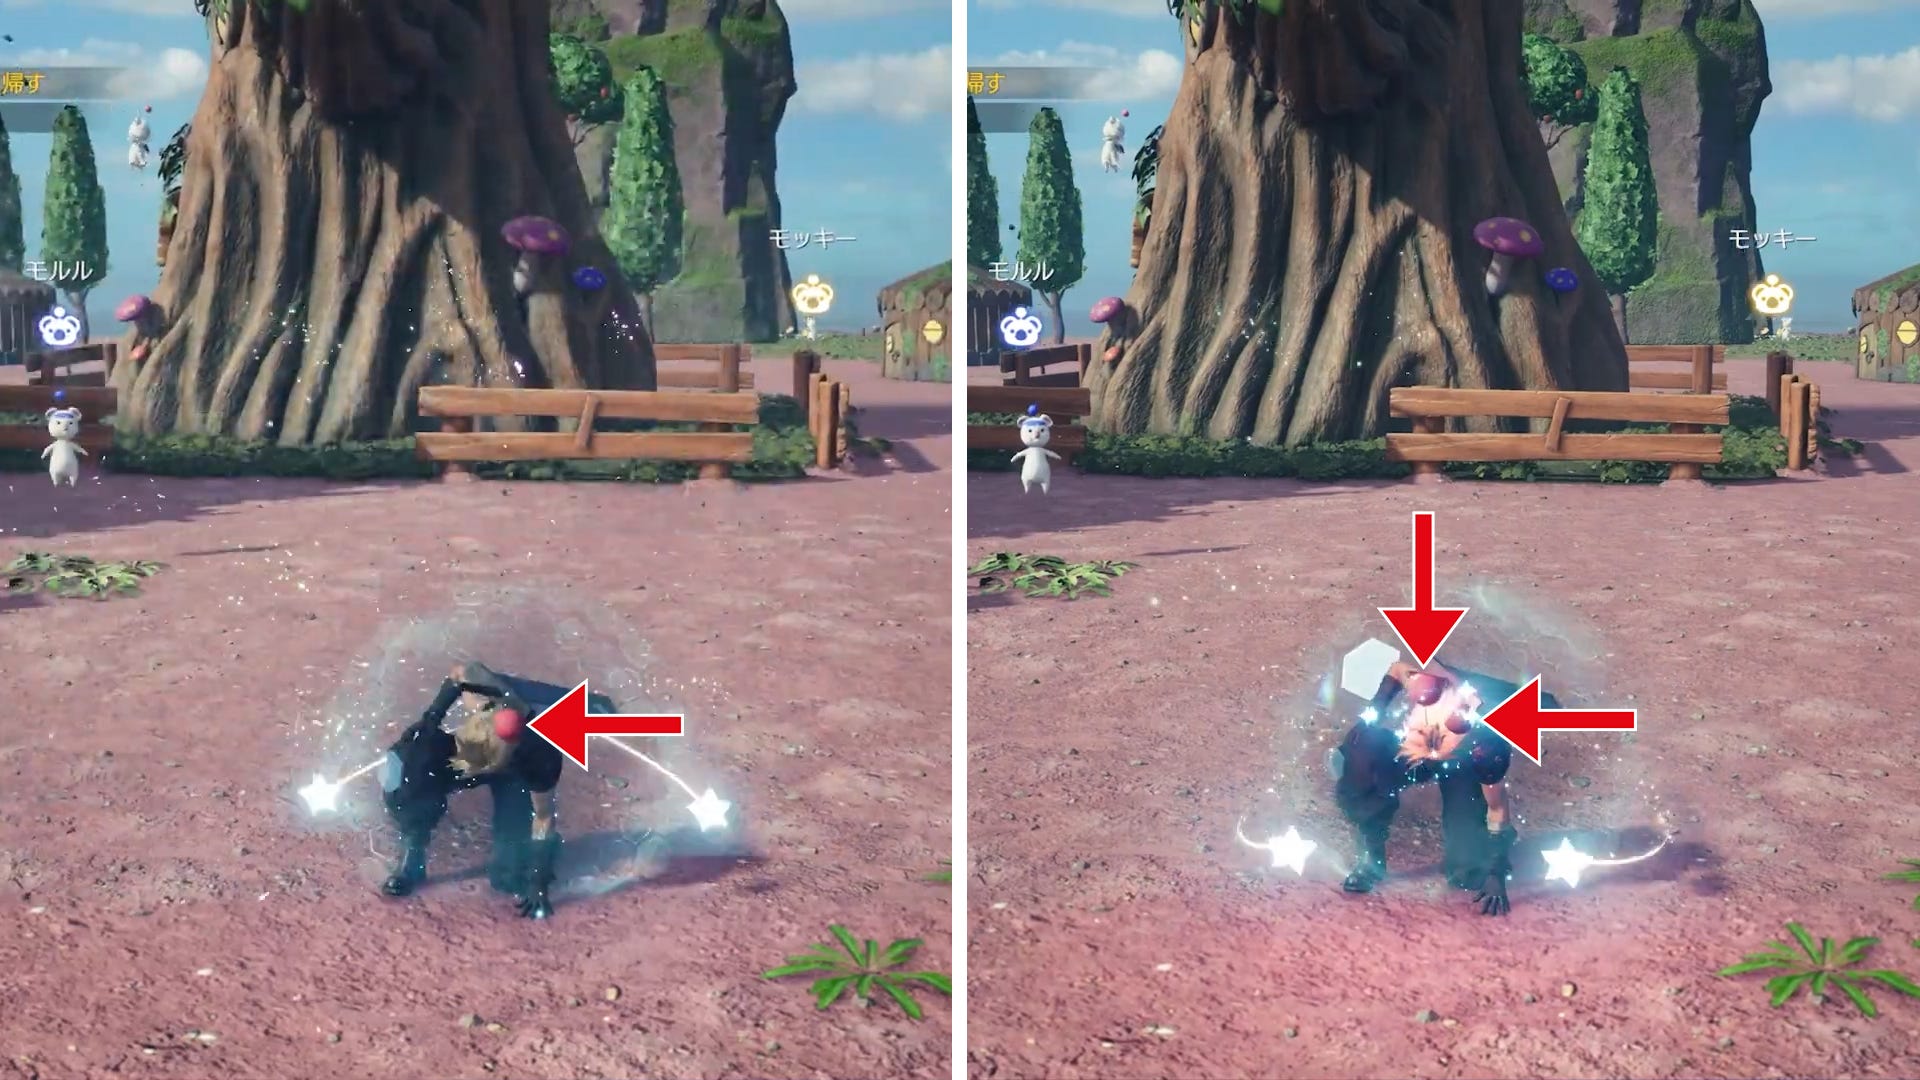
We can also see the head icons of those Mooglet receiving a glowing red circle around them when an attack is in progress. This is an especially important tell for attacks coming from off-screen. To make evasion easier, we can also use the parkour feature in here as seen in the bottom left of the third image ( ◎ パルクール).
But what happens if Cloud gets hit? I’m glad you asked! As we can see in images 2 through 4 above, Cloud has a Moggle’s pompom attached to his head. Such a pompom appears when he gets hit by an attack from one of the Mooglets. As seen below, a second pompom is added to Cloud’s head while being dazed from a recent attack—the wind sickle.
When hit and while dazed, Cloud is surrounded and protected by a spherical energy shield—held together by a sturdy hexagon pattern similar to those detailed above in the G-Bike section—which most likely prevents successive hits, just like in old school games where the player character, and sometimes even enemies, blink repeatedly after a hit during which they are invincible.
What happens when Cloud receives more pompoms? I expect us to lose the minigame once pompom count reaches three or we get hit while carrying three of them already. Maybe the game graces us with checkpoints after each Mooglet has been returned home, but I would not hold my breath.
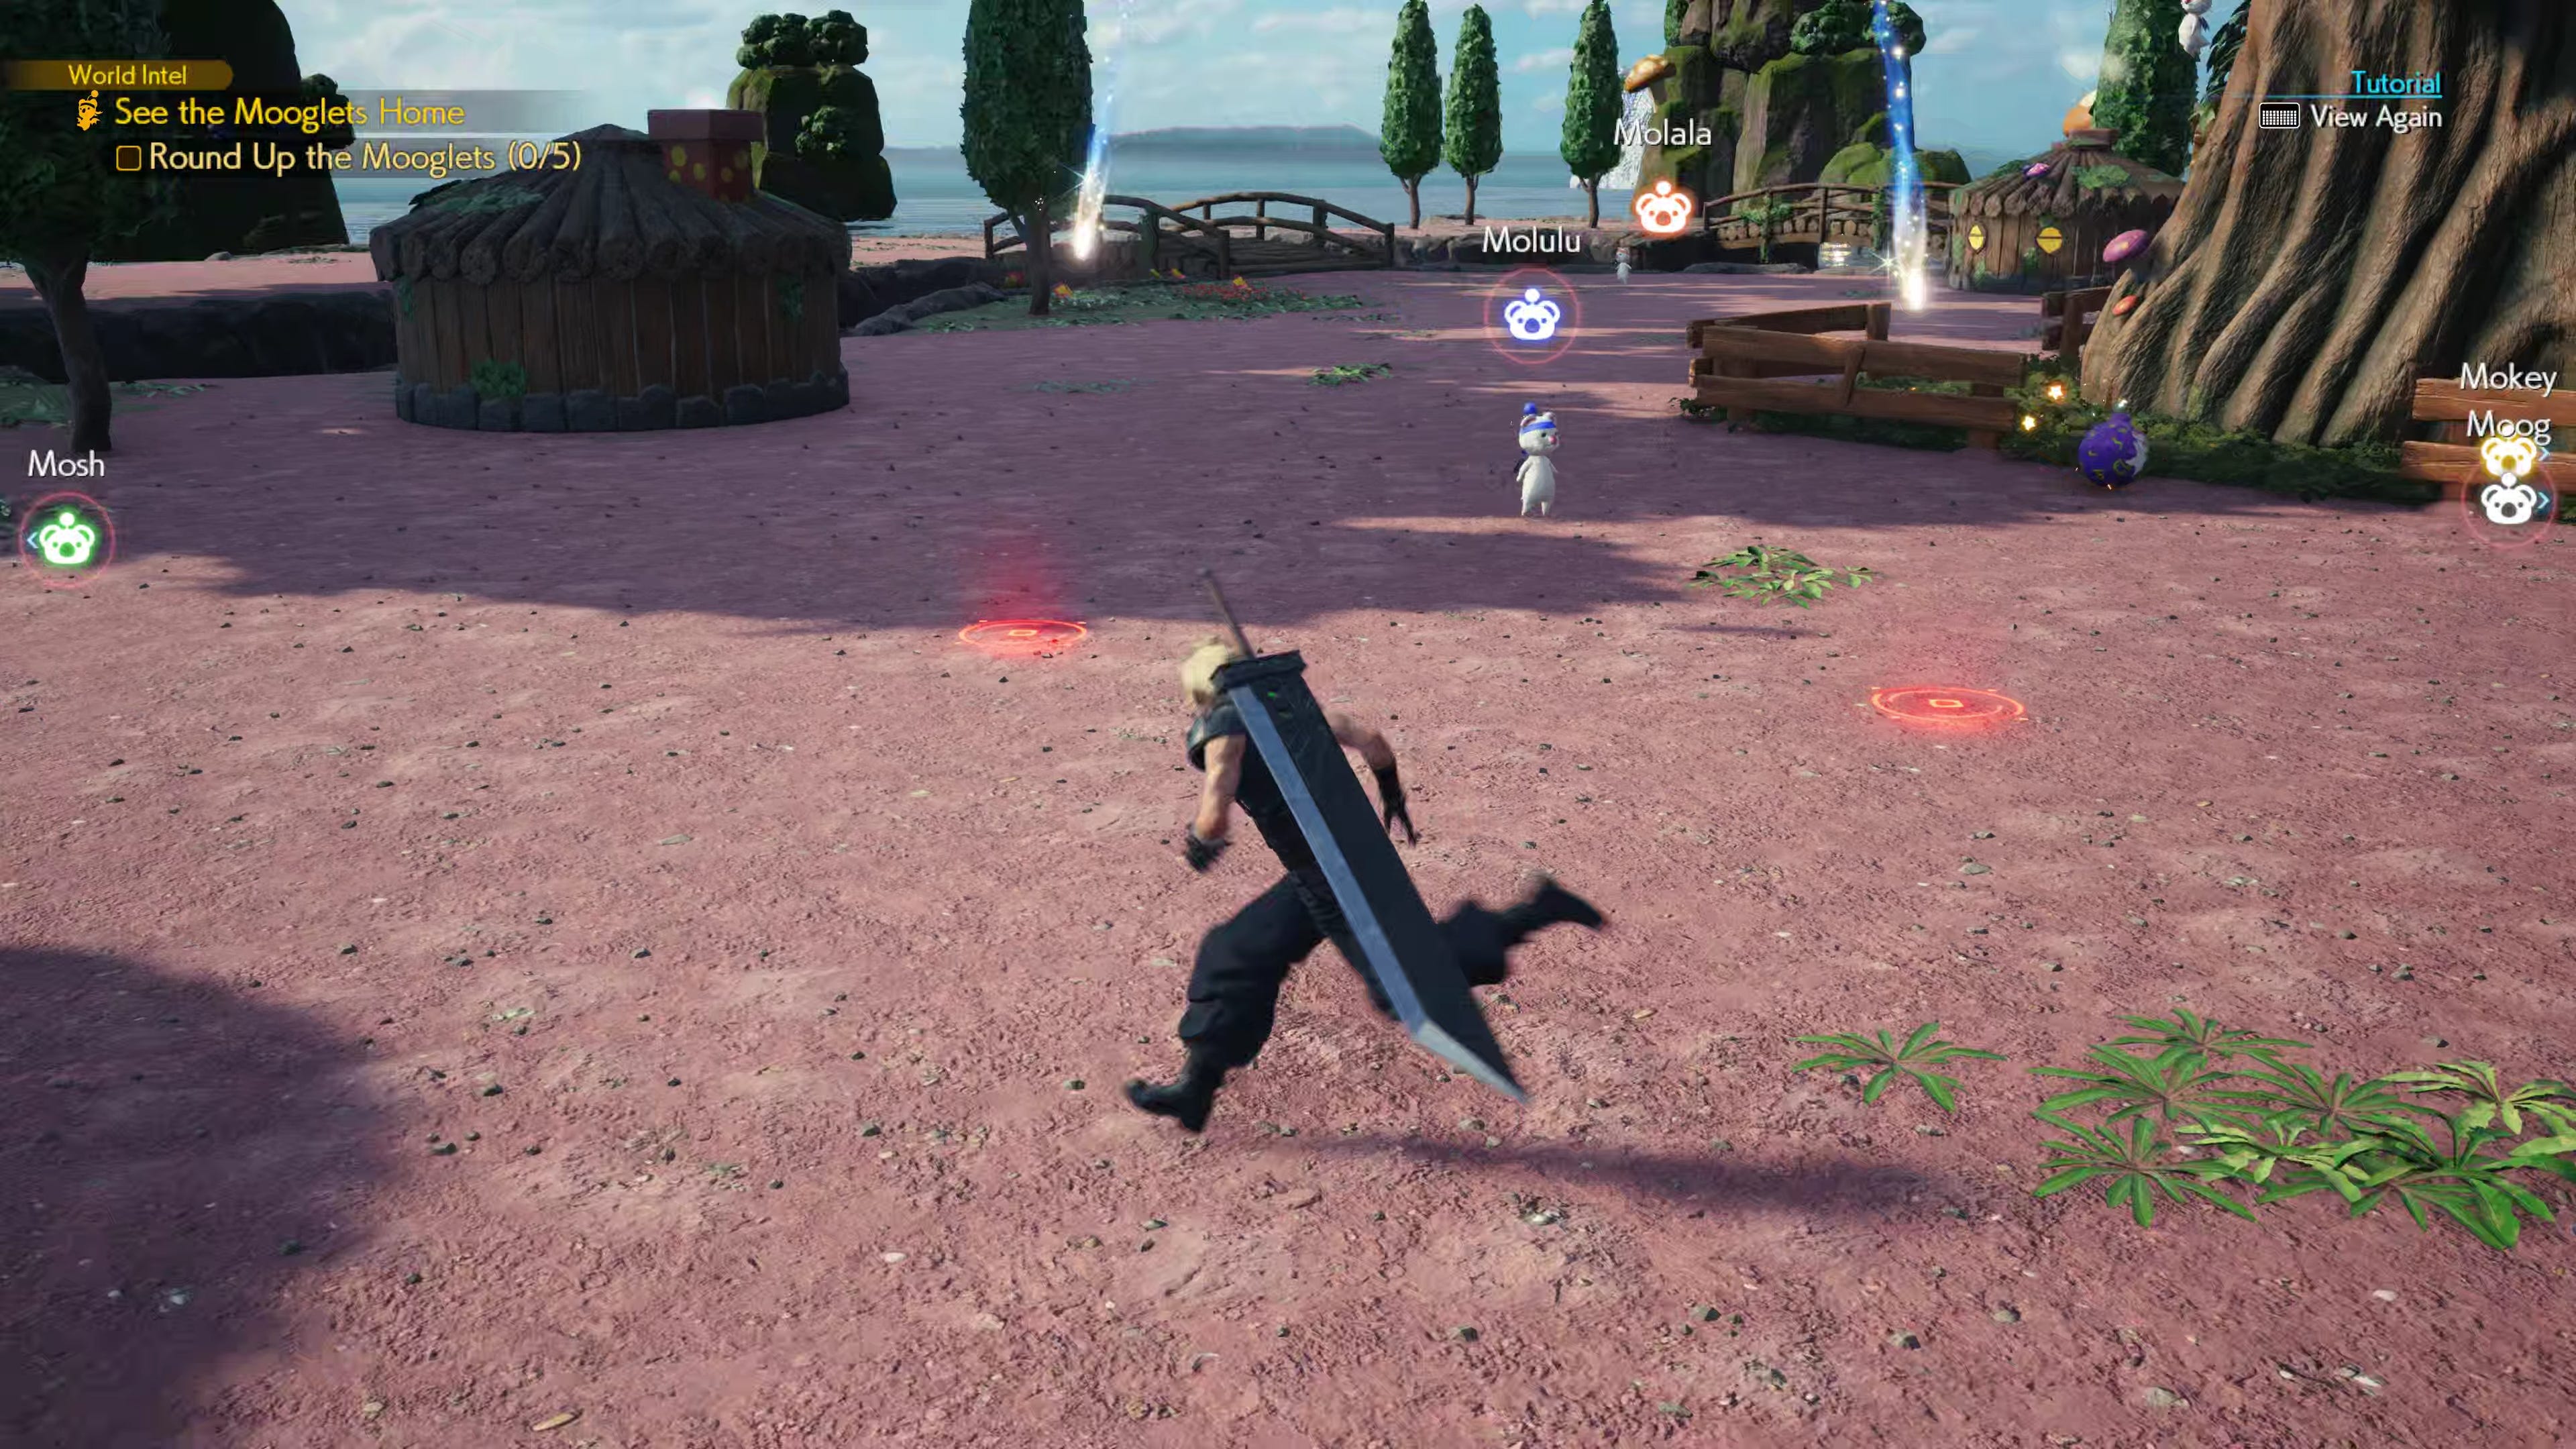
Before we move on to the last section, here’s the official English screenshot for reference regarding minigame target and progress, as well as the Mooglet’s names.
Moogle Emporium
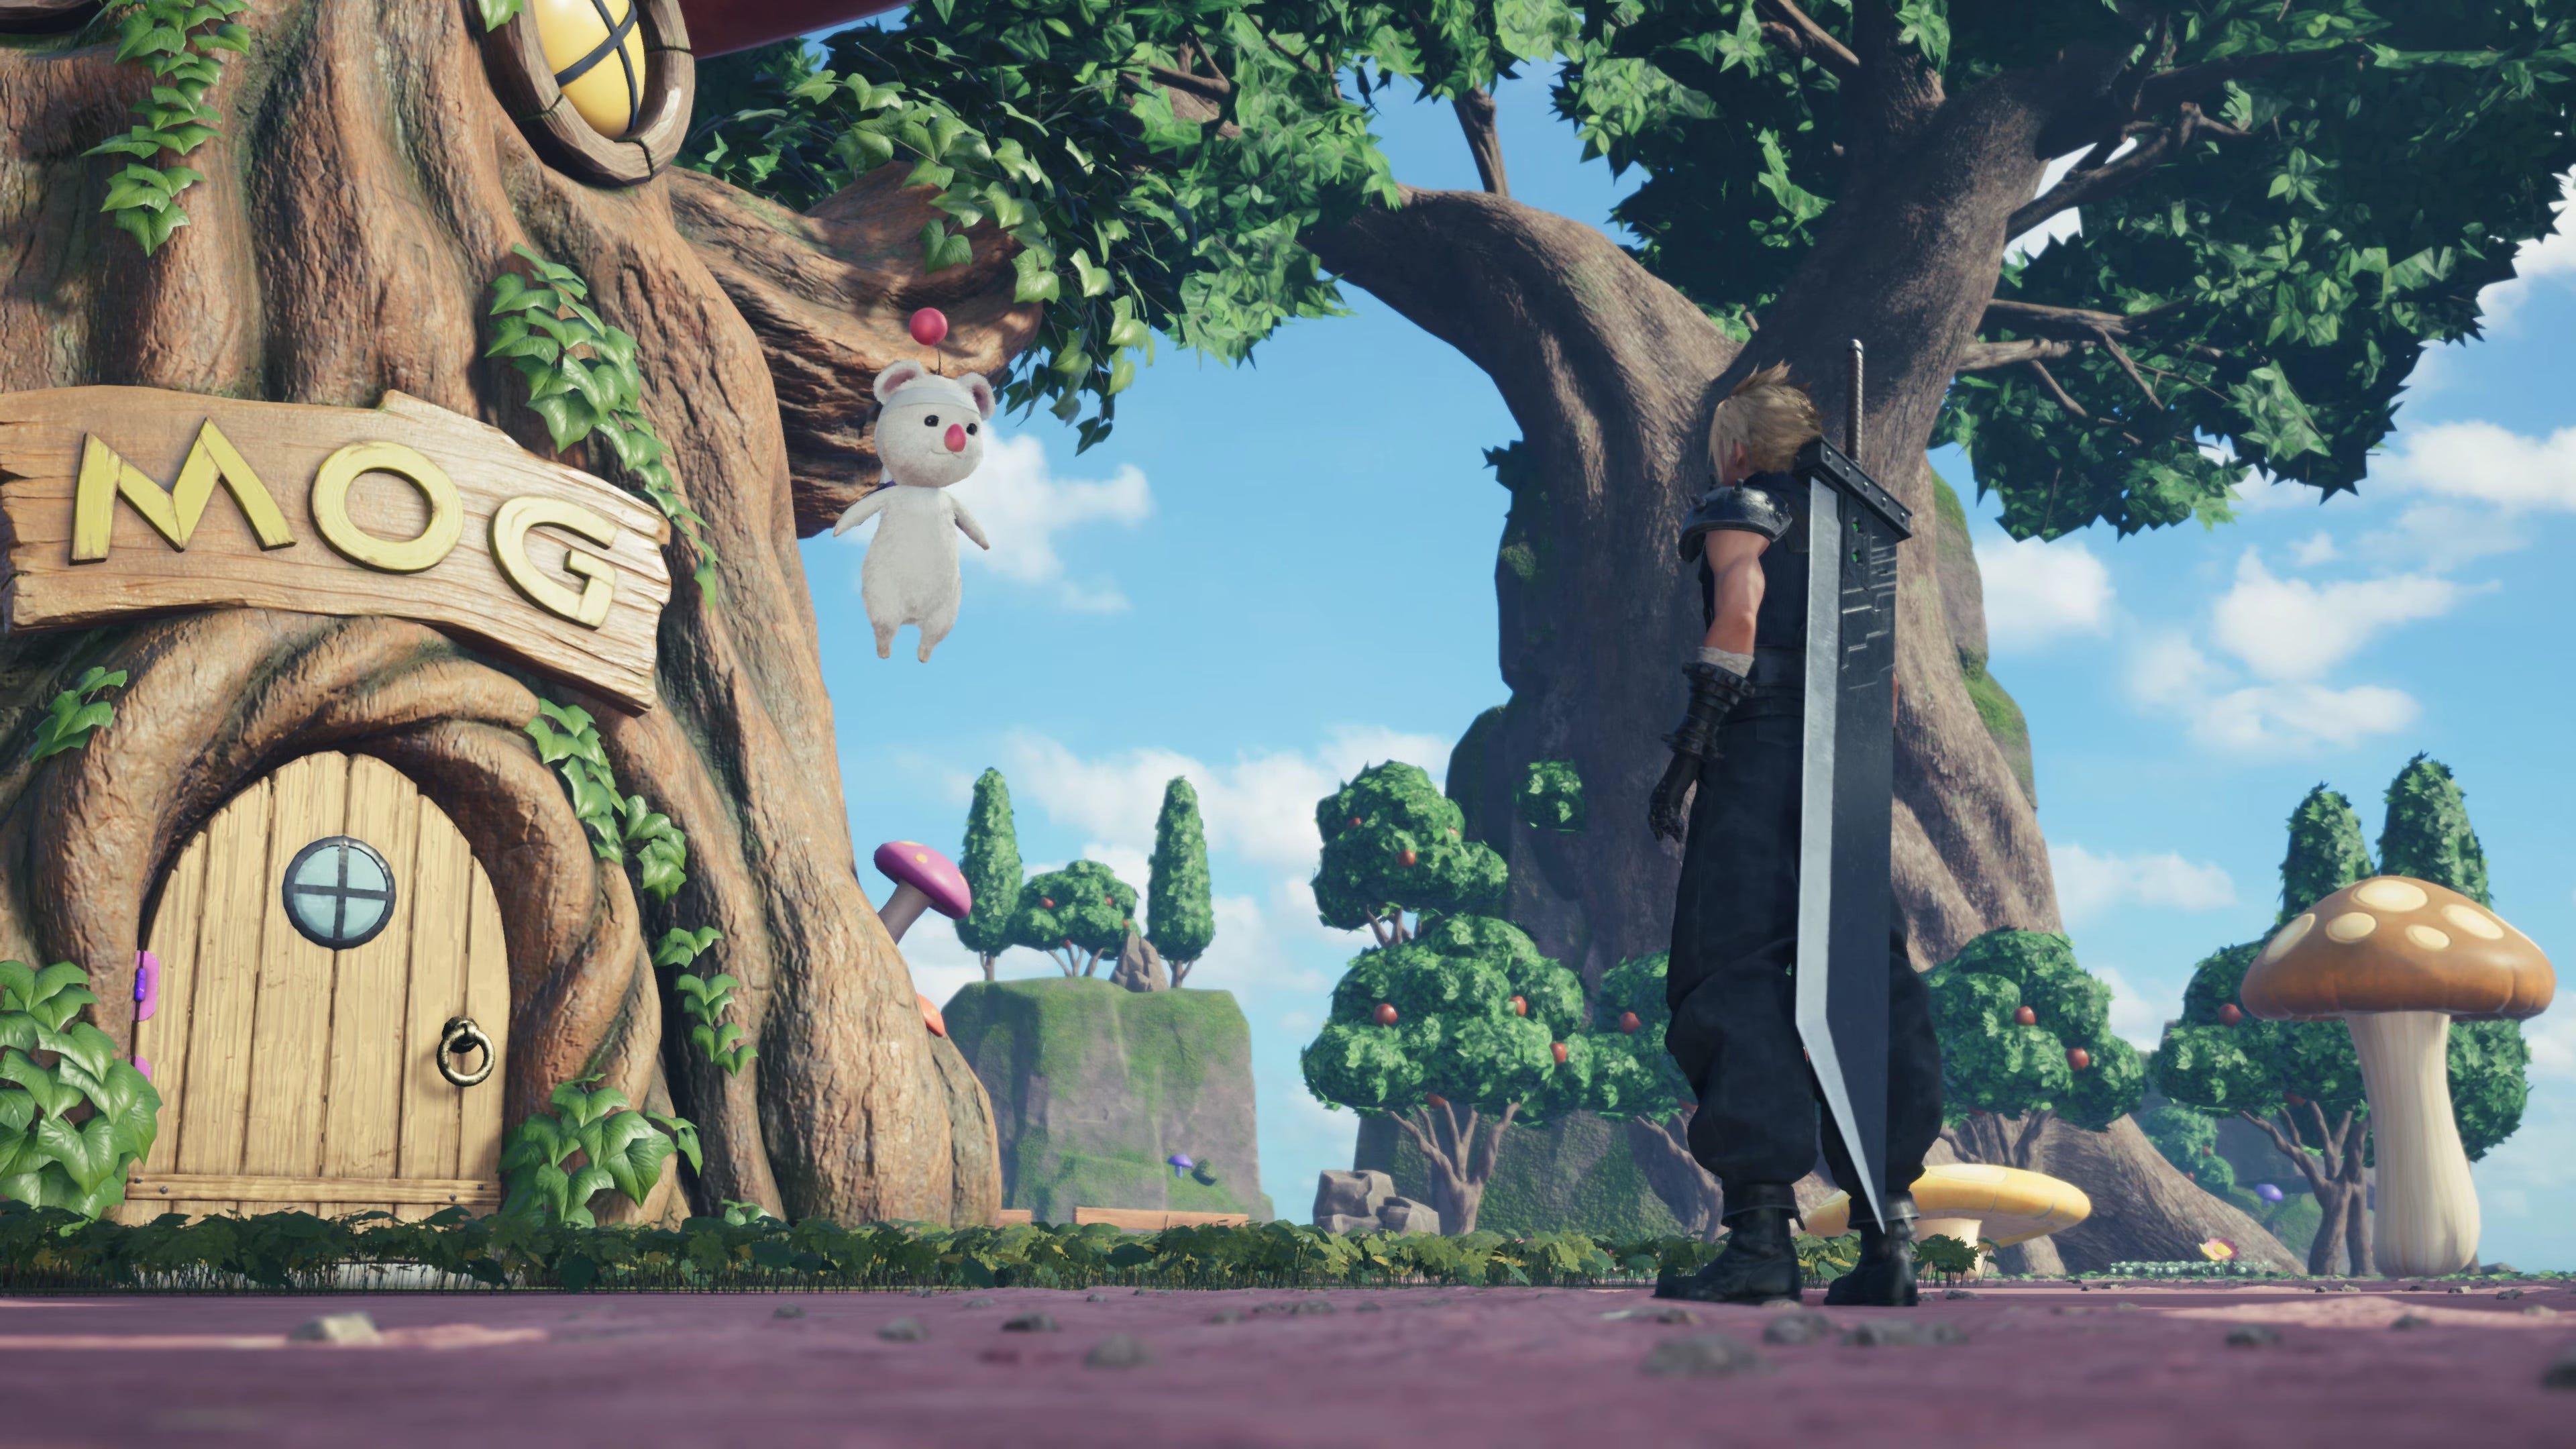
That’s it for the minigame, but there’s more to the Mog House. To everybody’s surprise which left their mouths agape, the Mog House happily resides out there in the wild, just like that. During Square Enix’s live presentation at Tokyo Game Show, the prerecorded gameplay demo footage of the Grasslands area contained a segment where the player was running towards a Combat Assignment. Unfortunately, the player only briefly stops there to show off its existence and give Hamaguchi-san time to also briefly comment on it, before quickly moving on to the Combat Assignment location farther south. Long enough, however, to also get a glimpse of Mog and some of his Mooglets, as well as those cute Moogle stone statues.

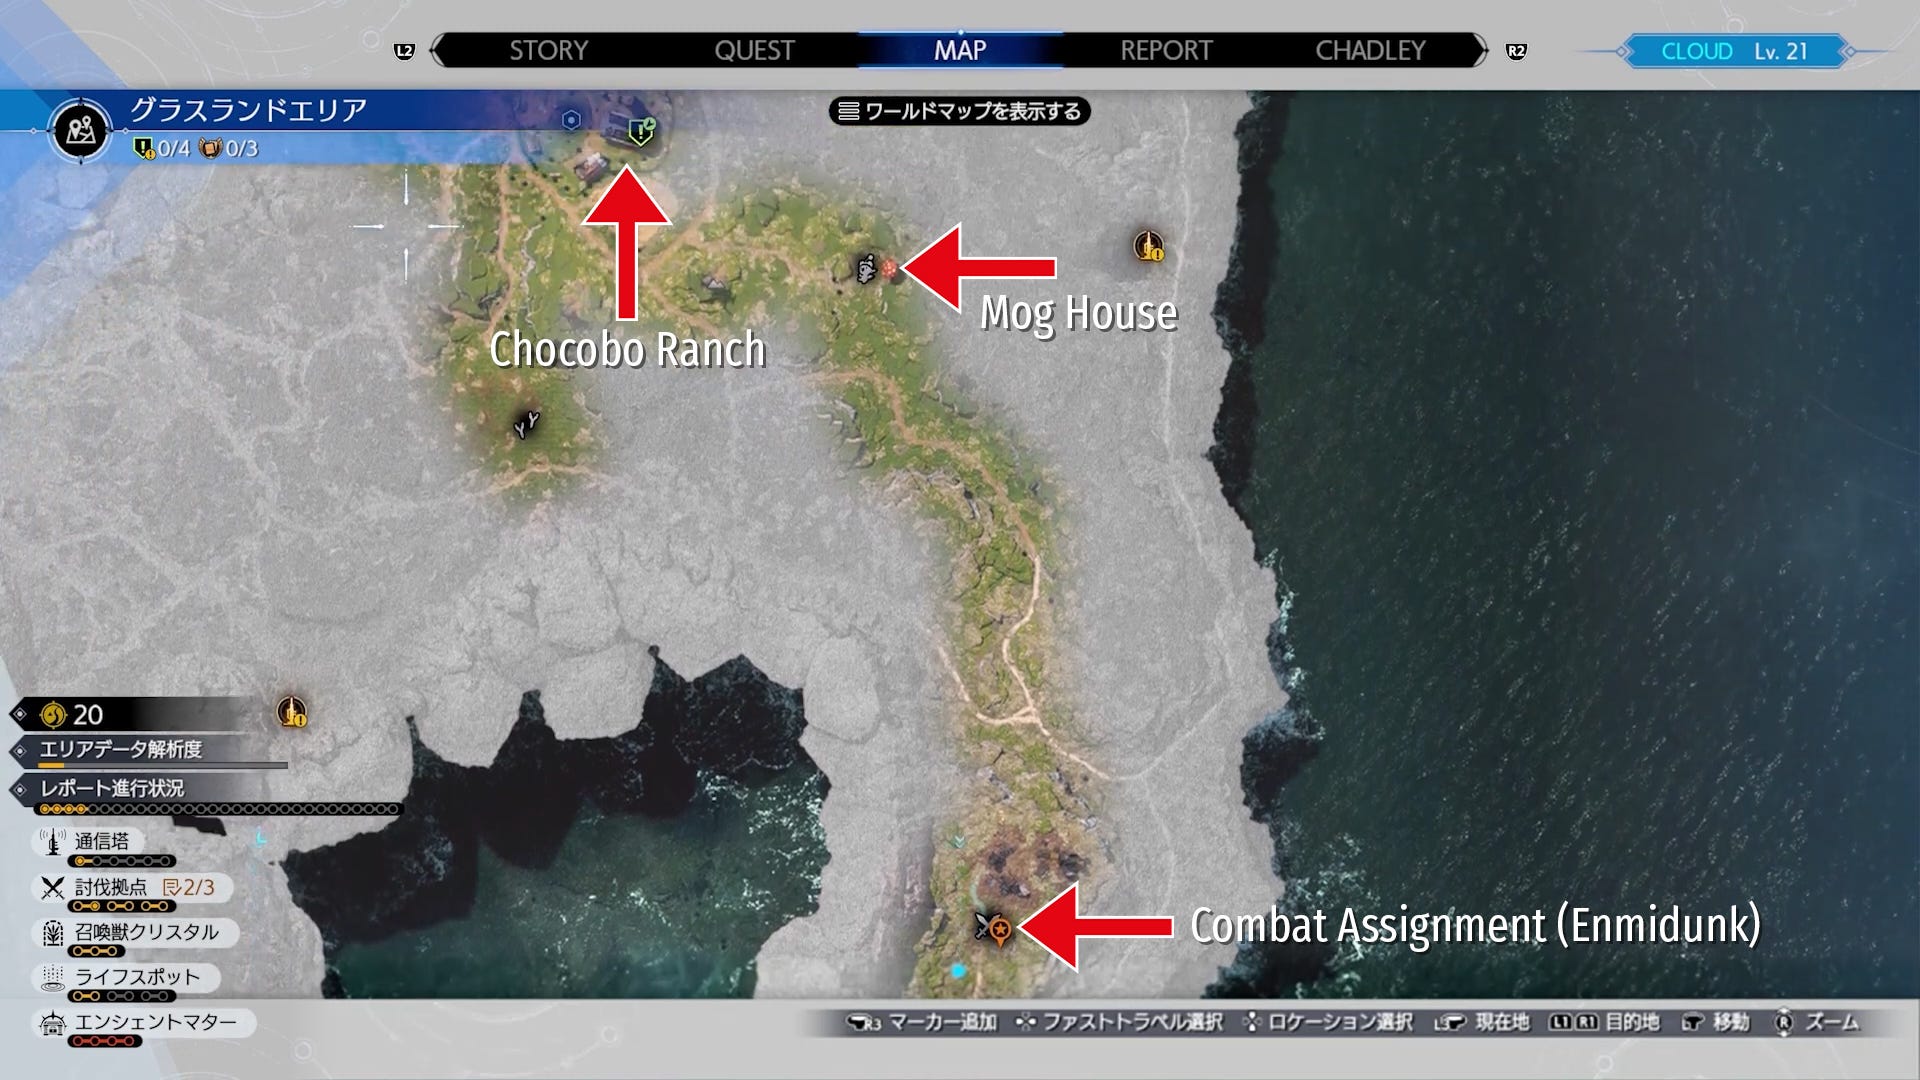
As seen in this chapter’s opening screenshot and the official one below, the actual surroundings around the Mog House differs greatly from the natural environment the house is in. Everything looks plasticky and, for the lack of a better word, fake. It seems like we get transported into Moogle land upon entering or maybe even by interacting with the Moogle in the front.
But that’s not all. The Moogle with the white bandana is a shop owner as revealed by his name above the Japanese dialogue line (モ一グリ原長) and he greets us with the following:
Moogle shop owner: “Welcome to the Moogle shop, Kupo!“13

He then proceeds to explain what we need to do for him.
Moogle shop owner: “bring the children who are playing back to this Mog House.“14

This sounds like we need to do this shop owner a favor first before we are able to conduct business. What business you ask? Well, Moogle Medals make a return in Rebirth and basically serve the same purpose as in Remake, with the difference that we can exchange them at real Moogle Emporiums and not with a slum child dressed up as a Moogle.


Which in turn means that multiple Mog Houses are scattered all over the world, possibly one in each region, and each one houses—pun intended—a Moogle Emporium. Will we need to do a favor for each one and round up the Mooglets or does this happen just once upon the first visit and all Moogle Emporiums are then automatically unlocked? Only time will tell.
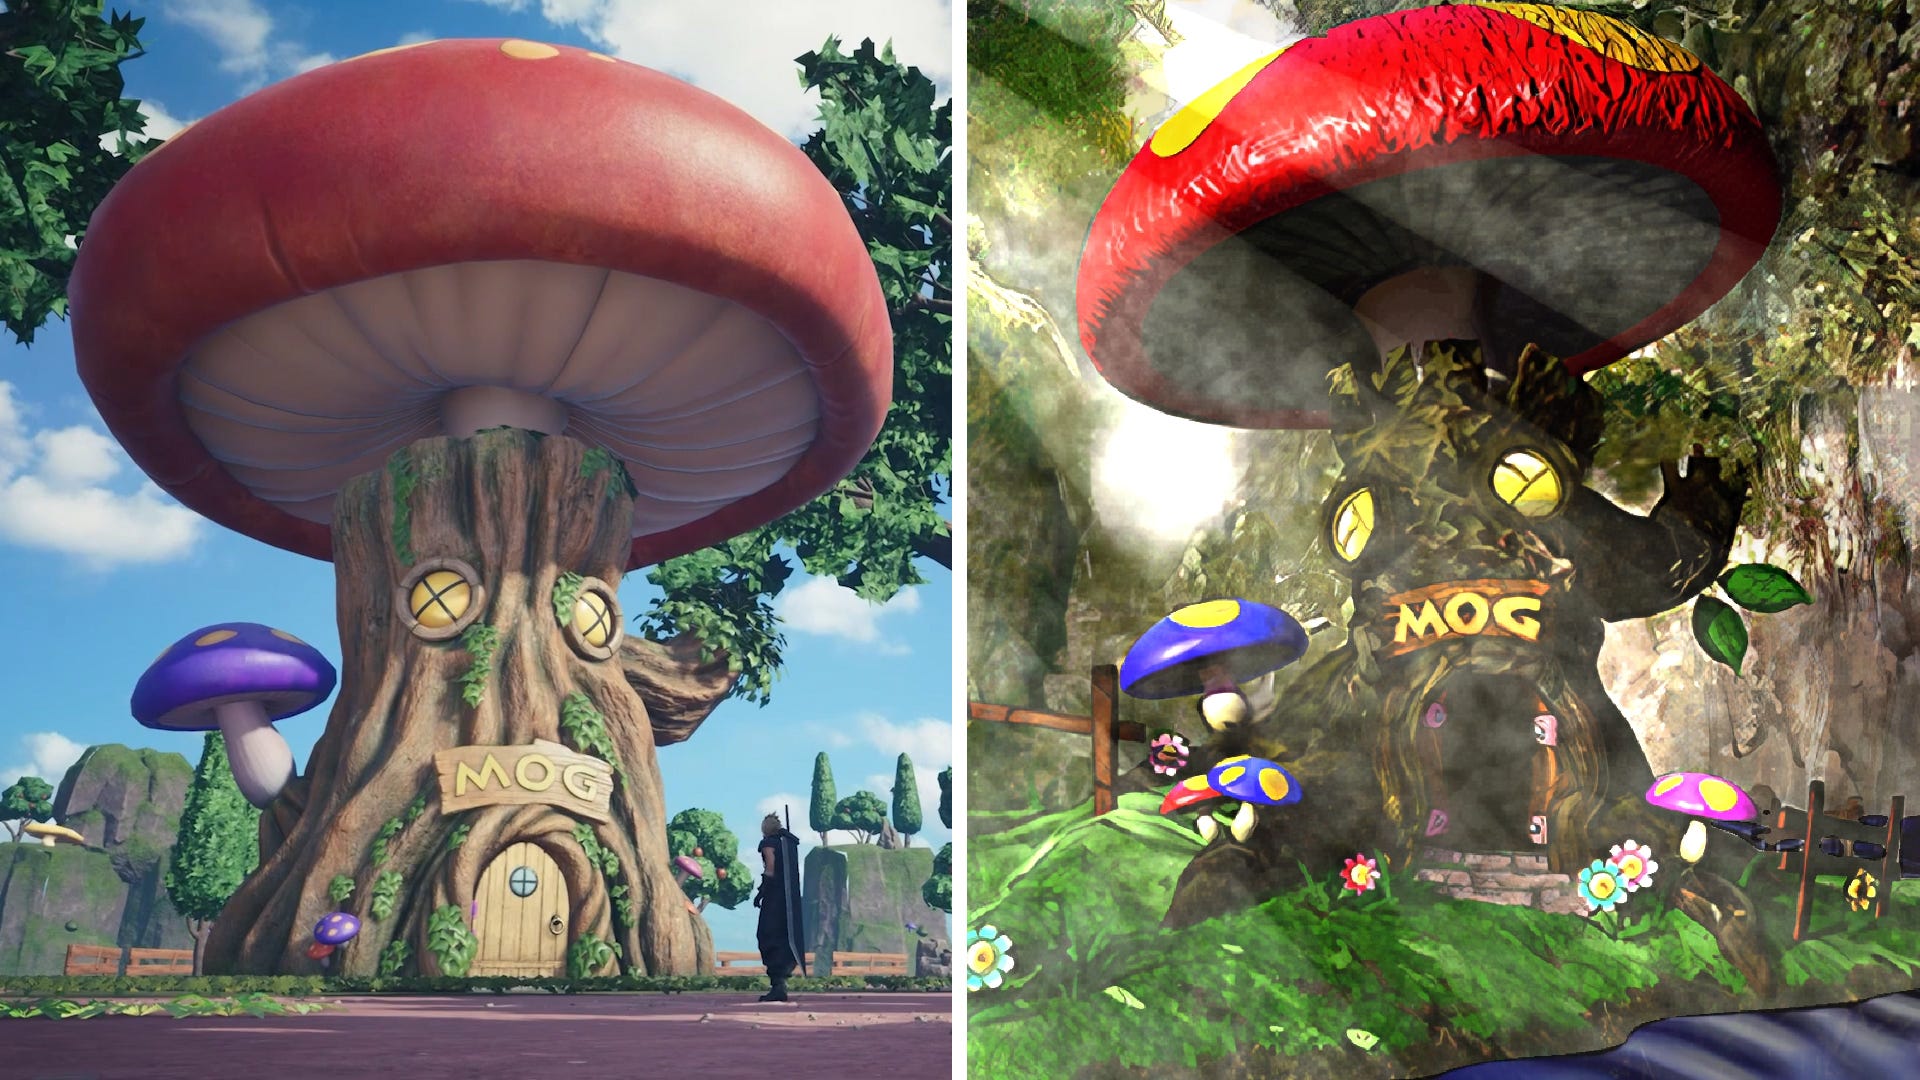
Lastly, can we appreciate the accurate modern representation of the original Mog House on a prerendered background from 1997?15
Chocobo Time Trial

I’m hard-pressed to categorize this as a minigame as it basically encompasses running around with a Chocobo like during normal traversal with a time attack component tacked onto it. We knows this by the existence of identical chocobo controls in the bottom left—even though Dismount, Scent, and Scour are disabled, as well as the Commands Menu—and the fact that the world around us remains exactly the same, down to item transmutation ingredient pickup spot signifiers.
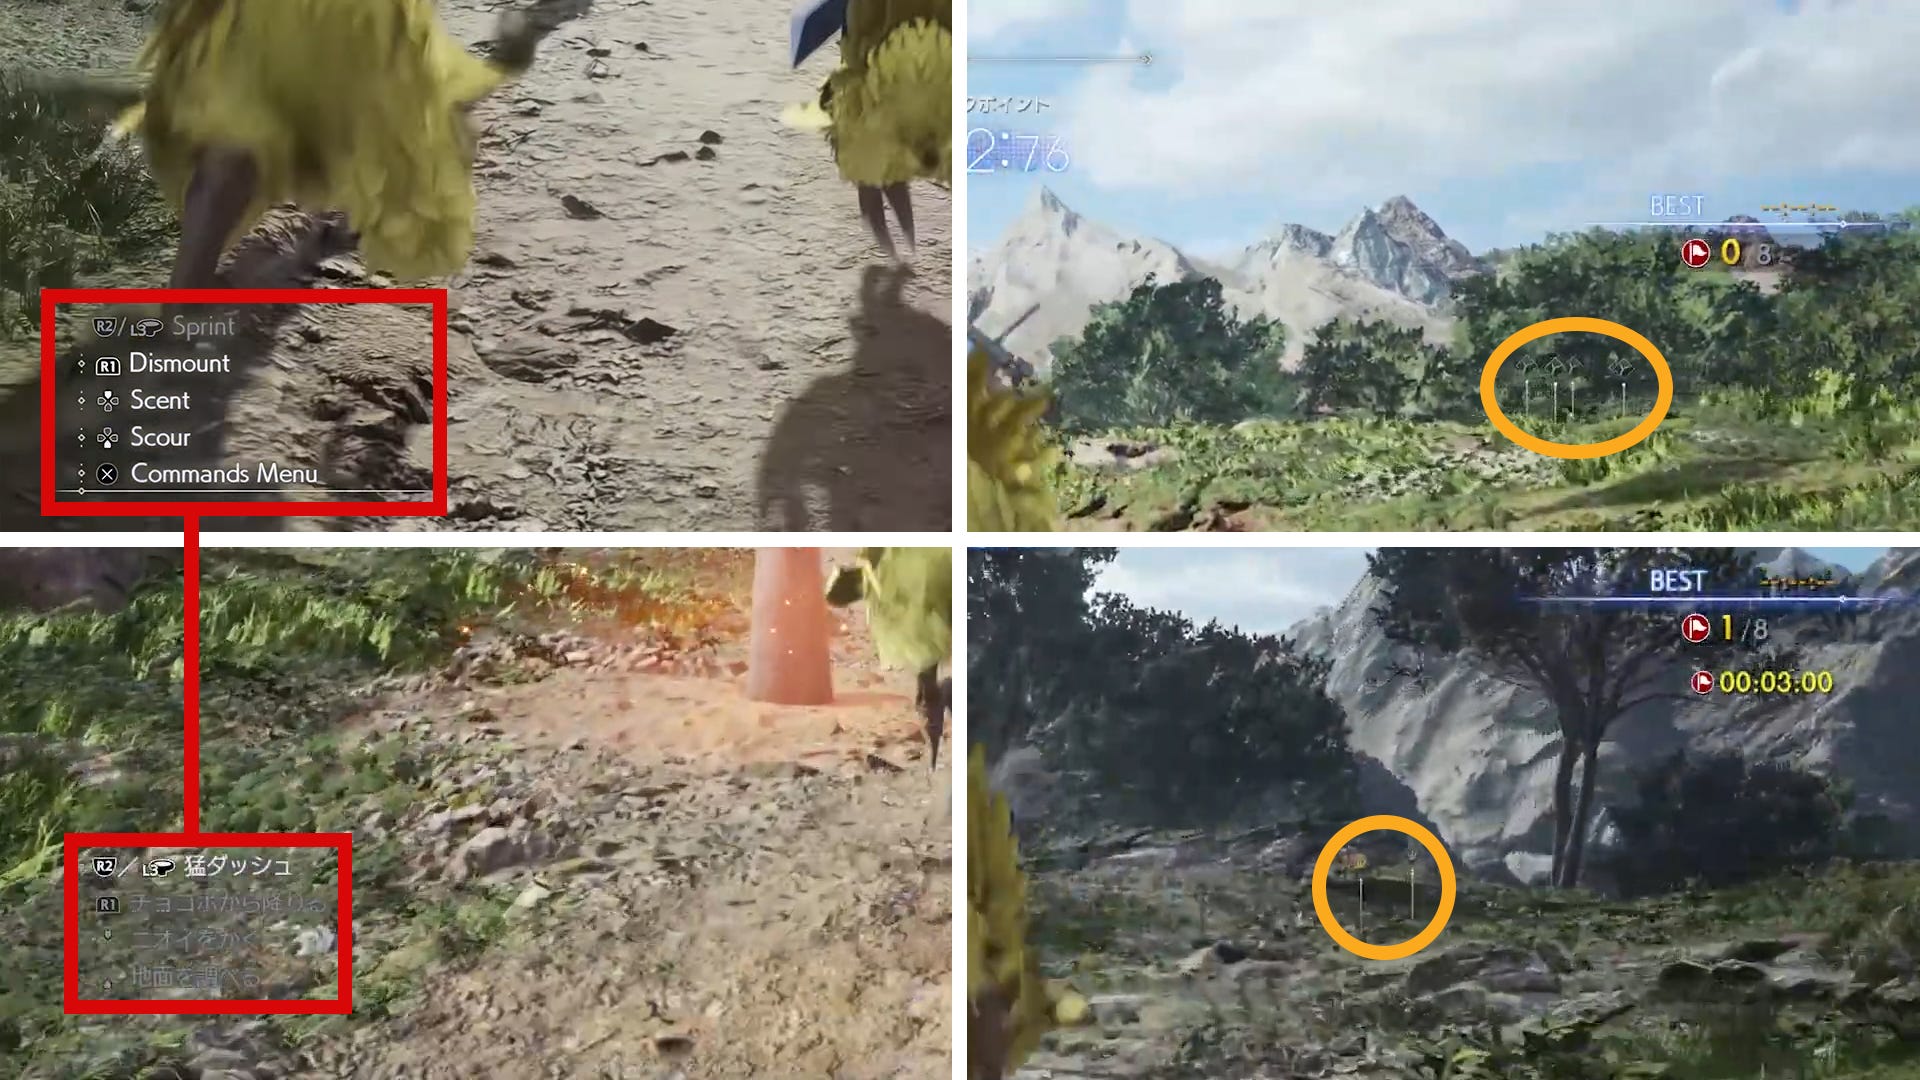
The only difference encompasses a timer and checkpoint poles, which are already visible during normal gameplay and don’t just appear for this “minigame.” However, the game does change certain mechanics and displays additional UI elements specific to this time attack mode, I decided to include it in this minigame analysis article. And here is how it works.
Race Track
First, you need to talk to Chocobo Billy standing in front of the Chocobo Ranch sign pointing towards its entrance when the Chocobo Time Trial icon is visible on his head. This is most likely accessible after catching Piko and receiving him from Chocobo Billy as a reward. For reference, this is what Chocobo Billy says to you in the screenshot below:
Chocobo Billy: “This is where I coordinate the chocobos that go into the race.“16
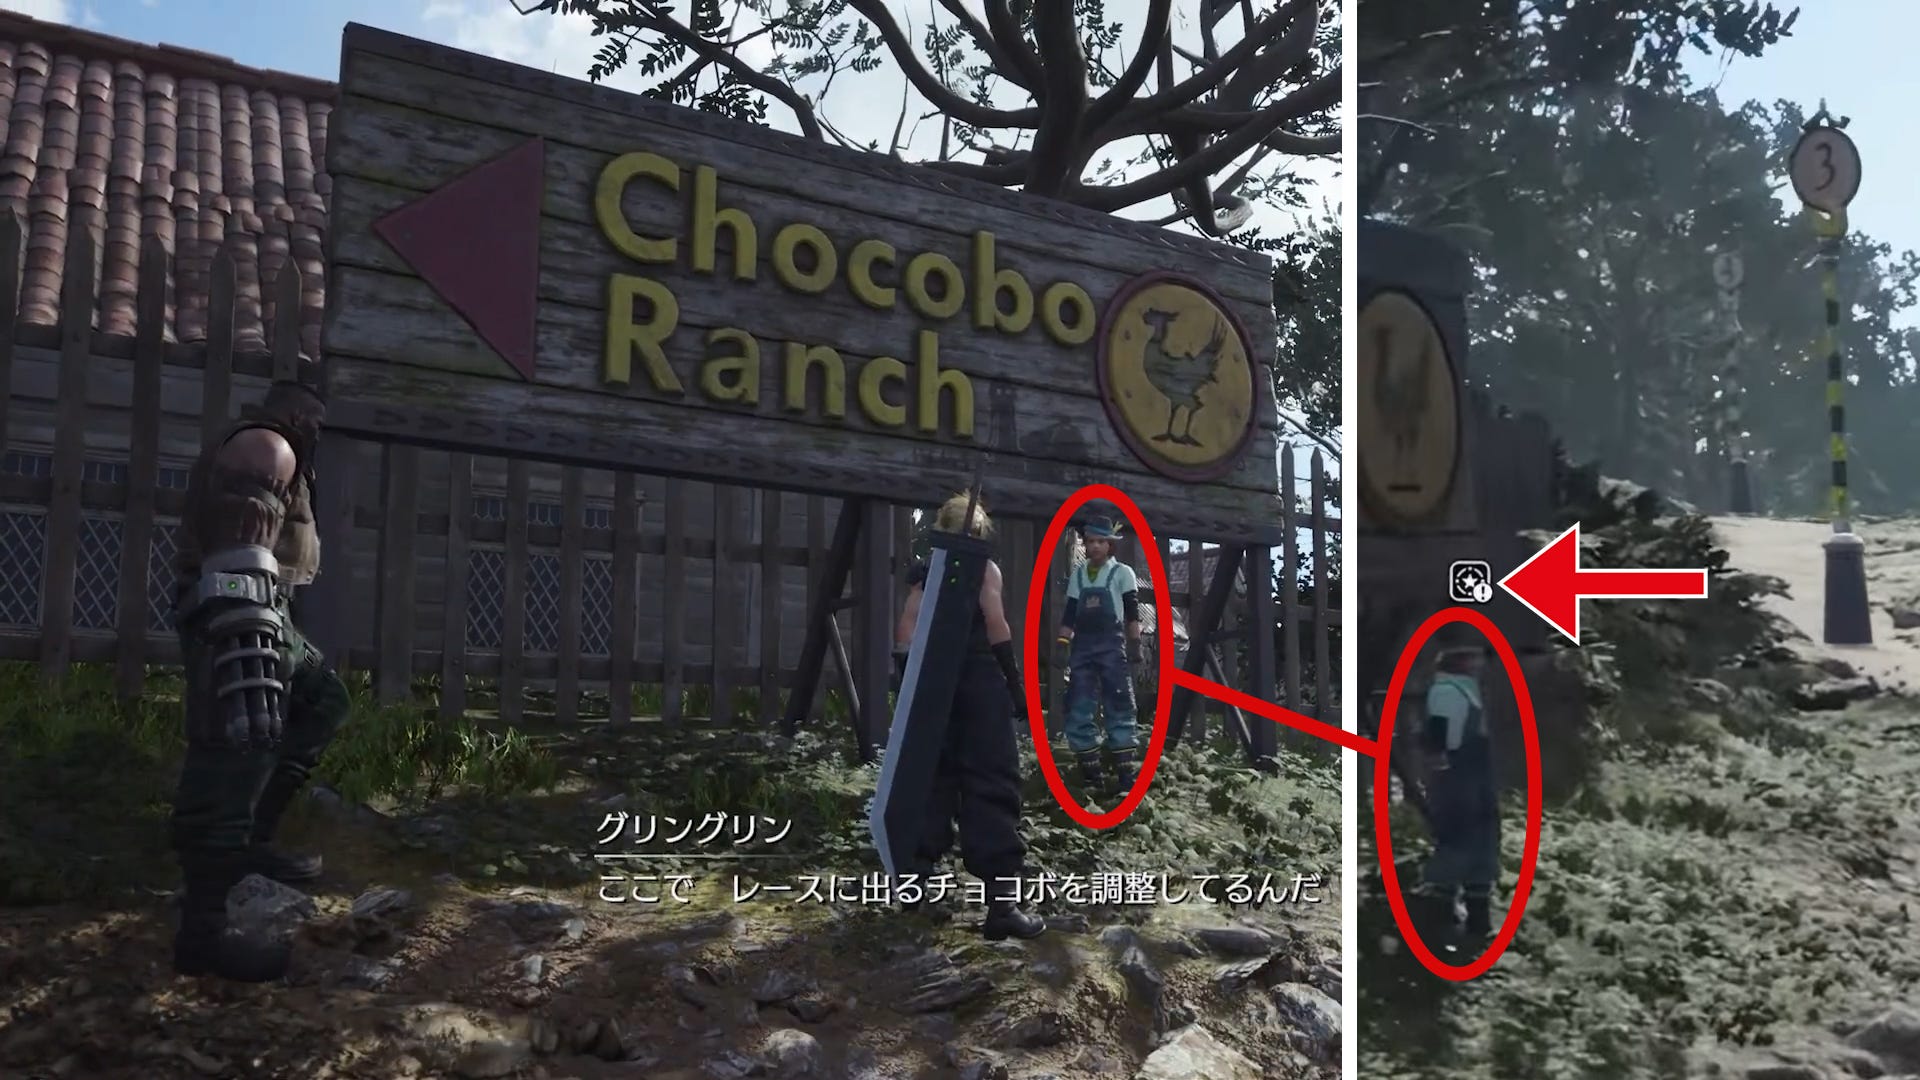
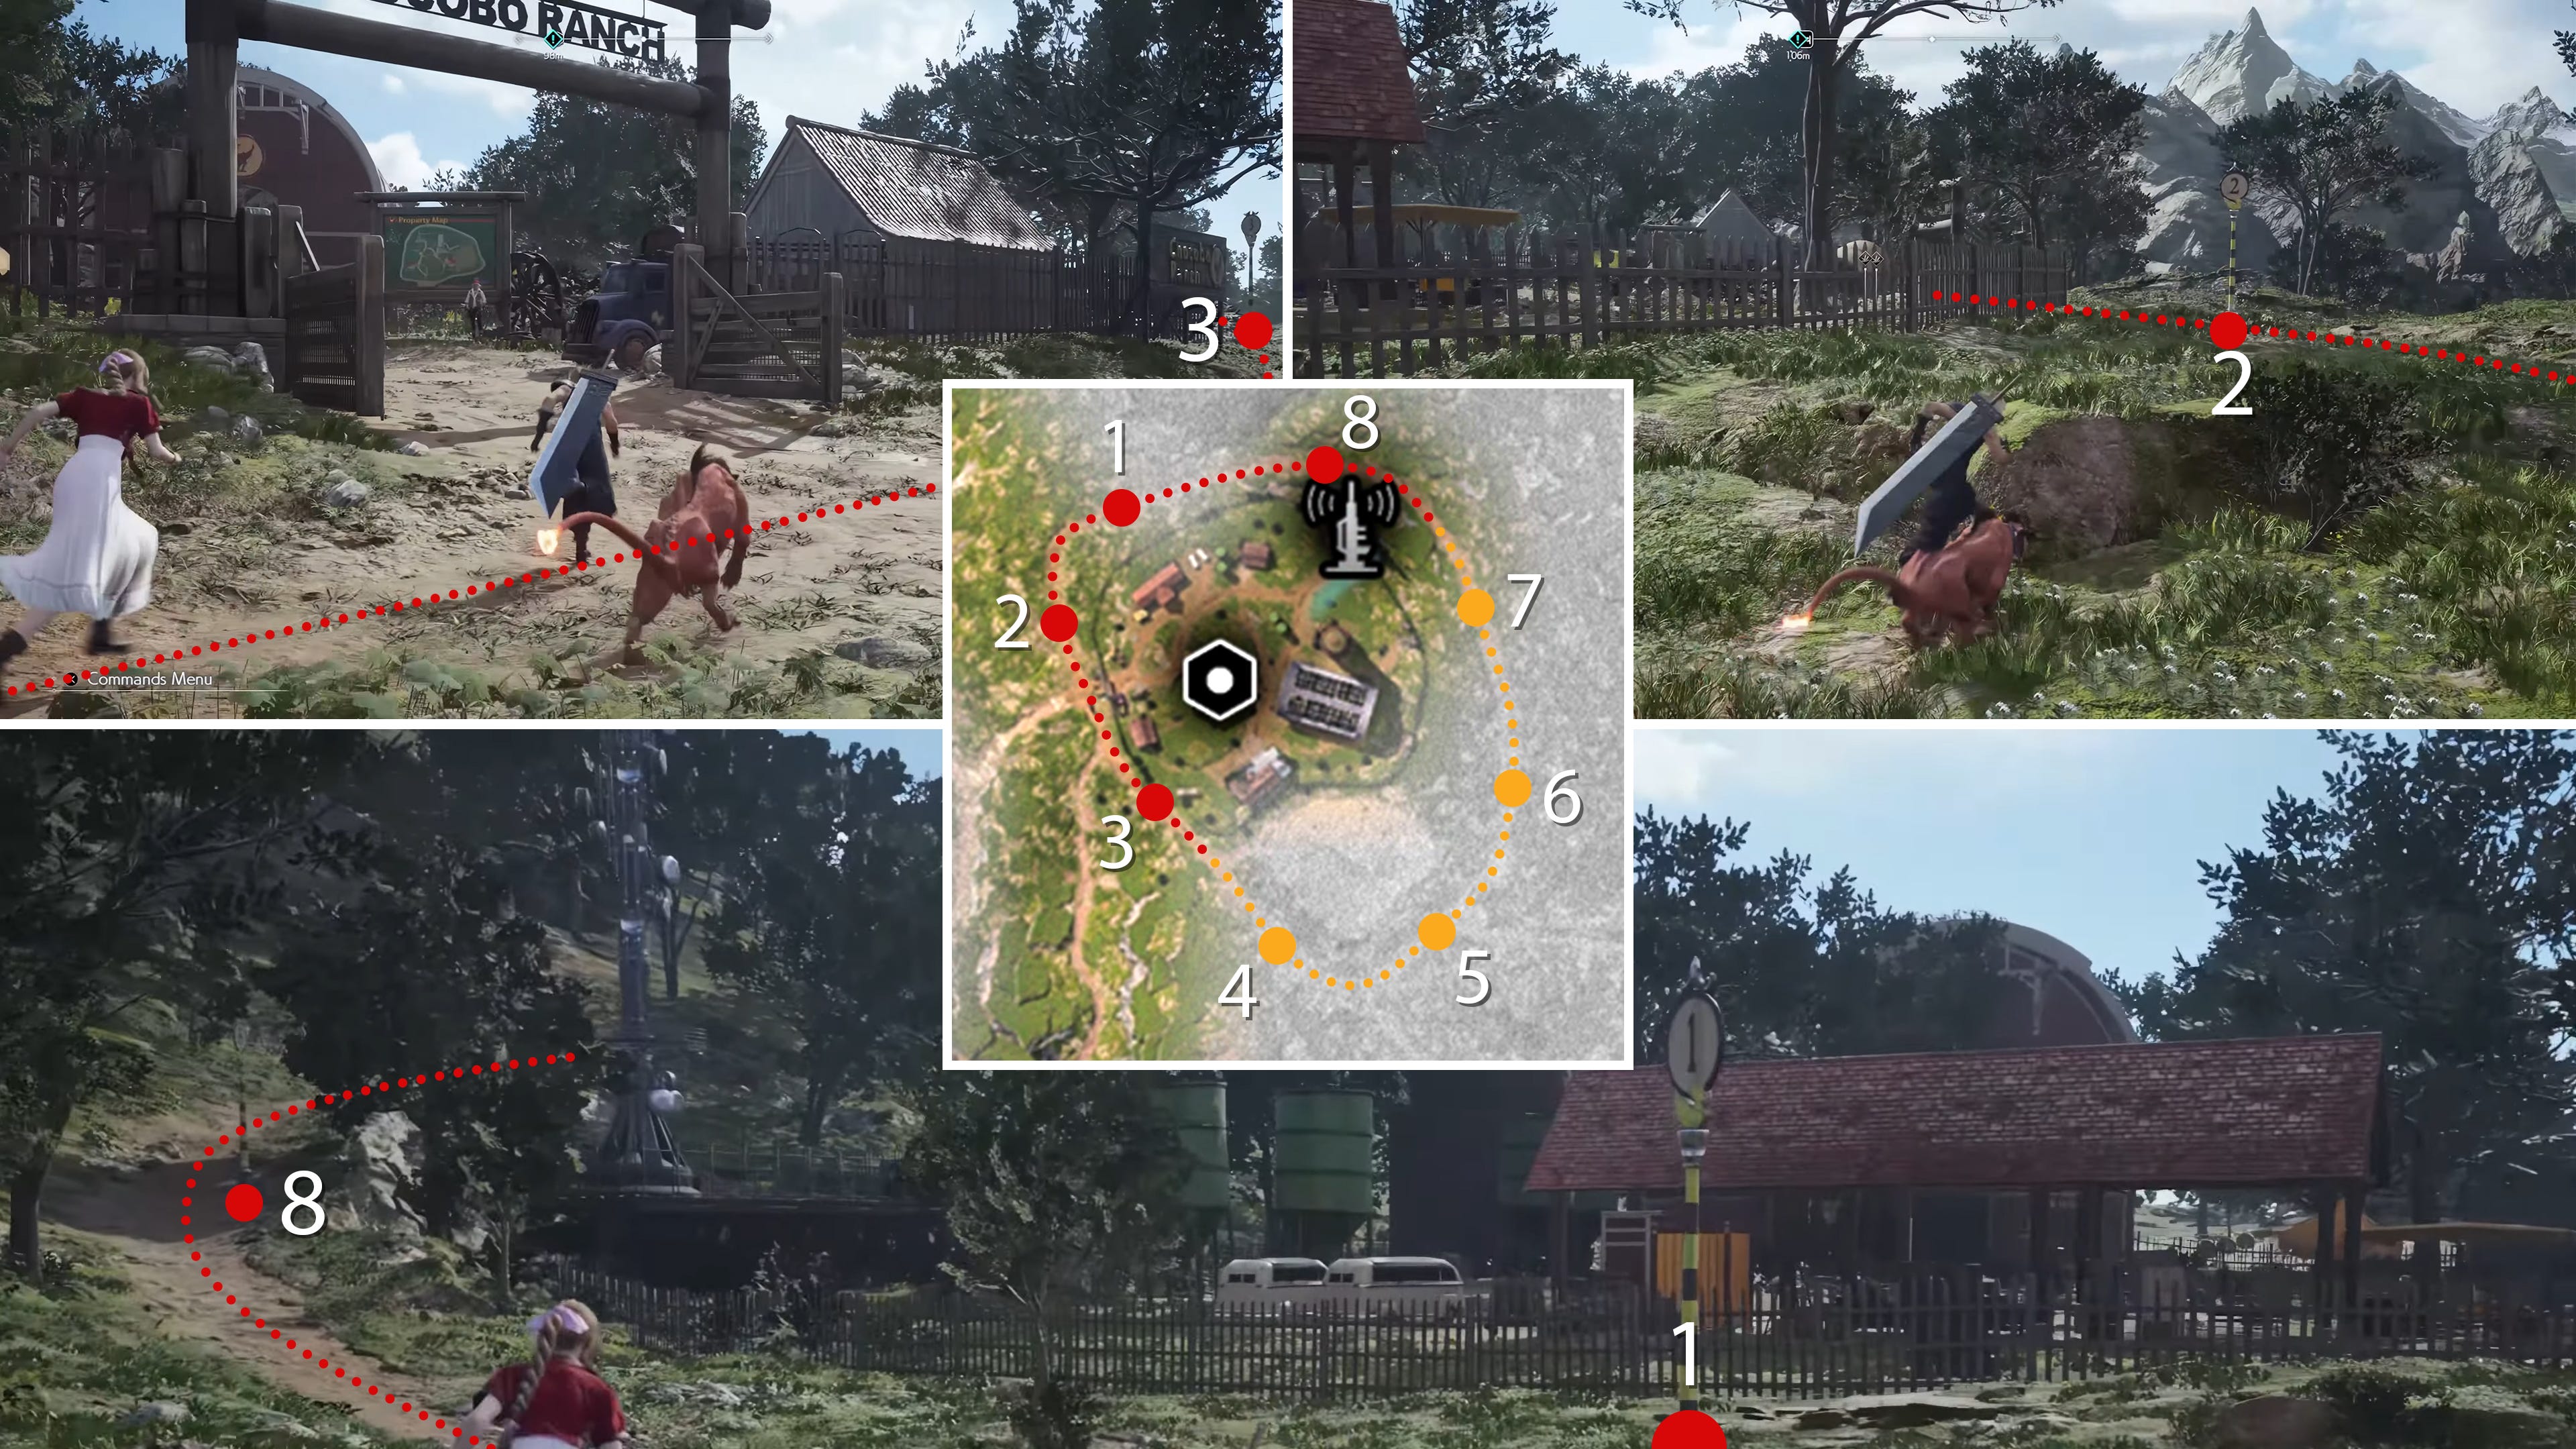
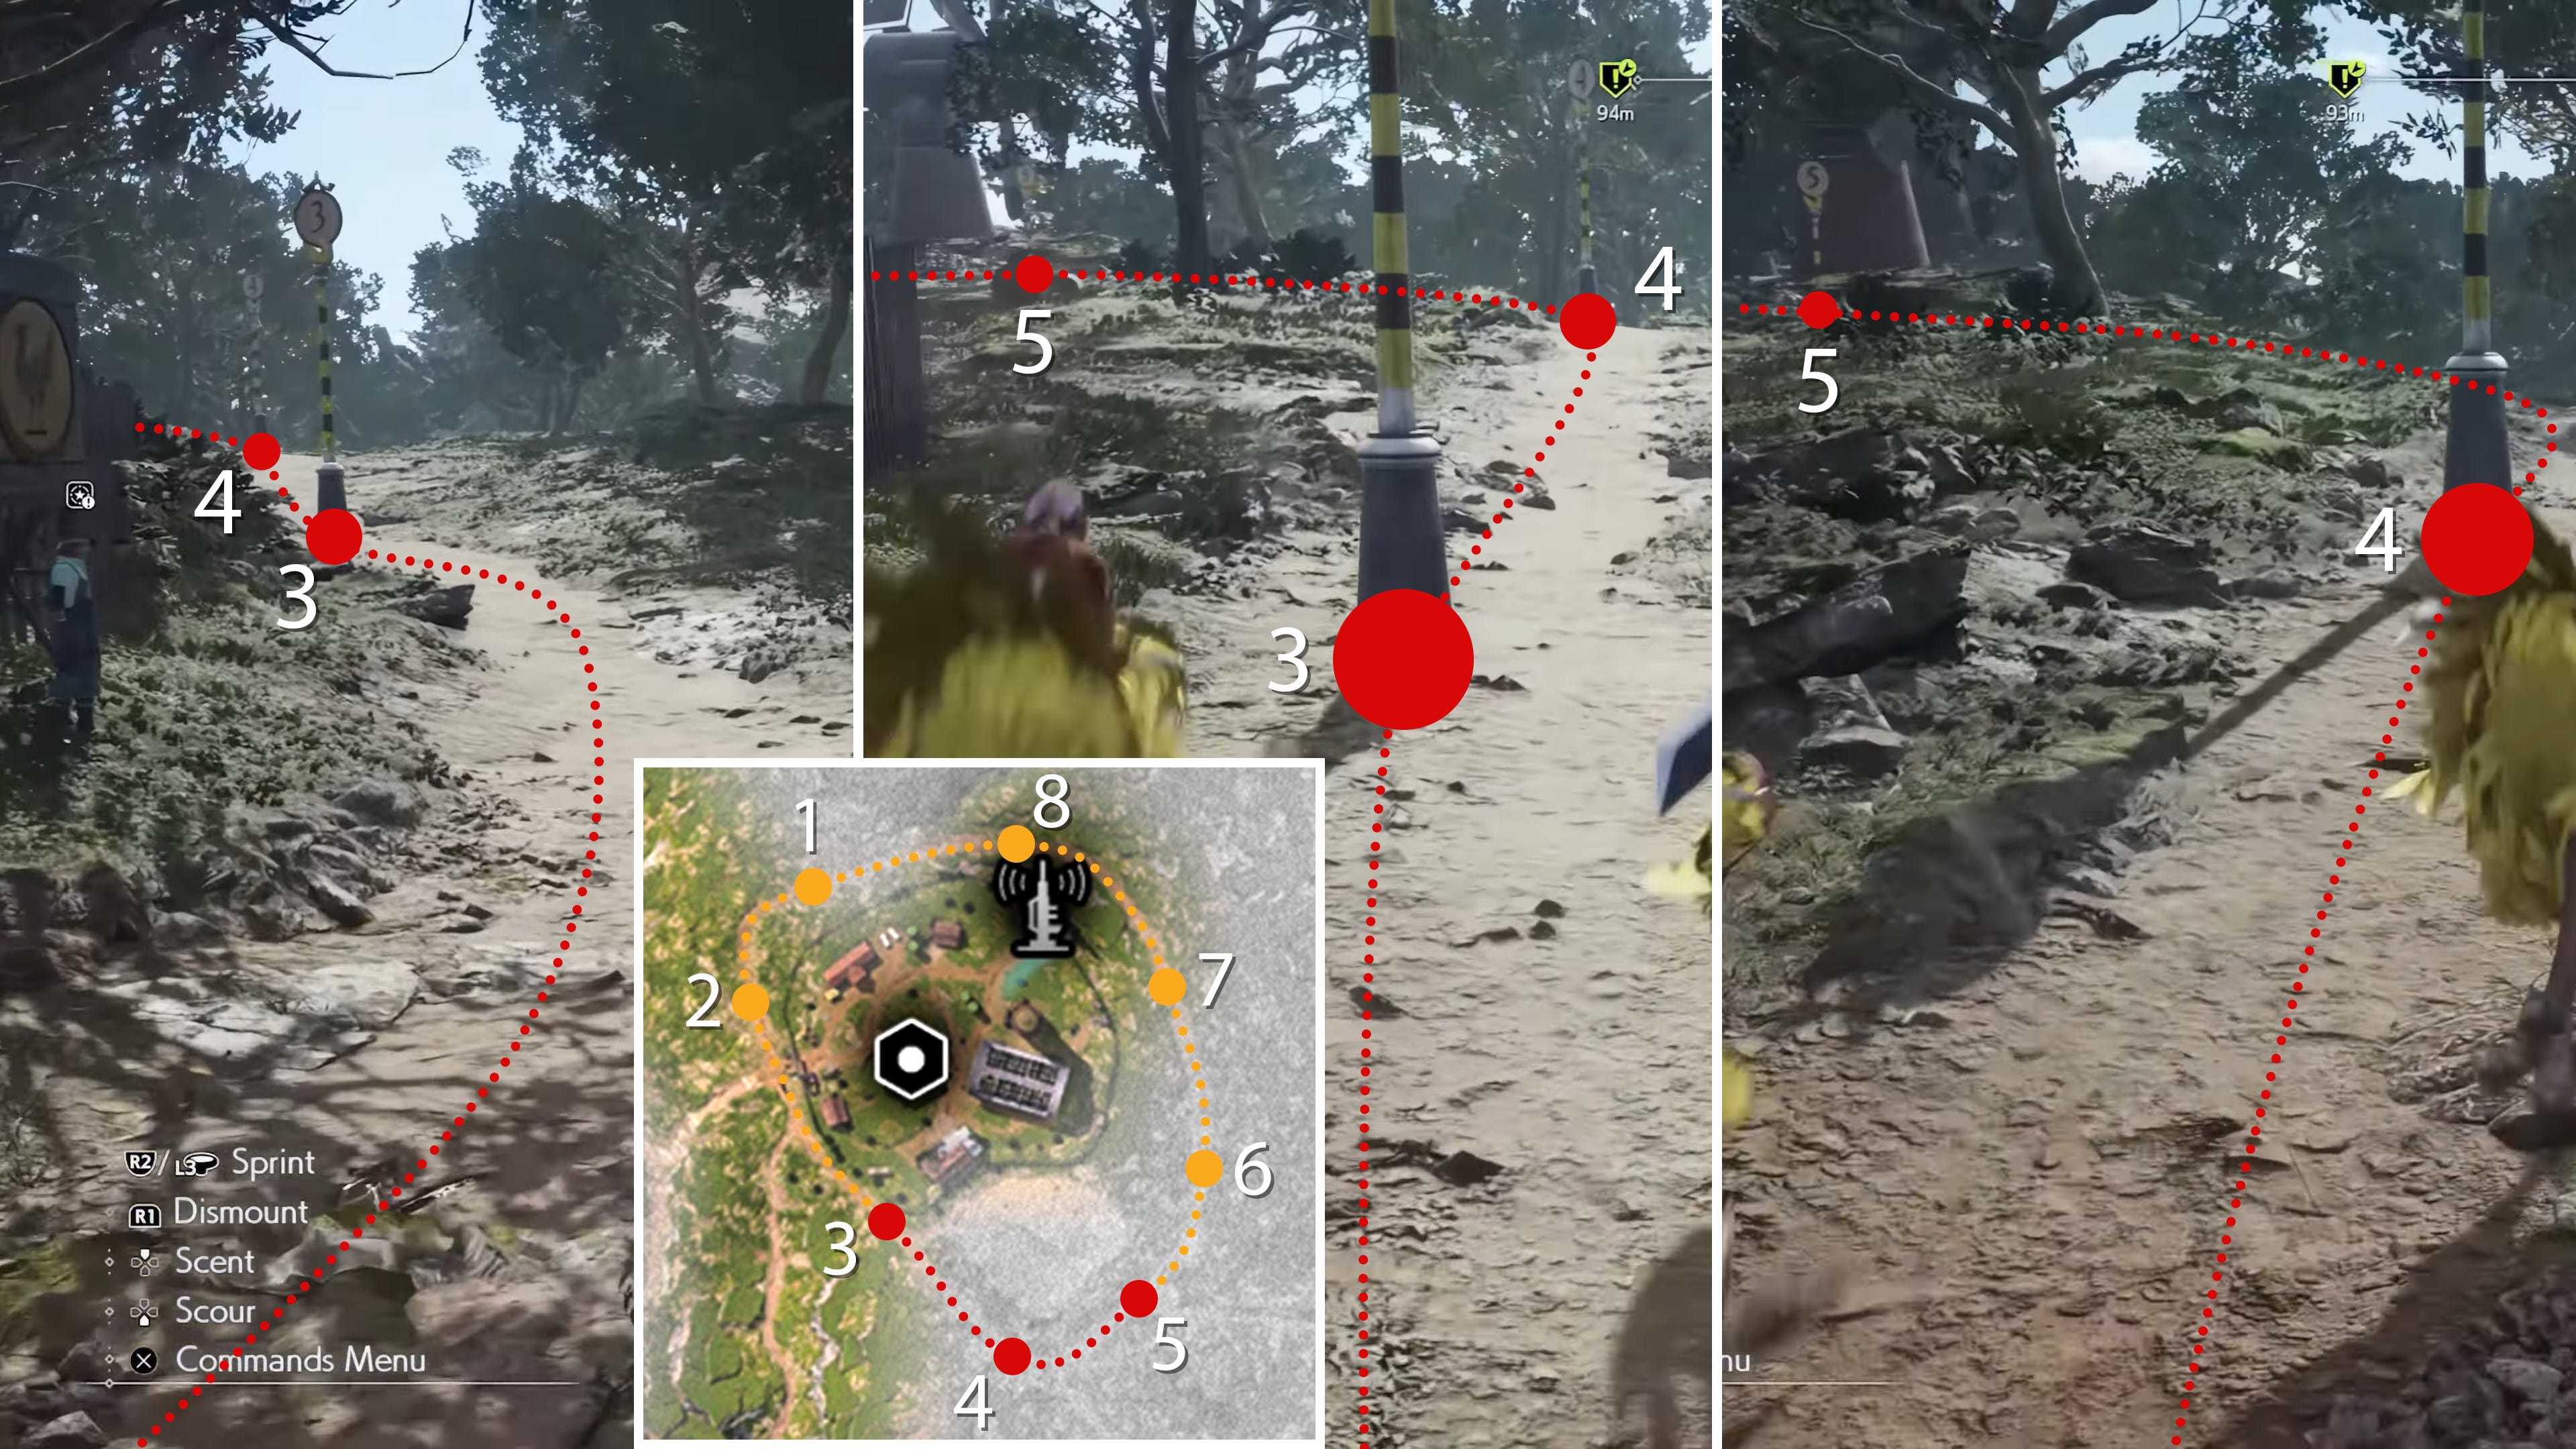
Then you’re positioned close to the checkpoint pole number 1. After a countdown usual for such time attack modes or even races, we then need to sprint from one checkpoint to the next in ascending order from 1 all the way to 8, maybe even back to 1 after that. Incidentally, this time trial race track leads all the way around the Chocobo Ranch according to checkpoints 1 through 5 and 8. Unfortunately, I wasn’t able to find footage showing checkpoint 6 and 7, but the others should amount to enough evidence. Have a look at the images below to see where those checkpoints are located, how they are positioned in relation to each other, and how the whole race track looks on the map.


Rules & Goal
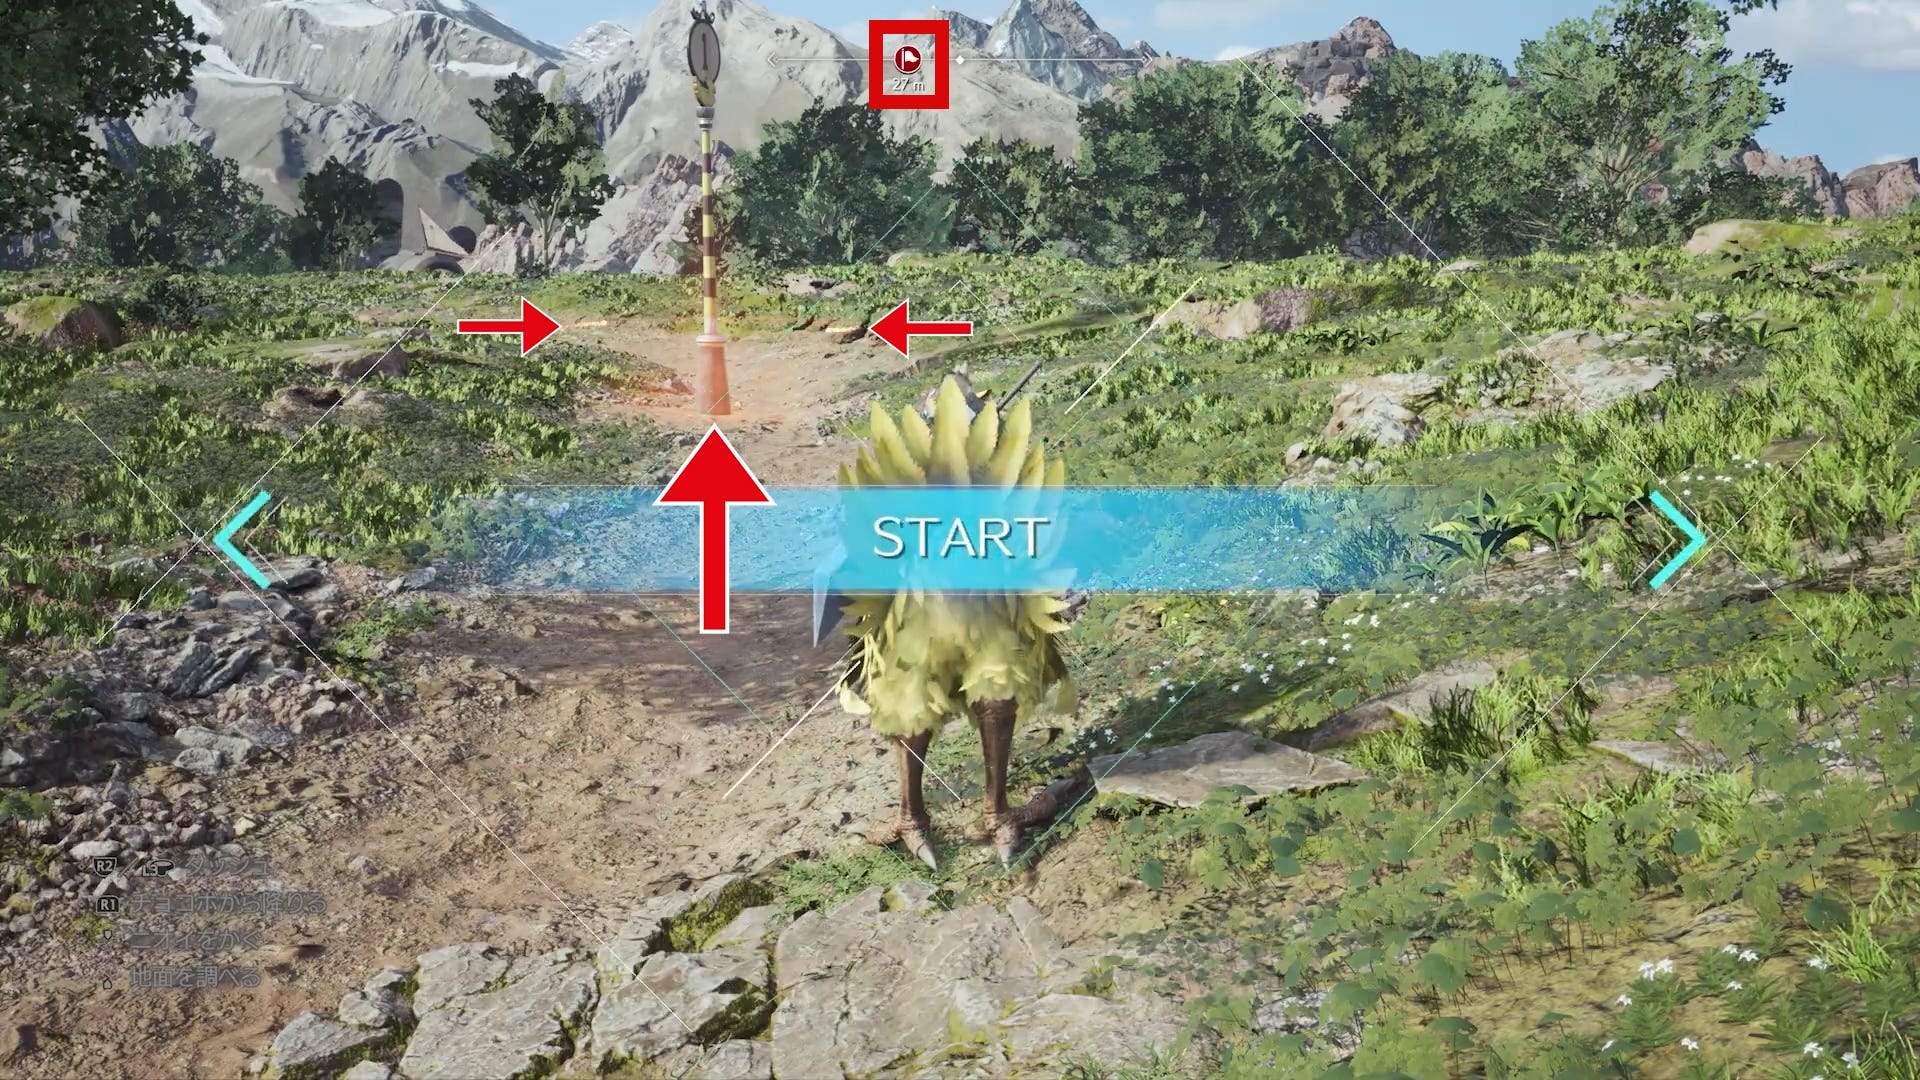
There are two more changes to existing elements and those are the circular glow around not yet passed checkpoint poles and the checkpoint icon on the compass at the top, which contains no other icons for the duration of the trial.
When the trial starts, new UI elements are displayed: the timer, your overall best time—which is non-existent during the first try—and the number of passed checkpoints including the maximum number. After passing the first checkpoint, a new time appears below that to show you the timestamp at the previous checkpoint. It’s also possible that the best time above does not show you the total time but the best time at your current checkpoint, complementing your current time below.

And that’s it! Race past all checkpoints along the ideal line and top your own best score. We can only imagine what reward we receive for meeting certain times, if there will be obstacles on higher difficulties, whether other Chocobo Ranches in other regions also provide such a time trial challenge, and if those will include other chocobos’ abilities like scaling walls, flying, or speeding across water. Let’s hope it’s more involved than just running past those same eight checkpoints around the Grassland’s Chocobo Ranch as fast as possible over and over. I have not seen or heard anybody talk about any checkpoint poles or Chocobo Time Trial icons in the Junon region demo, though it’s possible that those reside beyond the spatial confines of the demo. February 29th cannot come soon enough.
Piano Performance
This next minigame tickles my rhythm game itch that hasn’t been satisfied ever since the era of Guitar Hero and Rock Band games.17 Instead of merely learning a melody and being able to jam around a bit with a very limited note spectrum, Piano Performance has grown into a full-on rhythm game with a multitude of in-game themes to play along to. We also get a glimpse of Tifa’s childhood room and a dining hall somewhere in Costa Del Sol.18 But one thing at a time.
The official description of this minigame can be found in the a blog post on Square Enix’s Website about Rebirth’s world:
After obtaining a piece of sheet music, head to a piano and try your hands at performing it. These pieces feature music from the game, with some proving to be quite the challenge. If you would rather improvise, however, you can perform original music in the free play mode.
This description alone greatly exceeds the original version’s scope of this minigame. But before we dive into the mechanics of this vastly enhanced minigame and everything surrounding it, let’s first recall how it worked and what it offered in the original game.
Keys to Final Heaven
During the Flashback to the Nibelheim incident, you can visit Tifa’s house and even her bedroom. Besides looking through her drawers and reading the letters she received from the one of the other boys who left for Midgar a few years prior, you can also decide to play the piano. Select “Yeah, I jammed on it“ to freely play around to your hearts’ content (selecting “I forgot“ afterwards displays the button layout) or select “Just a little“ to have Cloud automatically play the notes on the sheet music resting on the piano, which combine into the first thirteen notes of Final Fantasy VII’s Main Theme.


This is the same tune you must play yourself on this very same piano after Cloud regains his true memories with Tifa’s help. Doing so reveals a hidden letter from Zangan and his last training manual for Tifa which contains instructions for her level 4 Limit Break Final Heaven. You can also interact with the Piano three times during the first current-day visit to find Tifa’s hidden savings of 1 gil or returning with Tifa as the party leader while searching for Cloud to find an Elemental Materia, but only if Cloud jammed on it during the flashback.
Speaking of jamming, the controls for playing yourself are quite simple and thus very limiting. On the PlayStation, you use the four face buttons (cross, square, triangle, and circle) alone and in combination with either of the bumper buttons L1 and R1 to play all 7 notes of the C major tonal scale plus the higher octave of the base tone (Do Re Mi Fa So La Ti Do). This is what you need to repeat the beginning of FFVII’s Main Theme. Besides that, you can also play the following three major triad chords: C, F, and G, plus the higher octave version of the C chord. Those merely exists for fun, though, and are not utilized for anything else.

That’s it for the original version of the piano minigame. While Cloud claims to be able to read sheet music in the original game, he seems to have grown into quite the master pianist in Rebirth.
Cloud the Master Pianist

When comparing the two versions, old and new, we can make out many similarities, although it is now not just limited to the first thirteen notes of Final Fantasy VII’s Main Theme and limited freestyle jamming. On the contrary. As mentioned before, it was turned into a full-on rhythm game. Cloud will most likely be able to sit down in front of any piano in any town and jam away. There are many facets to this minigame, so let’s go through them one by one.
Main Controls
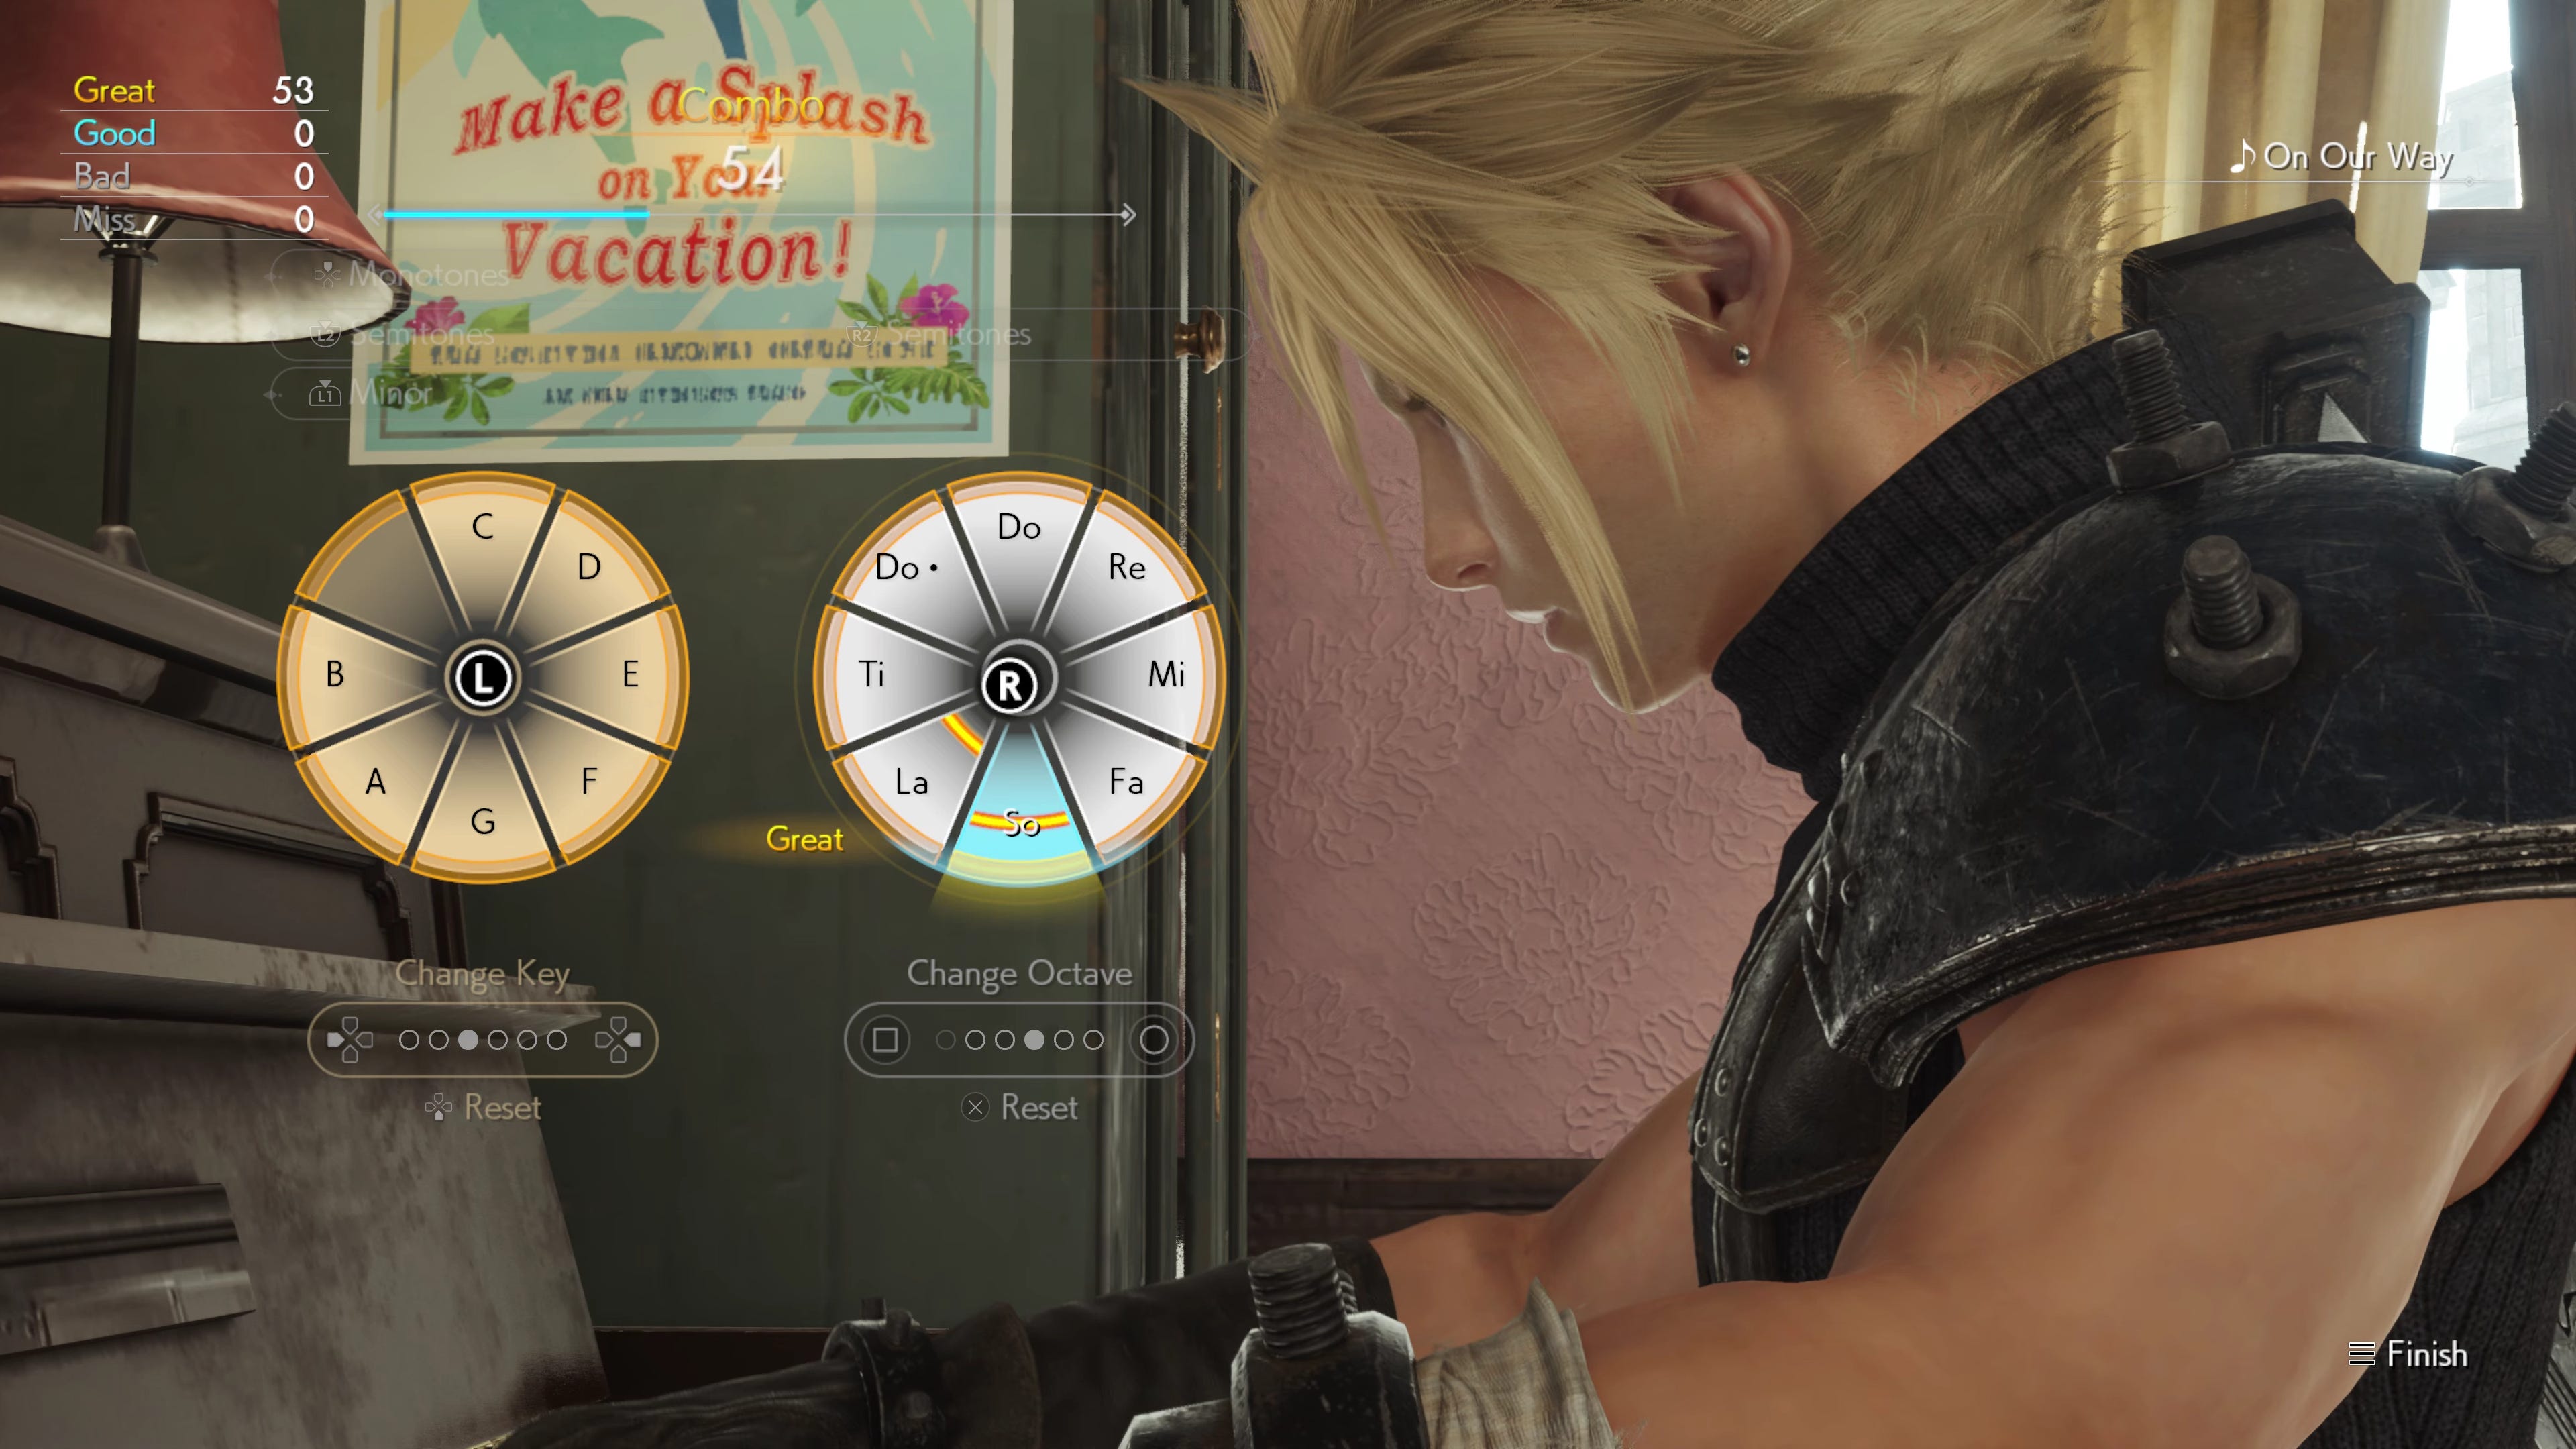
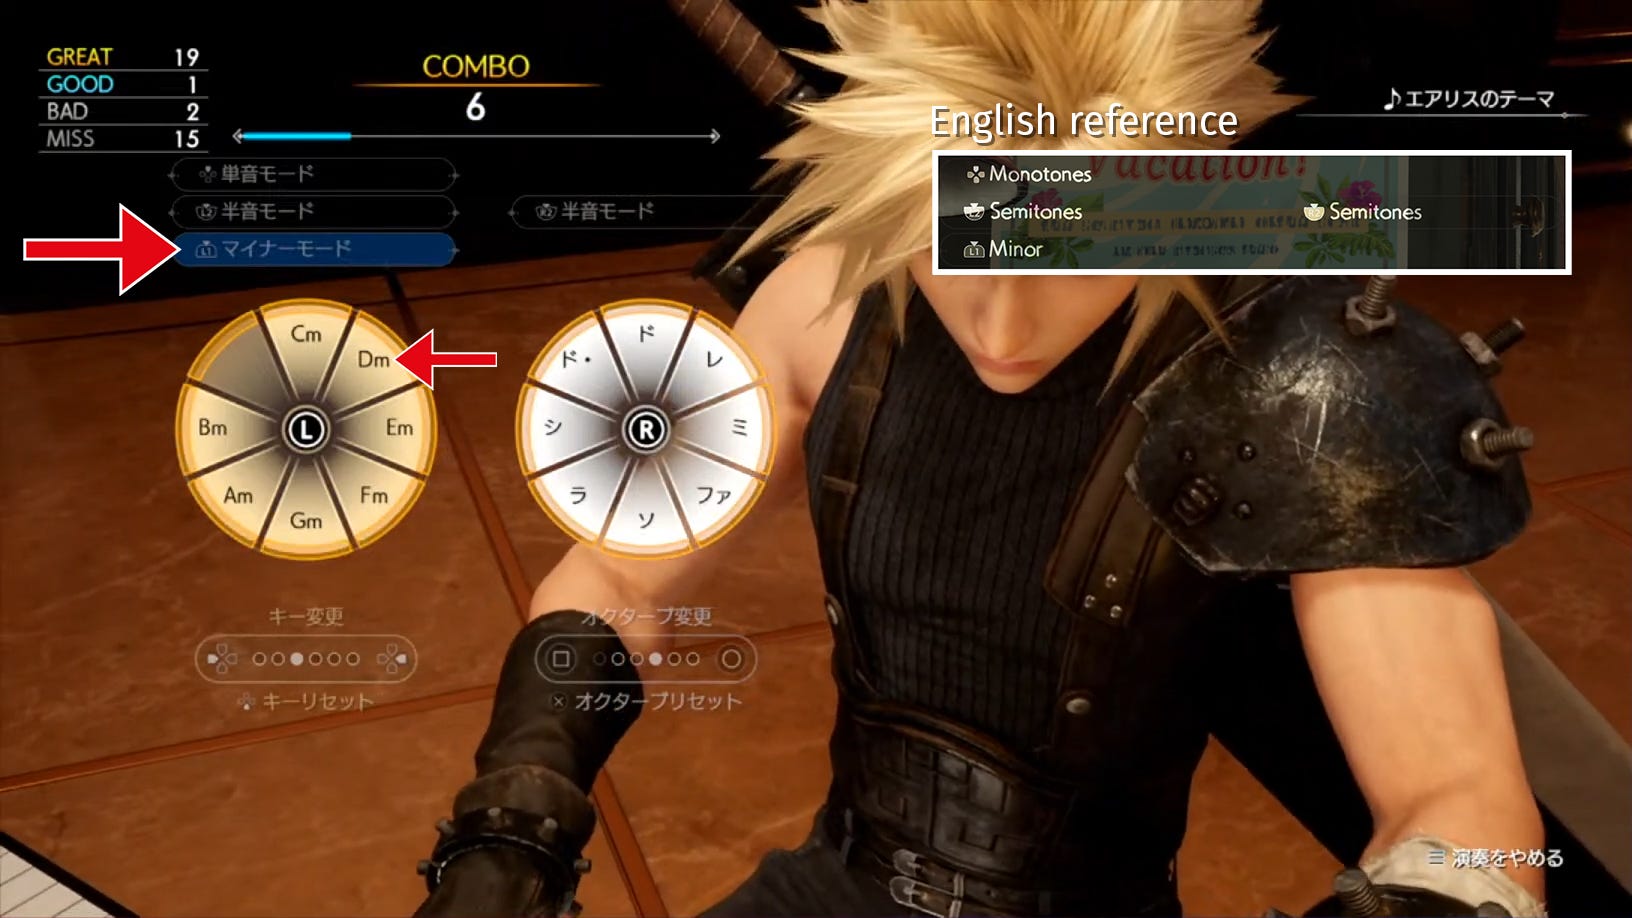
Playing notes is not much different than in the original game besides using the analogue sticks instead of a multitude of individual buttons and button combinations. For the left hand, we have the chord wheel, which offers a chord version for all seven base notes of the scale, unlike the original version which only provides three distinct chords. For the right hand, we find the same seven individual notes on the scale plus the octavated base tone Do, mirroring its original counterpart.
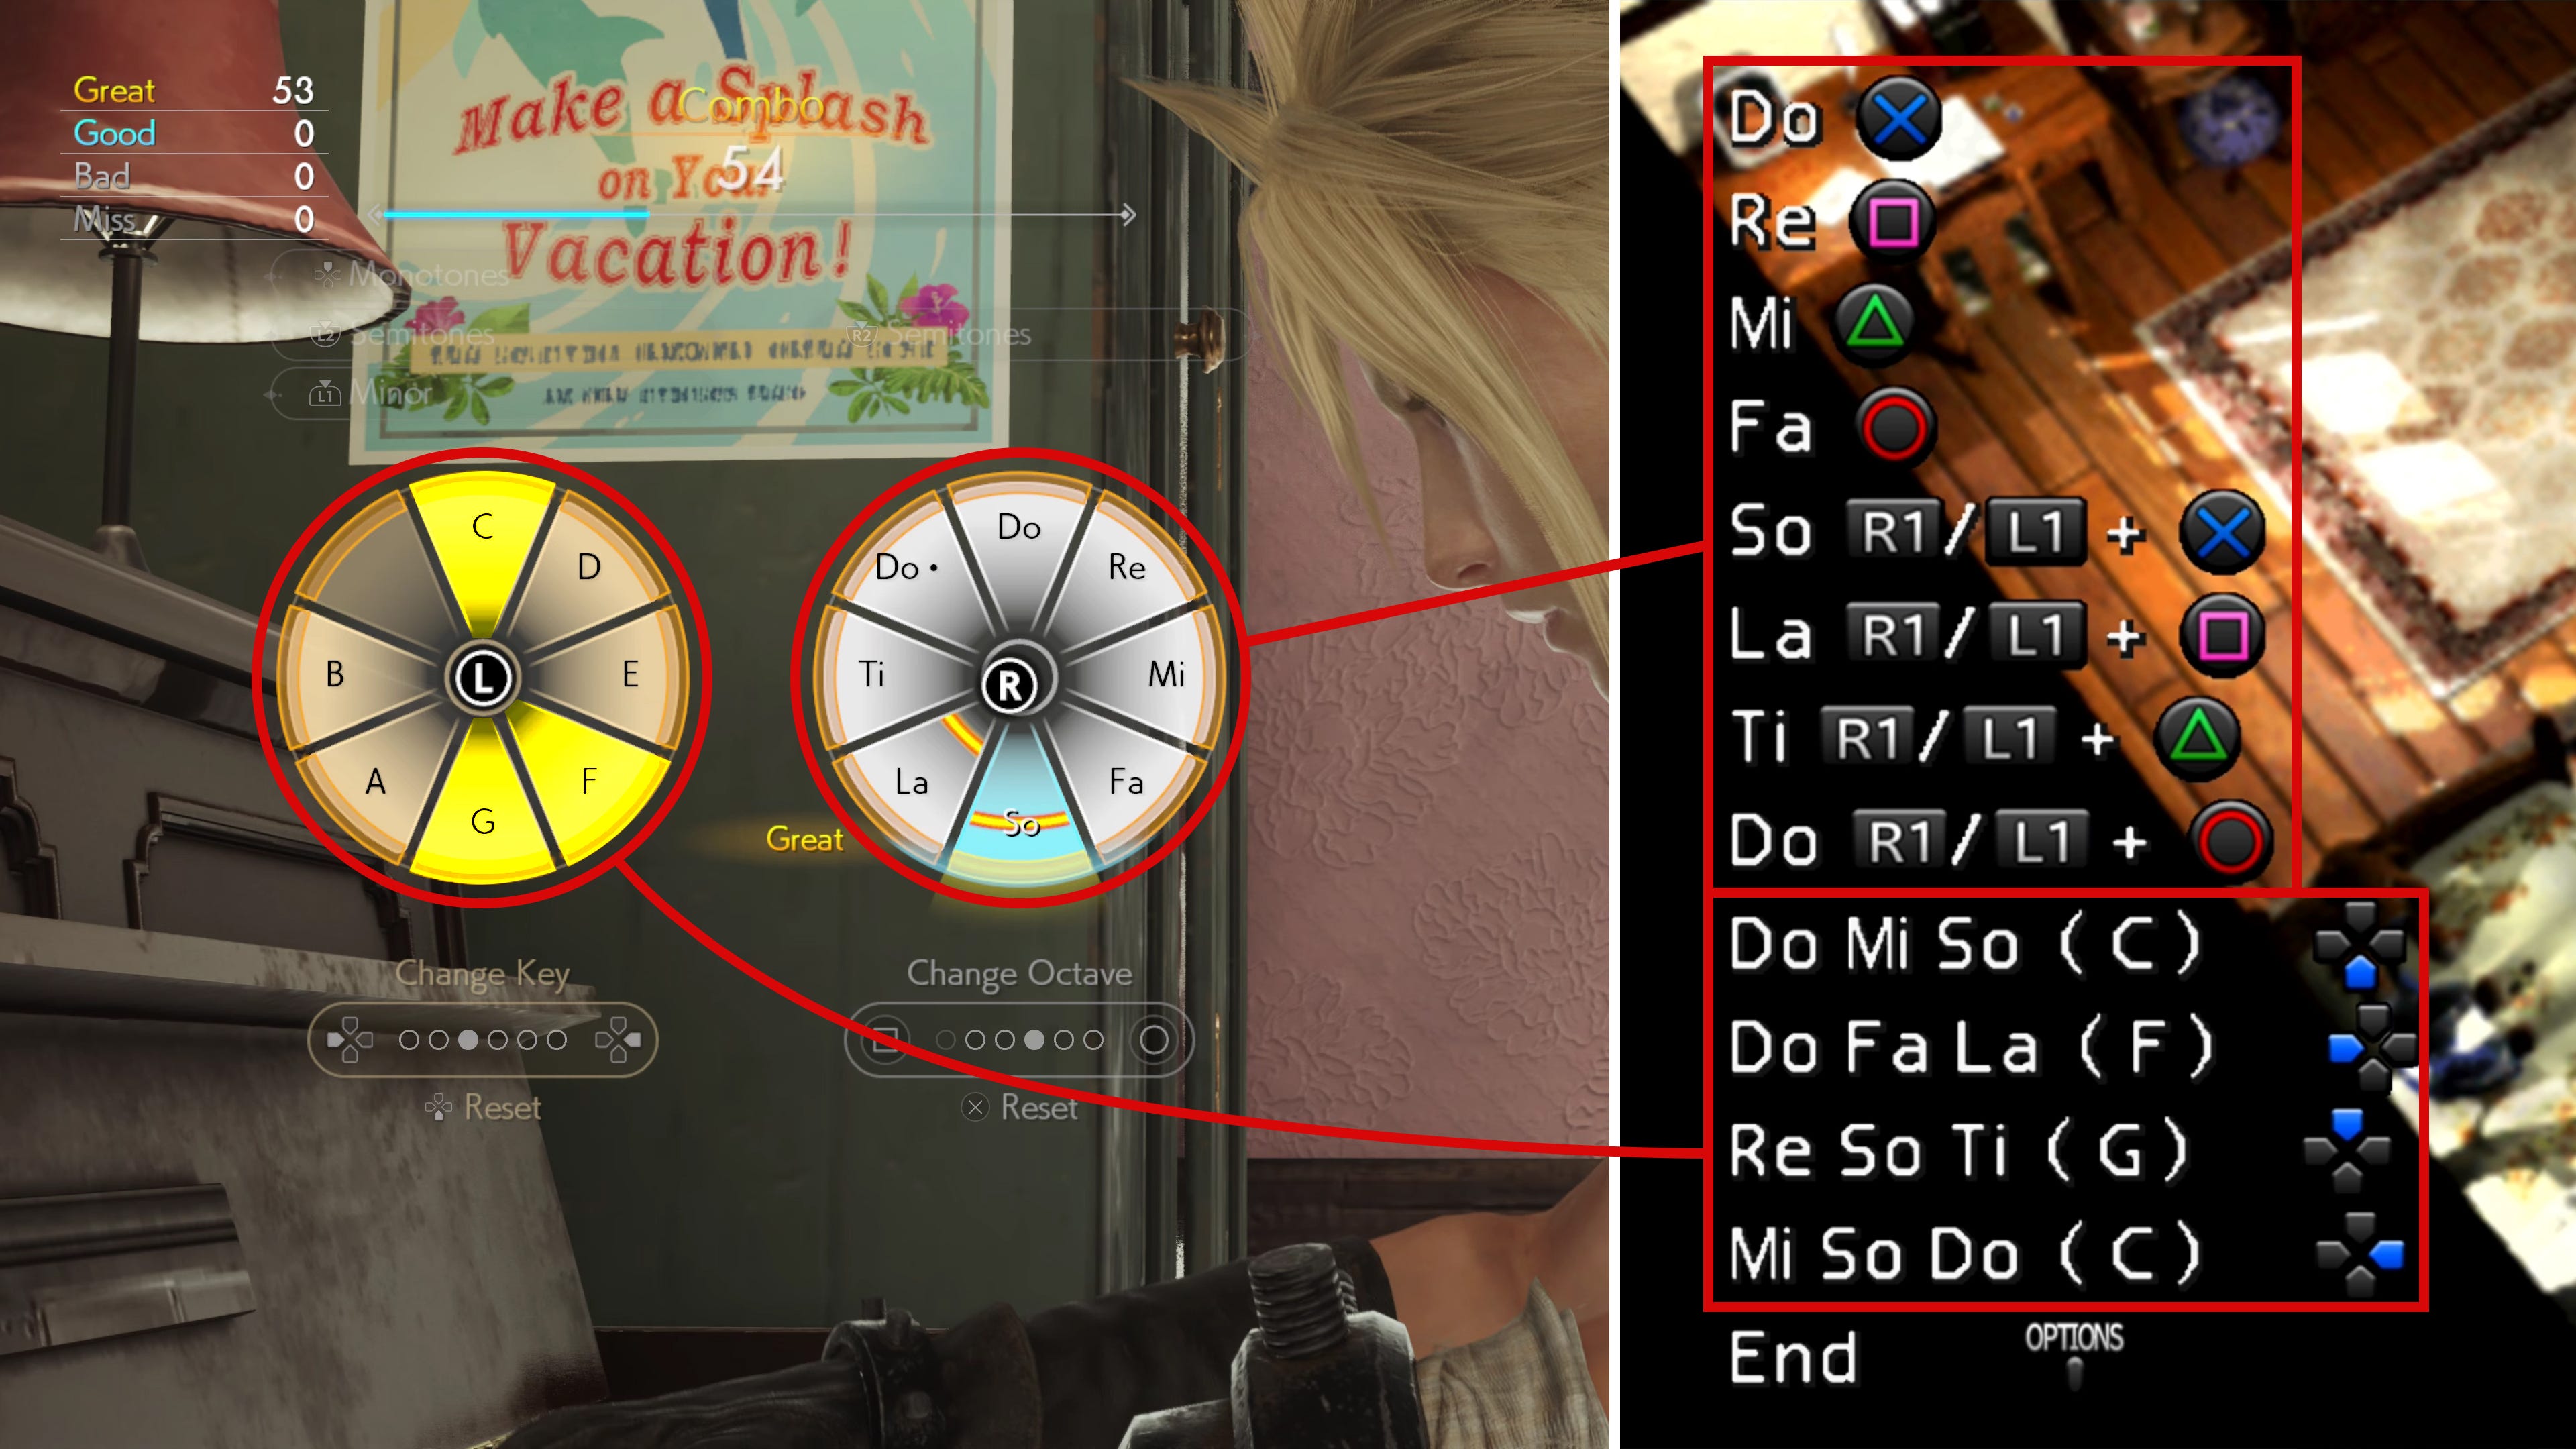
To play a note or chord, you simply need to tilt the right or left analogue stick into the direction of the desired note or chord and Cloud will actually hit the correct keys on the piano to play the chord with his left and the single note with his right hand as seen below. In action, however, Cloud’s movements are random, though the key press animations do represent the notes you hit.
Options
On top of that, the reborn version offers a myriad of options for allowing to play most types of chords and individual notes. The top options are barely visible in the English screenshot, so I edited the image to make the text readable for those not proficient in the Japanese language. Fortunately, the legibility of the options at the bottom is already provided.
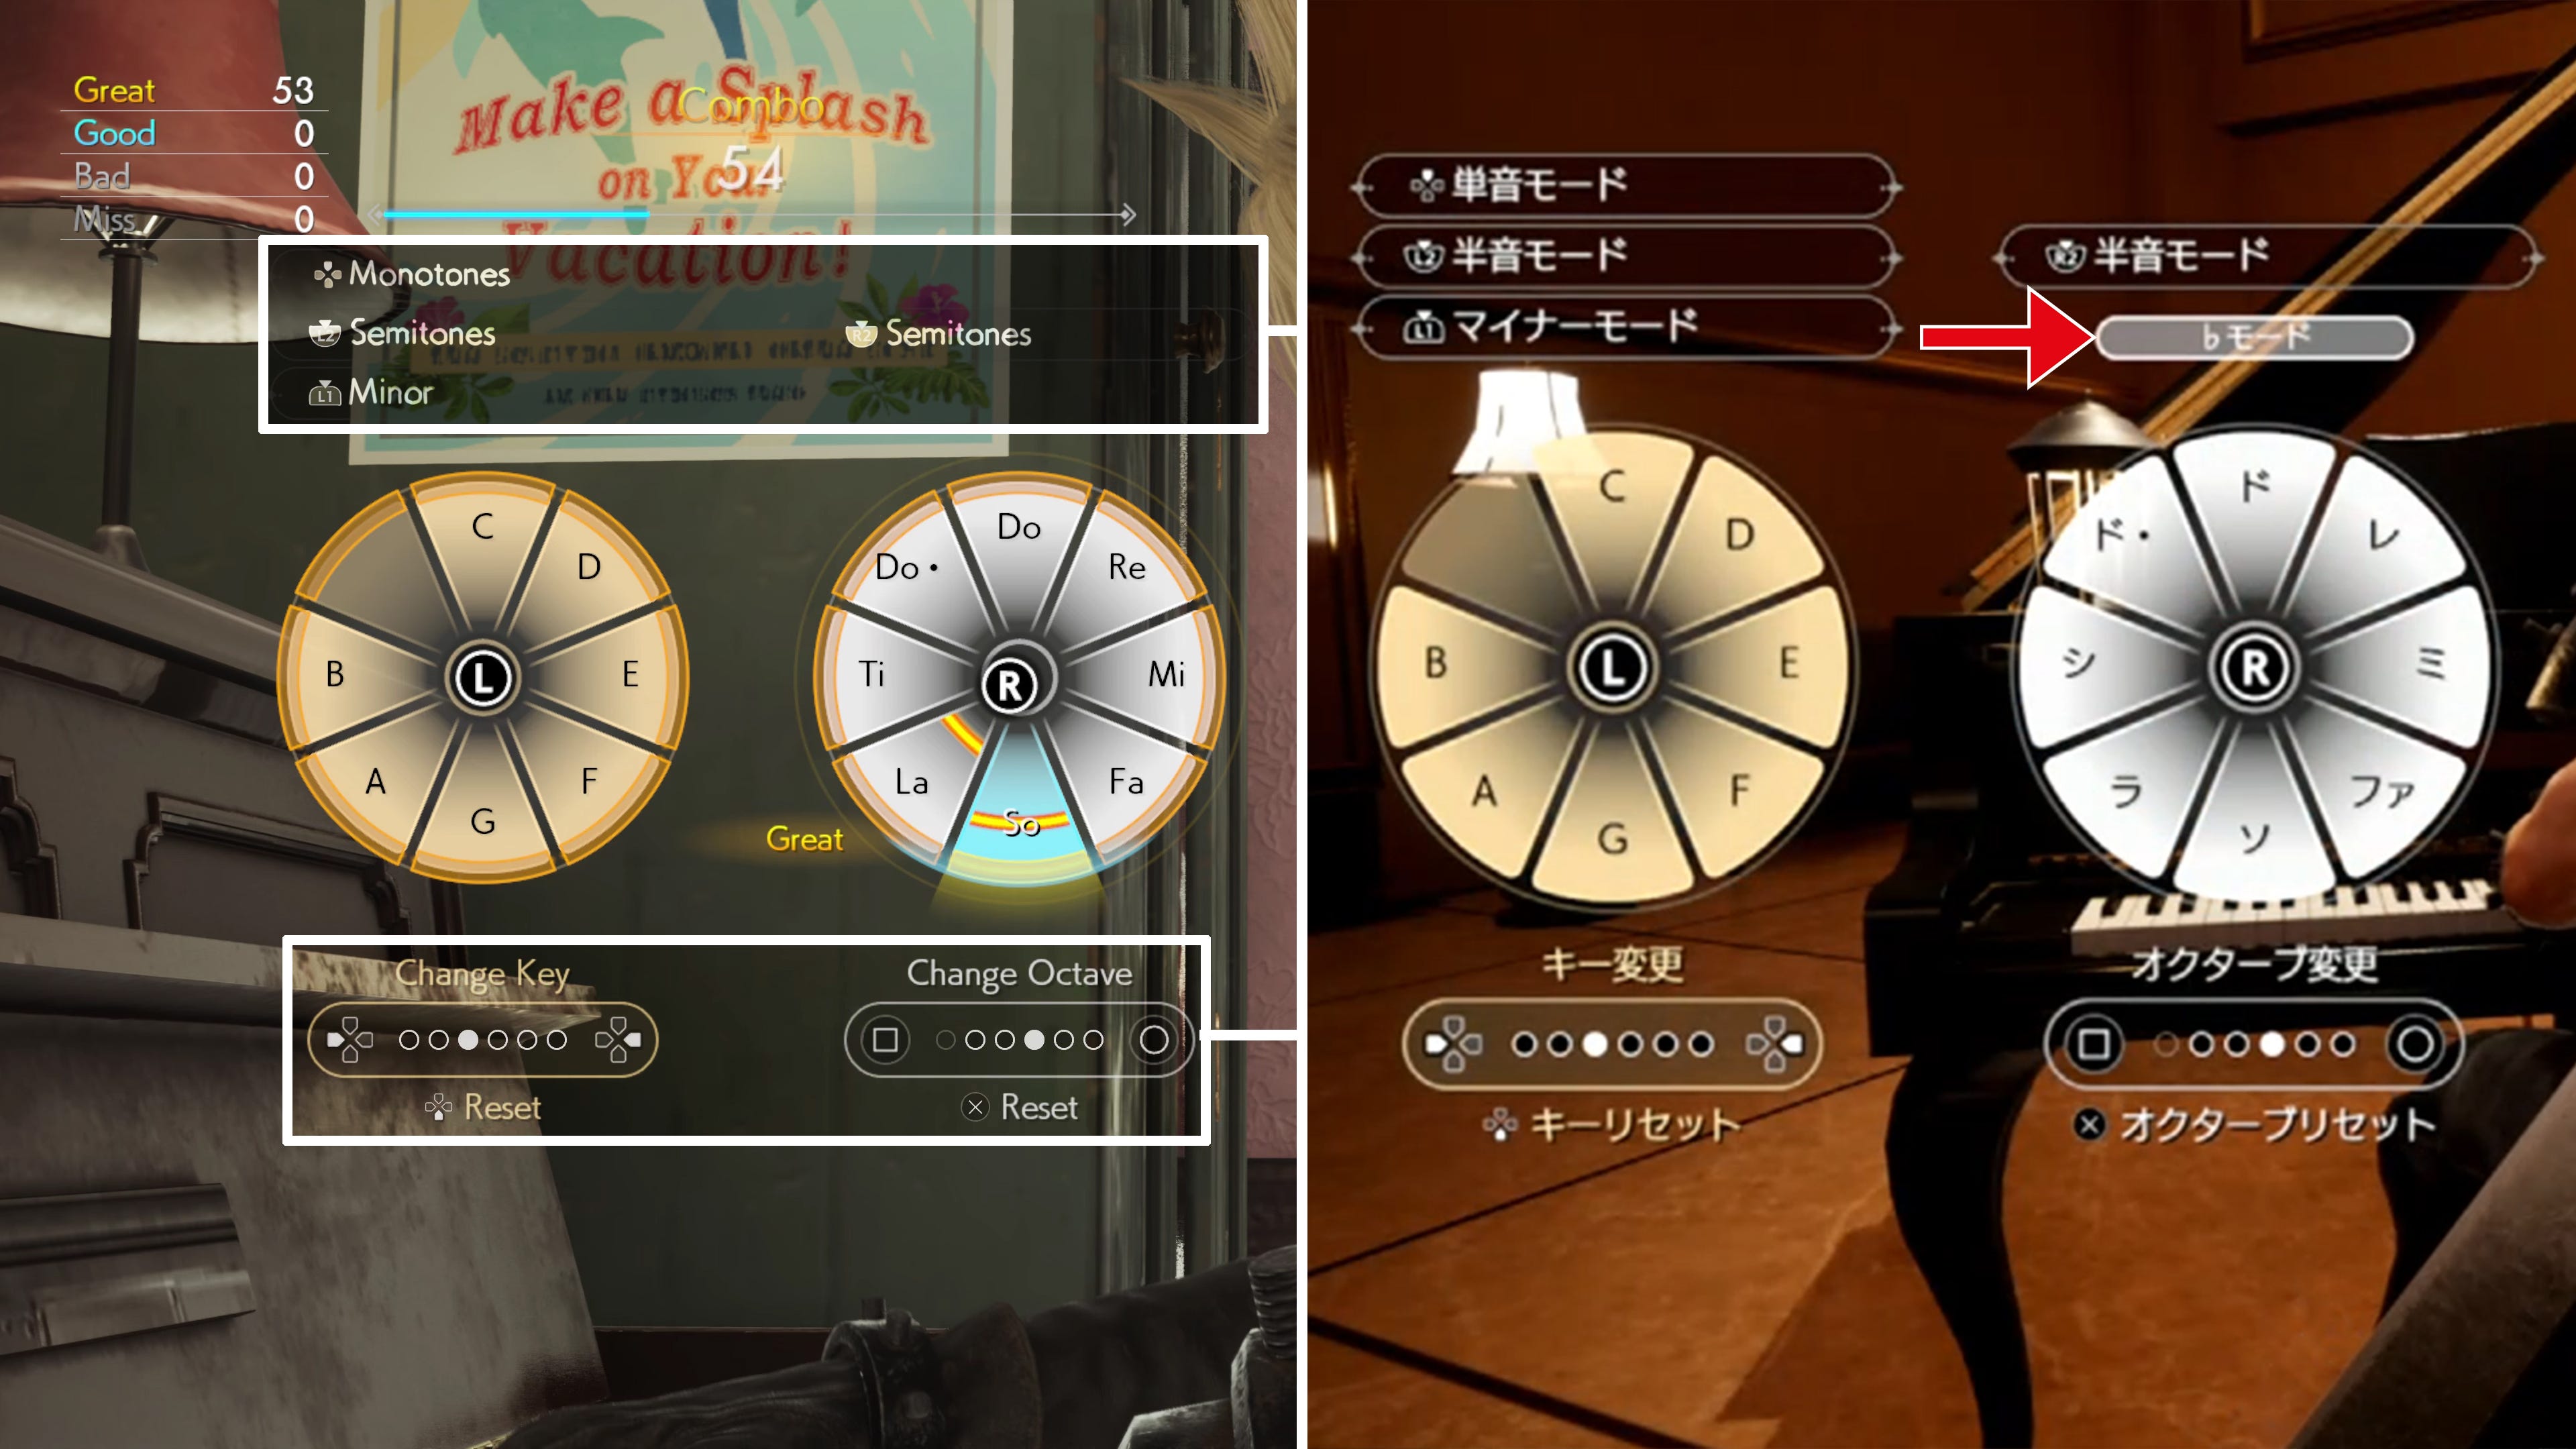
Let’s start from the top, which is seemingly the option with the most question marks attached to it. Pressing up on the directional pad apparently switches to monotones. I think that this is a mistranslation as the Japanese term 単音モード translates to “monophonic mode.” Monophonic is not the same as monotone. The former describes a melody comprised of only single notes lacking any sort of harmony while the latter is defined as a sound or string of sounds unchanging in pitch and loudness. Monophonic makes thus much more sense.
We haven’t seen this option used in action yet, so we can only speculate, but I assume activating it removes the harmonies from the chord wheel and turns it into just another single-note wheel, allowing you to create your own harmonies by layering only two notes max onto each other compared to normal chords with at least three notes plus the single note from the right wheel. This option is also located on the chord wheel side, so it should only apply to that one. Other than the other top options, it seems to be a toggle and not a holding-down switch.
This is corroborated by the fact that any option button not mapped to a bumper or trigger button cannot be simultaneously used while playing notes as our thumbs will be busy with tilting the analogue sticks. Monophonic mode being a trigger switch is therefore much more feasible.
Next up are the two semitone options activated by holding down the trigger button L2 or R2, as indicated by the small downward-facing triangle on top of each button icon. During certain sections of Noda-san’s performance of Aerith’s Theme, all chords and individual notes receive the sharp (#) suffix which looks like a hashtag and indicates a semitonal increase of the sound while the R2 button is pressed, as seen by the blueish coloring of the R2 option’s background. Since those options are semi-transparent during play, we do not need to care about those buttons and can focus on the analogue sticks. I suppose those options, both above and below, only matter during freestyle mode. More on that in a bit.

L2 on the other hand most likely does the opposite and decreases all chords and individual notes by a semitone, adding the flat (♭) suffix to chord and note descriptors while it’s being pressed. Unfortunately, semitone down is never used during Aerith’s Theme in the showcase.
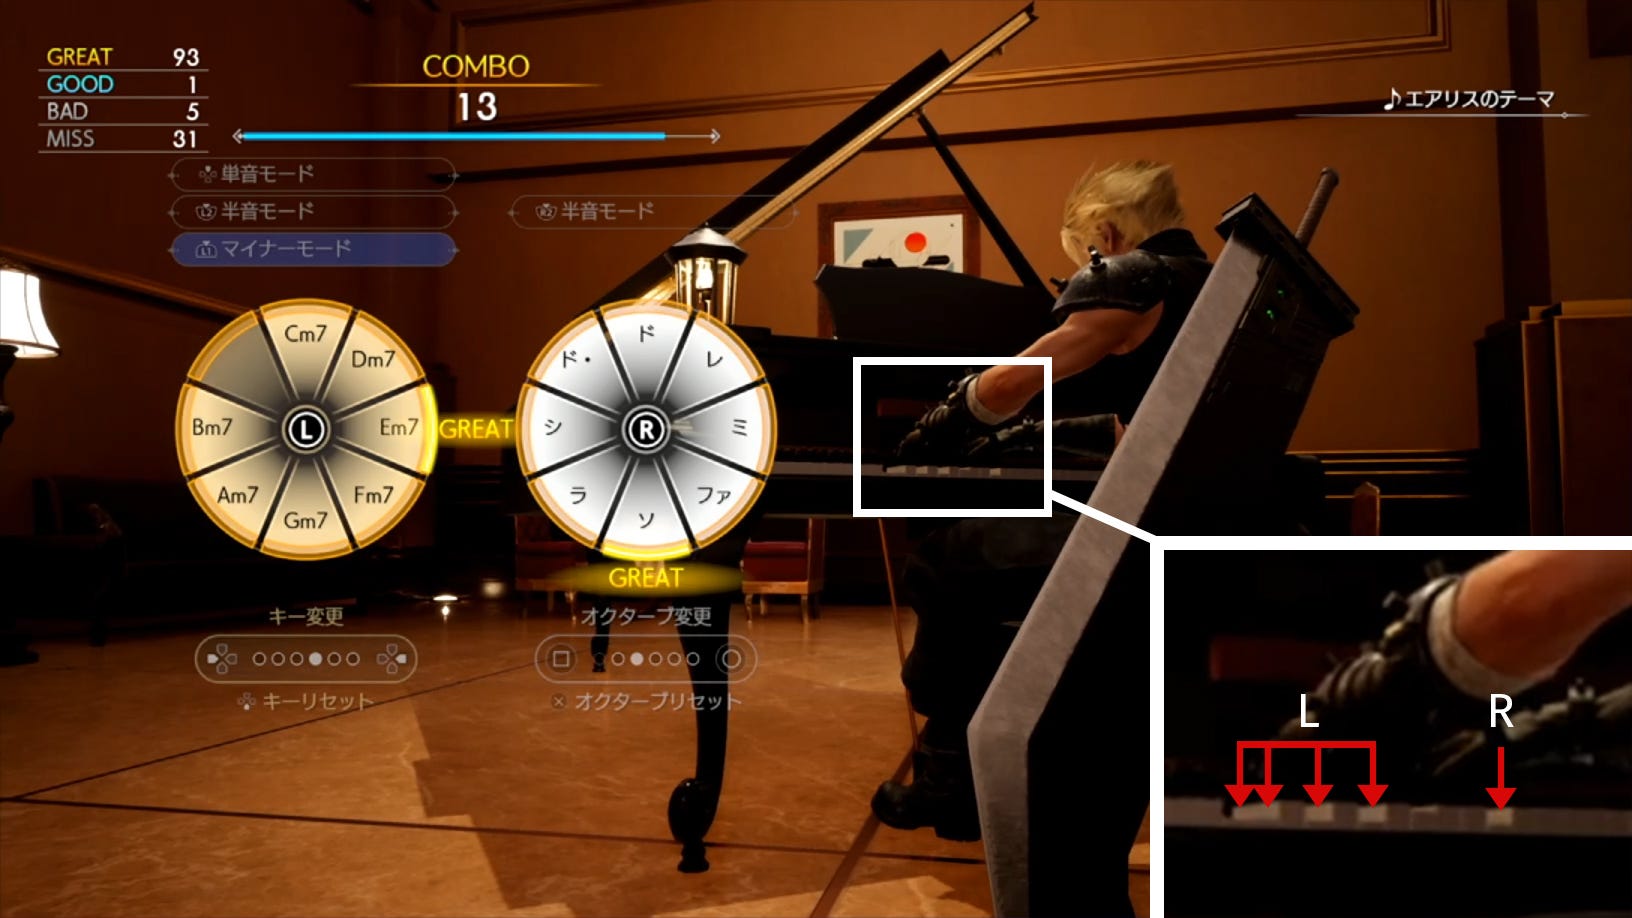
Lastly, we have the minor mode mapped to the L1 bumper button. While held down, all chords switch to their minor variant. Each chord has a major and minor variation with the former being the default setting here.19 We can see this in action a few times during the live play session when the L1 button option receives a blueish background and an ‘m’ suffix is added to each chord label.
Situated below the chord and note wheels are the options to change key and octave. Key option 3 our of 6 and octave position 3 out of 5 are considered standard as we begin every play session in those states. For the key setting, this would be the major triad, a major chord made up of the first, third, and fifth note of the scale.20 In Aerith’s theme during the live play session, this option changes to the fourth setting at some point where we see the number 7 added to all (minor) chords. This key adds the seventh note of the scale to the already existing triad, upgrading it into a quartet. Other options might cover a suspended second or fourth,21 a diminished chord ,22 or even an augmented chord.23 This option is inactive and changes automatically during normal song play. In freestyle mode, however, you can change the key by using left and right on the directional pad and down to reset it to the standard major key.
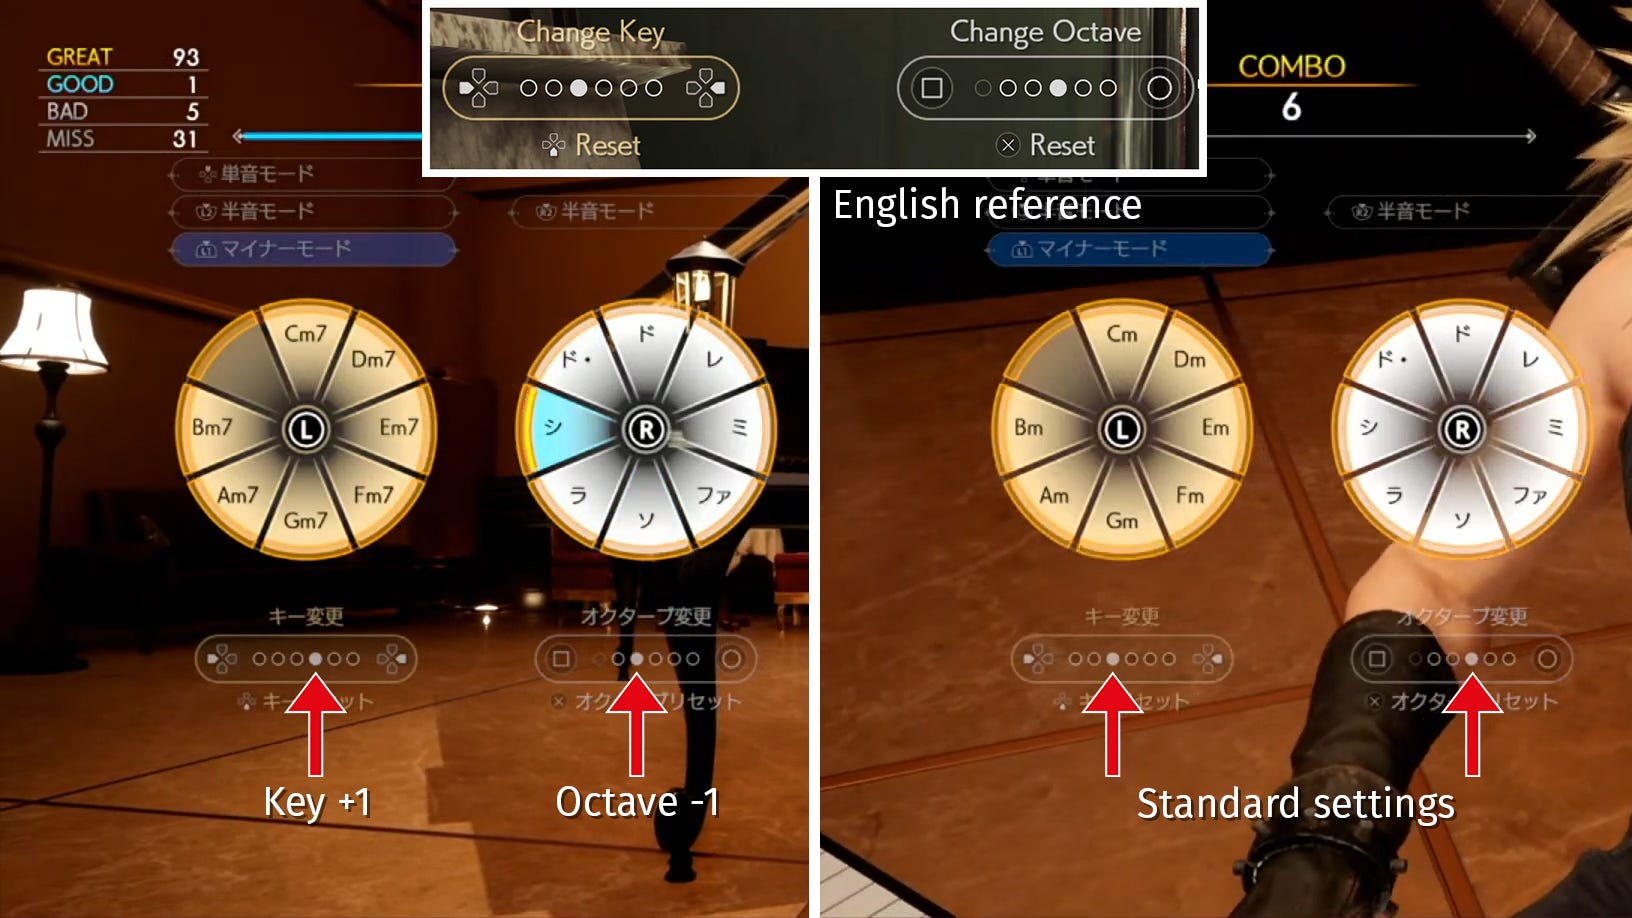
The octave option is much easier to understand and explain. By pressing square, the whole scale for the individual note wheel is shifted down one octave so you can play deeper notes. By pressing the circle button, all notes on the right wheel are shifted upwards by an octave, allowing you to play higher notes. The cross button resets the octave setting to the middle option. This also happens at some point during the live play session with Noda-san at Tokyo Game Show 2023 as seen in the image above. As with the key setting, octave changes happen automatically during song plays.
Freestyle Play
Before selecting a song to play, we are in freestyle mode where all the previously described options are active and freely available. After sitting down in front of a piano, you can immediately start jamming on it to warm up for a song or just have some fun.
In this mode, an additional minor mode UI element is added to indicate whether minor mode is on or not to telegraph its activation besides the colored L1 minor mode button to the left if pressed. This is the only difference in the UI compared to play mode.
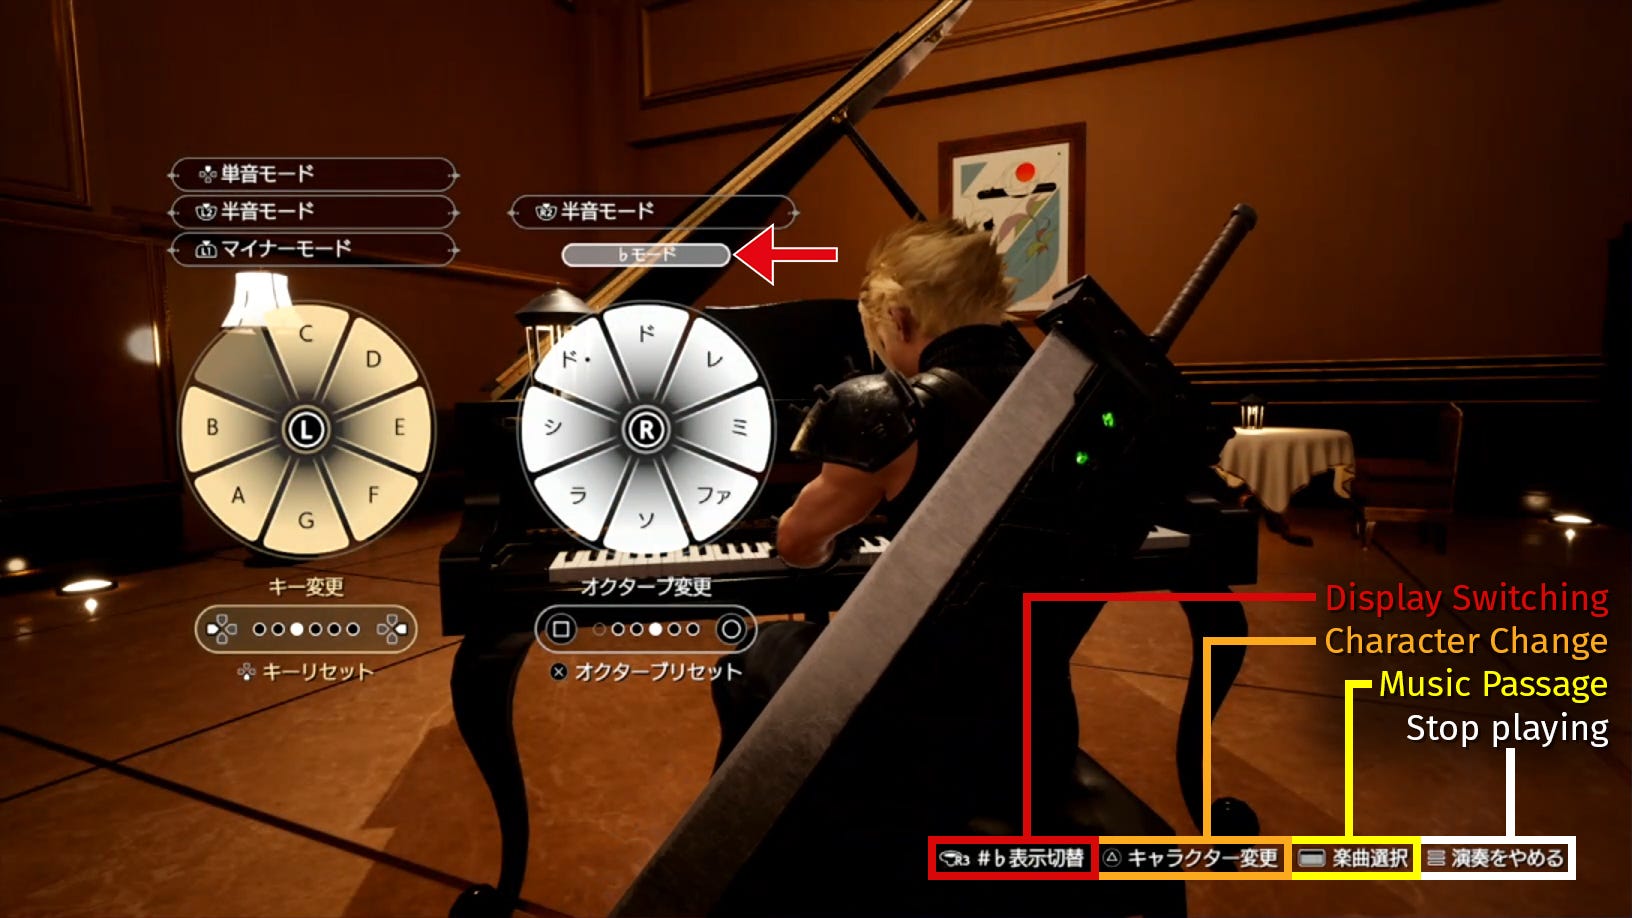
Speaking of play mode, you can open the song selection menu by pressing the touch pad. More on that shortly. If you don’t feel like playing a specific song or jam in freestyle mode, you can press the option button to step away from the piano. Another option is related to some sharp (#) and flat (♭) display. I’m not sure what it does, since I think the current display of those symbols is pretty clear. At least to me. Whatever it may represent, it’s not really important to this analysis.
What is important, however, is the fourth and last option: character change! Pressing the triangle button seems to switch between all currently available party members. Are all of them now suddenly master pianists?! How can Barret play with only one functional hand? What about Red XIII? Please make him selectable here. You already put him on a chocobo in a sitting position, which is hilariously funny and adorable. Why not have him try his mettle on the piano using his paws? Please, somebody draw this! I might make an attempt myself should I find the time to do so at some point before release.
Song Properties

Selecting a song is pretty straight forward. In the live play session, only Tifa’s Theme and Aerith’s Theme were available to play. Hamaguchi-san put Noda-san on the spot and made him choose between Tifa and Aerith, essentially making him reveal in which “camp” he is in. It was a pretty funny exchange. Anyway, we can see in the list of songs how difficult each one is according to the number of golden stars it has. Tifa’s Theme has two while Aerith’s Theme has three stars. I wonder what the maximum number of stars could be. Seven? Ten?

In any case, the currently selected song’s properties are shown in the area below. The top one represents the song duration. 2:14 for Tifa’s Theme and 2:08 for Aerith’s Theme. Displayed below are the number of notes to hit. 146 for Tifa’s Theme and 142 for Aerith’s Theme. And below that is not another song property but the setting for note speed (ノーツ速度) with five levels. I assume this defines how fast the golden ring segments move from the center to the edge, essentially enlarging or shrinking our reaction window but also increasing or decreasing clutter on the display. The slower the indicators, the more of will be visible on screen the same time. I personally like how you can change this setting before each play session and later it according to your preference.
Naturally, as almost every minigame in Rebirth, we need to reach certain target scores to either earn better rewards or a better ranking, like in this case, which ranges from C to S. The more notes you hit and the more accurately you hit them, the higher the score at the end.
Playing the Piano
We’ve been talking a lot about options, the UI, the button layout, and even the minigame’s framework and windows. I suppose we should finally get to the meat of it, shouldn’t we?
It’s pretty simple, actually. Golden ring segments move from the center to the outer ring. We then need to tilt the respective analogue stick into the indicated direction. Basically, tilt the stick once the golden timing bar hits the edge of the circle. In the example below, Noda-san managed to hit the So (ソ) note perfectly, granting him a golden Great rating.

Above the chord and note rings lie the combo number display and the song position gauge. The former increases by one each time you hit a note. If you miss one, it resets to zero. Pretty standard stuff. The blue gauge below merely indicates how far into the song you currently are. In the screenshot above, the song is basically over. Only a couple of notes left to hit.
In the top left corner you can find your current performance status. It tells you how many Great, Good, and Bad note hits you made and how many you missed completely. Since it was Noda-san’s very first attempt of this minigame, he started off very poorly but got the hang of it by the end, as seen by the 25 combo and the comparatively high number of Great note hits (105).
Lastly, the current song name is displayed in the top right—Aerith’s Theme in this case—and the option button’s function in the bottom right which lets you know that you can press the options button to stop playing at any time. I can already foresee many premature rage quits when it doesn’t go well during harder songs.
Results
Finally, after we finish playing a song, the results are displayed. We receive 100 points for every Great rating, 30 for every Good rating, 0 for every Bad rating, and even a negative 30 for every missed note. Quite harsh if you ask me, but still fair. Gotta git gud, mate!

Accumulating those individual rating scores nets you the final score, which is then matched to the target scores for each rank. In Noda-san’s case, he didn’t even manage to reach rank B, though it was quite close. Only 300 points short. I wonder if there are any rewards tied to this minigame or only to trophies. You can be sure I’ll be aiming for an S rank in each of the available songs, maybe even for a maximum score, if I feel like it. We’ll see.
Details in the Background
That’s it for the minigame, but as always, we look past the main subject and check out the surroundings, too. During the live play session with Noda-san, Cloud is sitting in front of a grand piano situated in the middle of a luxurious-looking dining hall somewhere in Costa Del Sol according to the background music playing during freestyle mode and before starting to play the actual song. This room seems quite large, the round tables are covered by white expensive-looking cloth, and the two wooden chairs flanking each table almost look like small thrones with their ostentatious crimson padding. The lighting in this room exudes quite a romantic atmosphere thanks to the lanterns on top of each table and even the grand piano, the dim overhead light, and fancy circular dome-lights laid into the floor, along with shaded standard lamps.

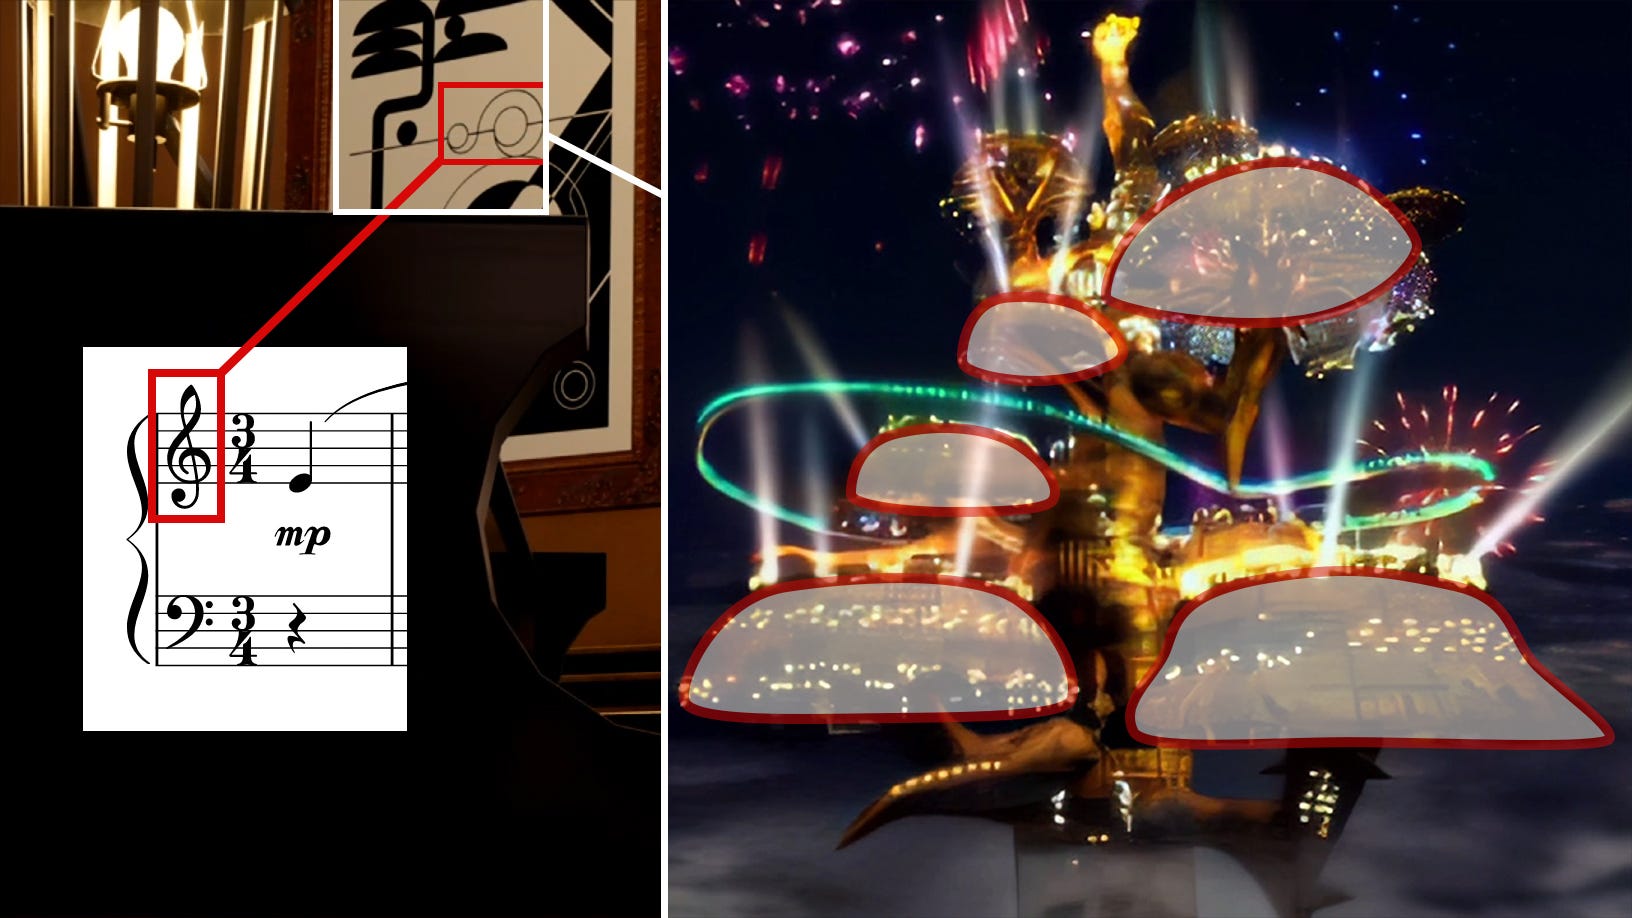
We can also see at least two different abstract paintings. The one seen in the screenshot above reminds me of seaweed growing out of a body of water or even a normal plant being born from the Lifestream. The red dot over the larger circular pattern may represent Meteor hovering above the planet, threatening planetary life. I can also vaguely make out a woman’s head between Cloud’s hair and the plant. A representation of the last Cetra? Or maybe the red dot is just a Moogle’s pompom. Who knows.
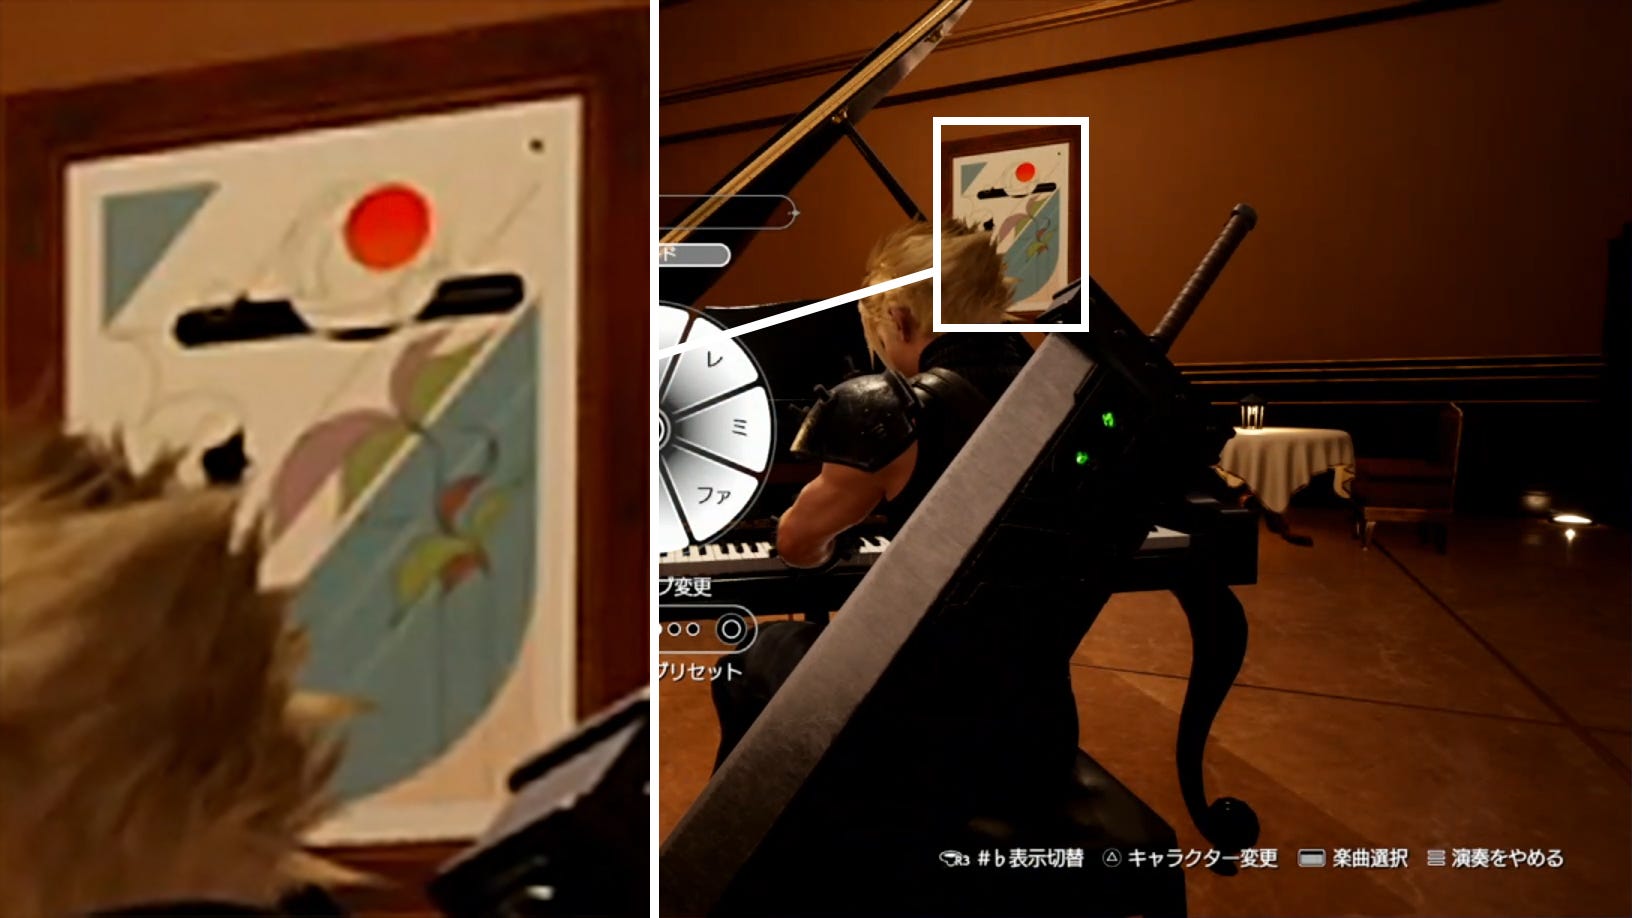
The other one clearly contains an abstract version of the Gold Saucer as seen in the image below. Unfortunately, most of the other parts of the painting are obscured by the piano, though we can clearly make out a form that closely resembles the G clef—also called treble clef—which positions the G note on the second line of the staff from below, the center of its spiral. It’s the most commonly used clef in musical notation and usually found on the right hand staff on a piano sheet music. The F clef—or bass clef—occupies the left hand staff where the F note is located on the second line from the top, the one between the dots. This musical notation symbol is therefore very closely tied to the piano and thus this minigame. But why the Gold Saucer imagery? Probably because Costa Del Sol is the first station on the western continent for travelers to the Gold Saucer who came over via passenger ferry.
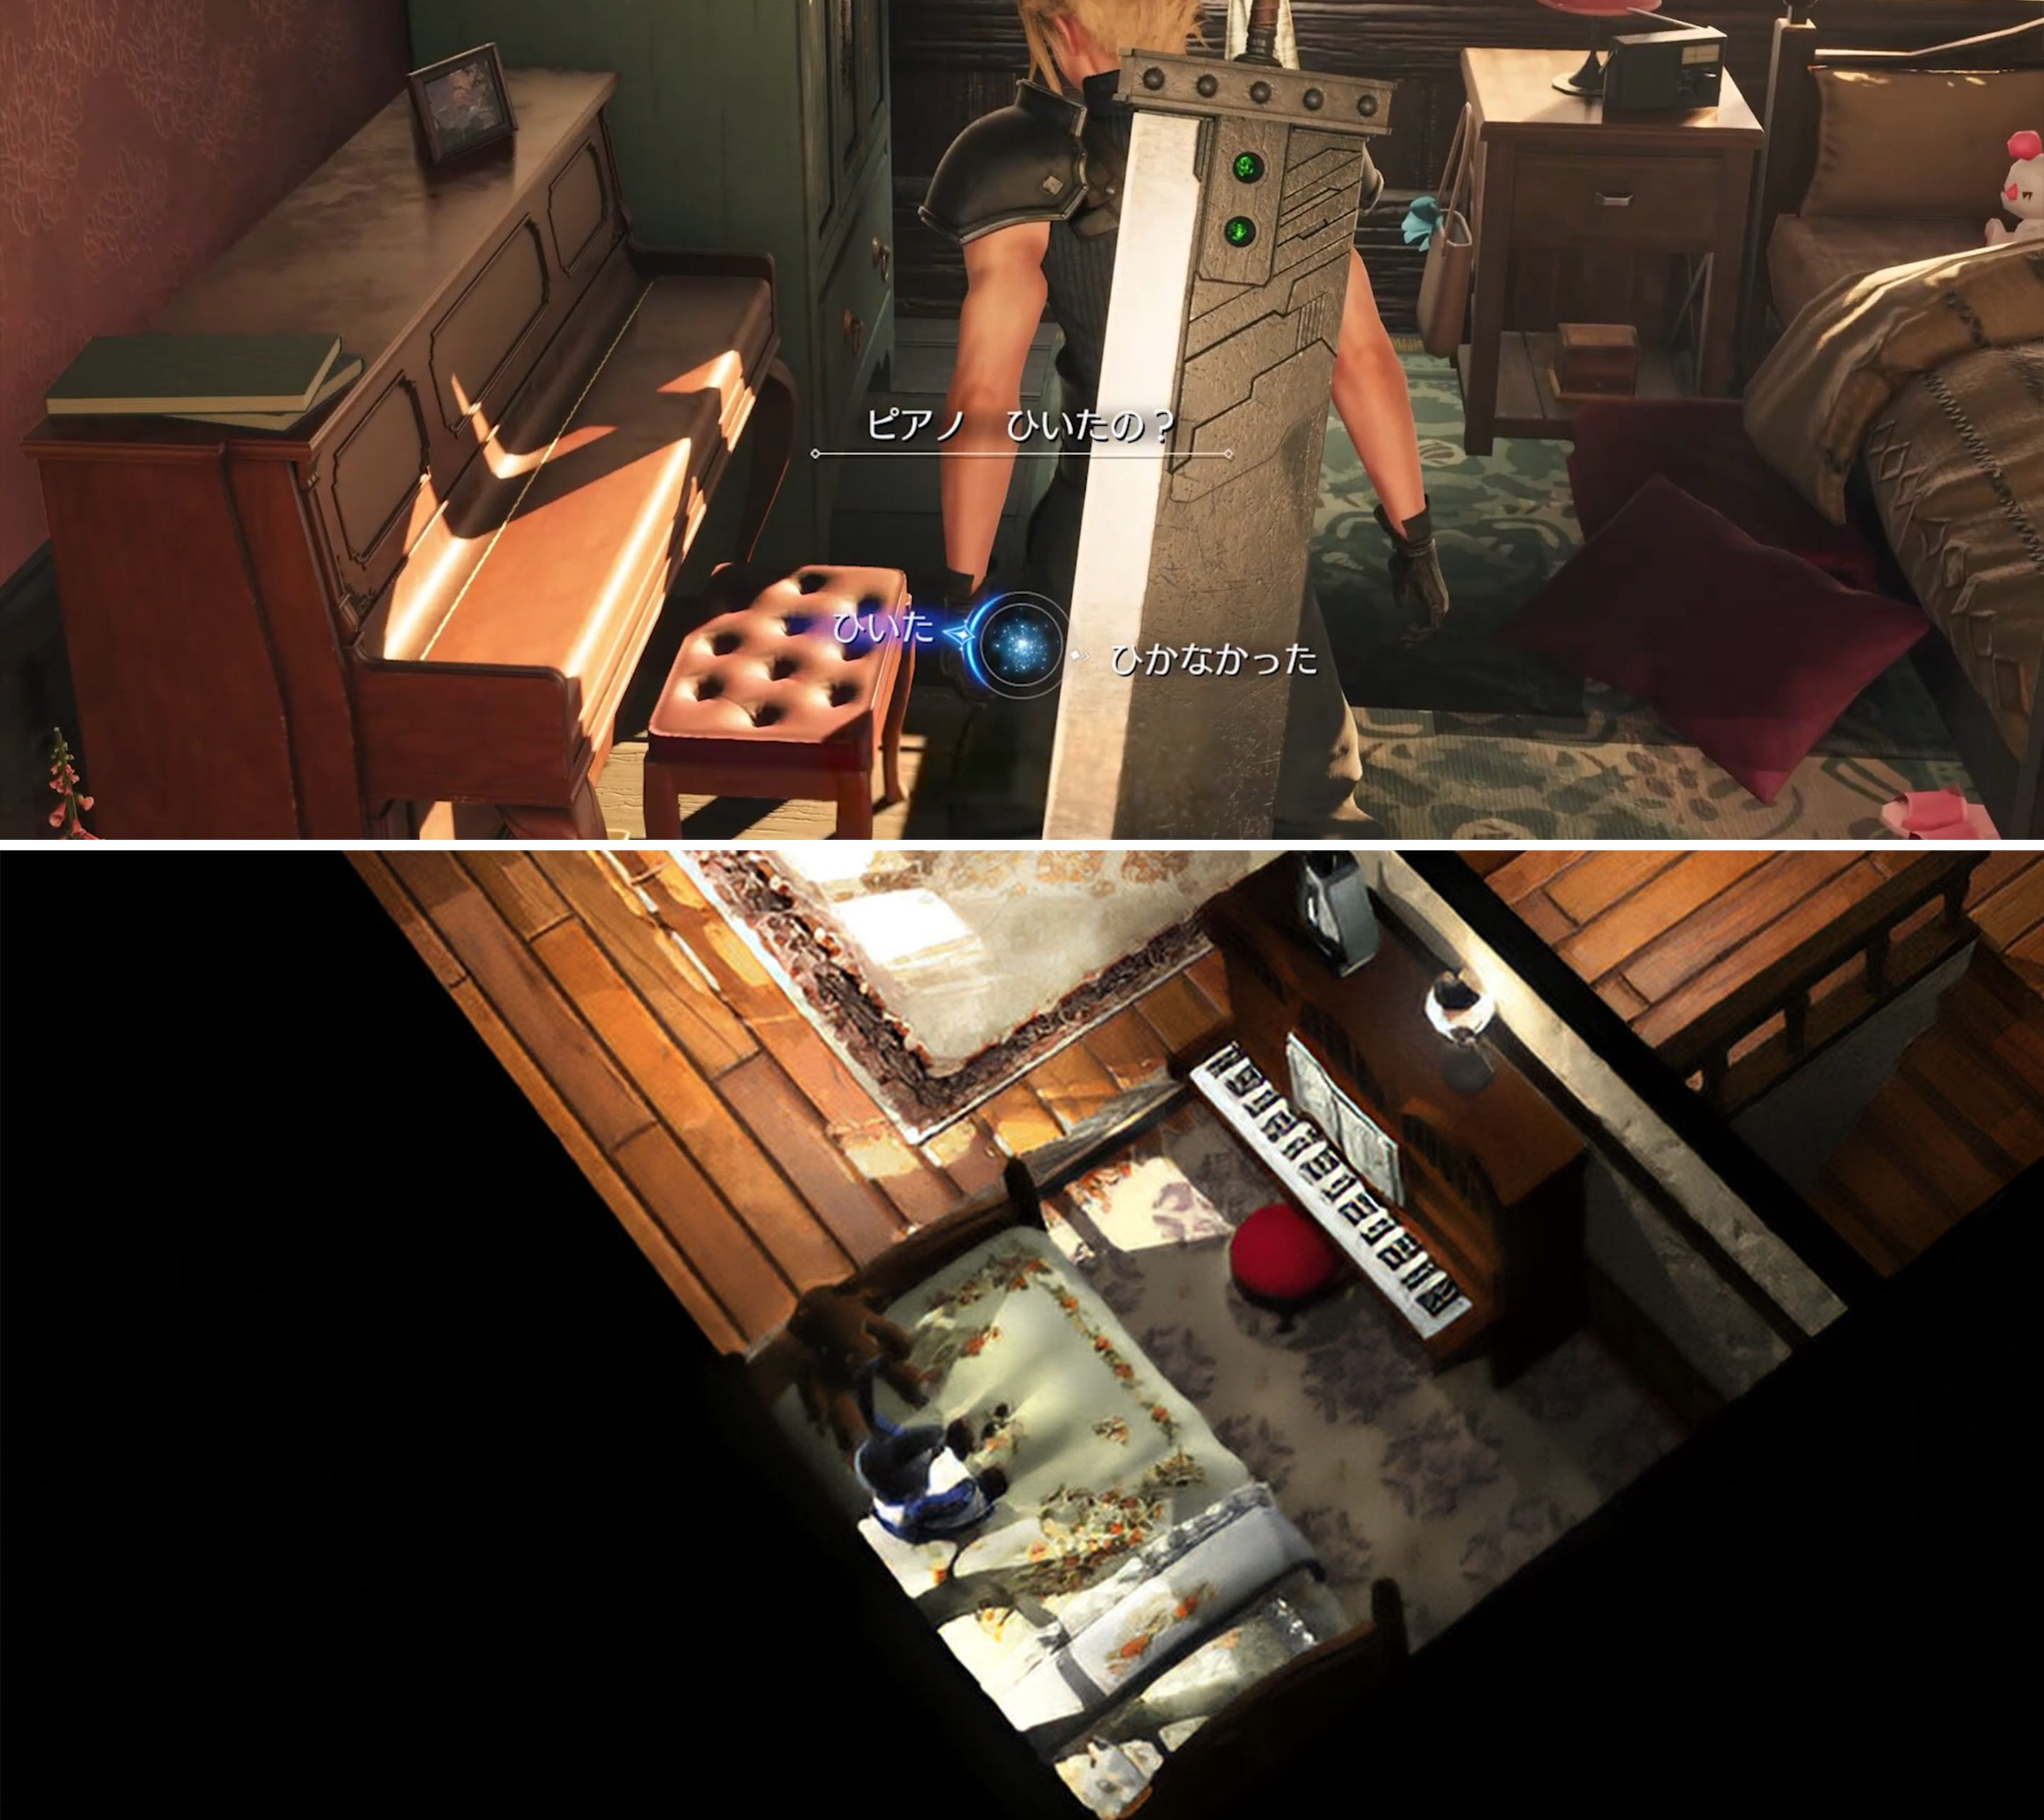
That’s it for the Costa Del Sol location. In the trailer and official screenshot, however, we get a glimpse of Tifa’s room! I will let the following two comparison images speak for themselves.


I’m not entirely sure about the Cloud reference on that poster since the exposed midriff matches Tifa’s much better, but the rest of the silhouette fits Cloud in his Costa Del Sol outift much better.
Below is a comparison image devoid of indicators to prevent confusion. By comparing Rebirth’s version to the original render, the sleeping corner of Tifa’s room has been kept intact. The same piano type—though now rectangular instead of round—the red cushion on the piano stool remains and Tifa’s bedclothes and the carpet on the floor both expose a similar color scheme and thus still feel the same, even though their exact patterns differ.
But we’re not done yet. during the Tokyo Game Show trailer when Cloud approaches the piano and decides to play on it, he does so during the flashback. Playing the minigame on the other hand happens during the main events of the game while revisiting Nibelheim. And I have three pieces of evidence for you.
Cloud’s SOLDIER outfit. When deciding to play, the shoulder pauldrons and gloves represent those of a standard issue SOLDIER 1st class uniform. The same one Zack wears and thus Cloud during the flashback, and the one Zack makes Cloud wear for their escape from Nibelheim. Cloud only has his uniform changed after reaching Midgar alone. Where, when, and how remains a mystery to this day.

When interacting with the Piano, a question and two possible answers appear. The question “Did you play the piano?“ (ピアノ ひいたの?) is asked by Tifa (the no/の syllable at the end usually indicates a question asked by a female) and the two possible answers are “I did“ (ひいた) and “I did not” (ひかなかった). It looks like you can’t just jam on it anymore. You either play or you don’t. I assume that this basically acts as a tutorial for this minigame and if you already know everything about it you can skip the tutorial by just not playing the piano during the flashback. Let’s just hope that not playing it does not lock us out of any reward or bonus scene later down the line.
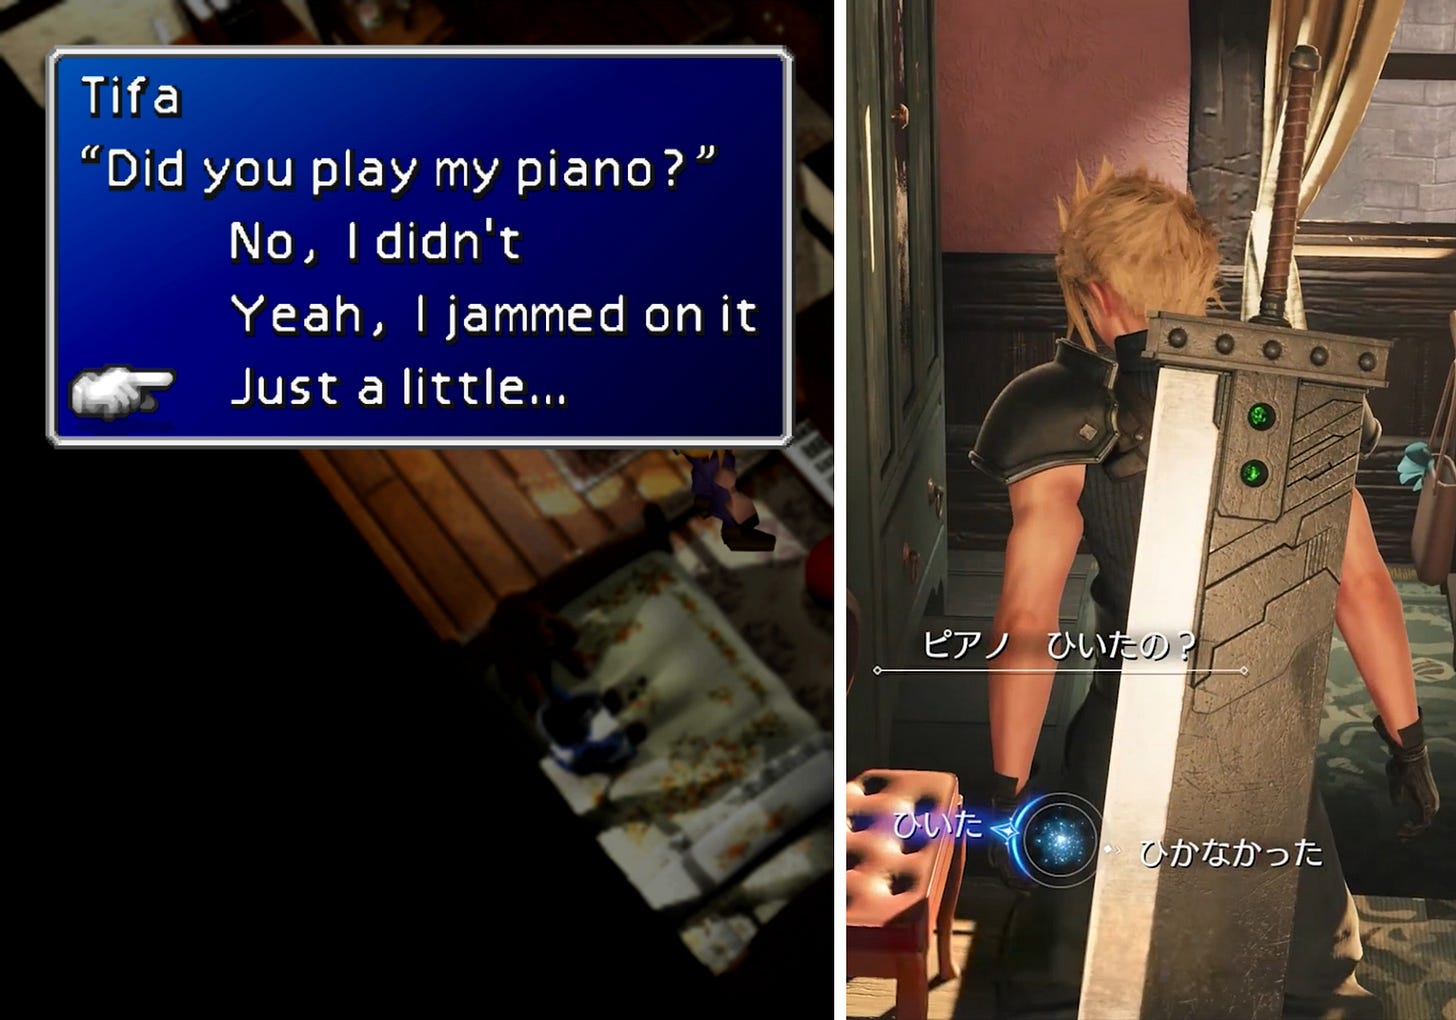
During the Tokyo Game Show trailer and the official screenshot, the song currently being played is displayed in the top right corner and it is neither Tifa’s Theme nor Final Fantasy VII’s Main Theme but On Our Way. This is another very strong piece of evidence that we’re not in the flashback anymore as that song has no place there. I predict that this is the first song we obtain in the context of the actual minigame if we sit down in front of a piano located in Kalm. On Our Way is the original game’s town theme and primarily played in Kalm, after all.


Piano Maghnata
The last thing I’d like to cover is how we might obtain sheet music for this Piano Performance minigame. It’s just a thought and there is no real evidence to be found for this, but it is possible that we might be able to buy new sheet music pieces from those mysterious Maghnata bookstores and automats. There is no official information about those to be found anywhere but we could steal a glimpse of both in some recordings from the Junon area preview demo and the Grasslands demo shown at Tokyo Game Show.


Further analysis of everything related to Maghnata is out of scope for this article. However, I do think the idea that Maghnata bookstores and automats may sell new sheet music has merit, which is why I wanted to throw it out there in case it turns out to be true. I can also see those places selling cards for Queen’s Blood, the highlight of this article, which is what we’ll tackle next.
Queen’s Blood

This mini-game is completely new to the Final Fantasy VII universe and was specifically created for Rebirth. One would think it might tie into its larger narrative because of that, but that’s for later. First, let’s check out official information on it.
Official Information on Queen’s Blood
In an interview from September 22nd 2023 published on the Square Enix blog, director Naoki Hamaguchi was asked about his personal favorite minigame, and this was his response:
Naoki Hamaguchi: “Out of all the different mini games available, the card game, “Queen’s Blood” could be said to be one of the headliners.
It’s an in-world card game that is very popular in the world of FINAL FANTASY VII REBIRTH, and a minigame that can be played many times from the start of your adventure to the end.
Winning matches doesn’t just let you enhance your deck - you can also follow a unique Queen’s Blood story as well. The narrative progresses as you engage more challenges in matches.“
There are three interesting takeaways from this:
Like Fort Condor in Episode INTERmission, it’s an in-world game that’s popular among the people living in the current game’s world—Midgar in Episode INTERmisison and the whole planet in Rebirth. This heavily reminds of other card games in the franchise like Triple Triad in Final Fantasy VIII or even Tetra Master in Final Fantasy IX.
It seems to be available throughout the whole journey. I hope we can play against Sephiroth at some point…
Playing against more and more rivals, you’ll progress through a side-story tied to this minigame. This sounds very exciting and makes winning or finding new cards and playing numerous matches even more rewarding.
Another Square Enix blog post provides a short description of this minigame, but reveals barely anything new, save for the main goal and winning condition:
“Queen's Blood is a strategic card game that has skyrocketed to popularity. Players take turns placing cards on the board in an attempt to overpower their opponent by accumulating power in each lane. Collect cards and utilize their abilities to claim the crown as QB royalty.”
We know what it is about and how it looks like. But what are the rules and how does it play like? Let’s find out!
Challenging Rivals
Before we can even begin to play, we need to seek out so-called rivals. Like in Episode INTERmission, each rival has their own level as indicated on the compass, minimap, and most likely on a rival’s head, too, though I wasn’t able to find an example in any existing footage.


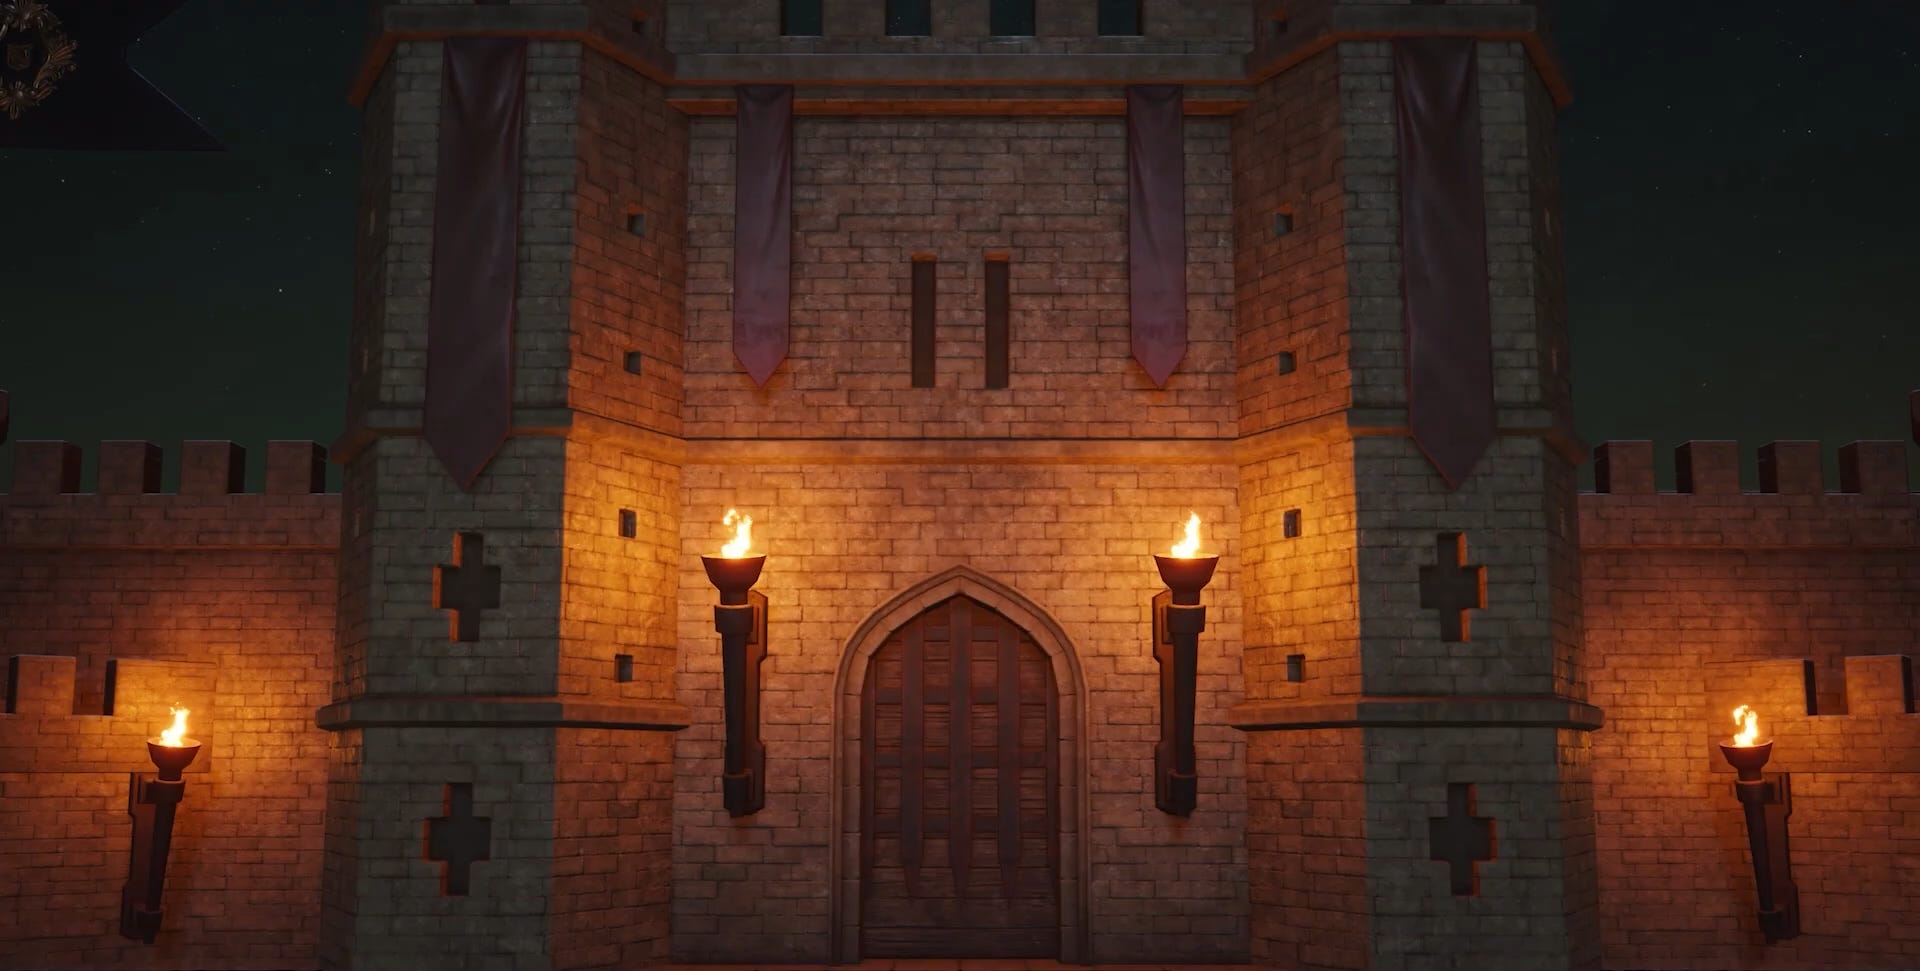
However, the trailer exclusive to the Tokyo Game Show stage showcase provides us with a view on such a rival sitting in front of her Queen’s Blood setup, which does not just contain the board but boasts a miniature castle front towering over the game board.
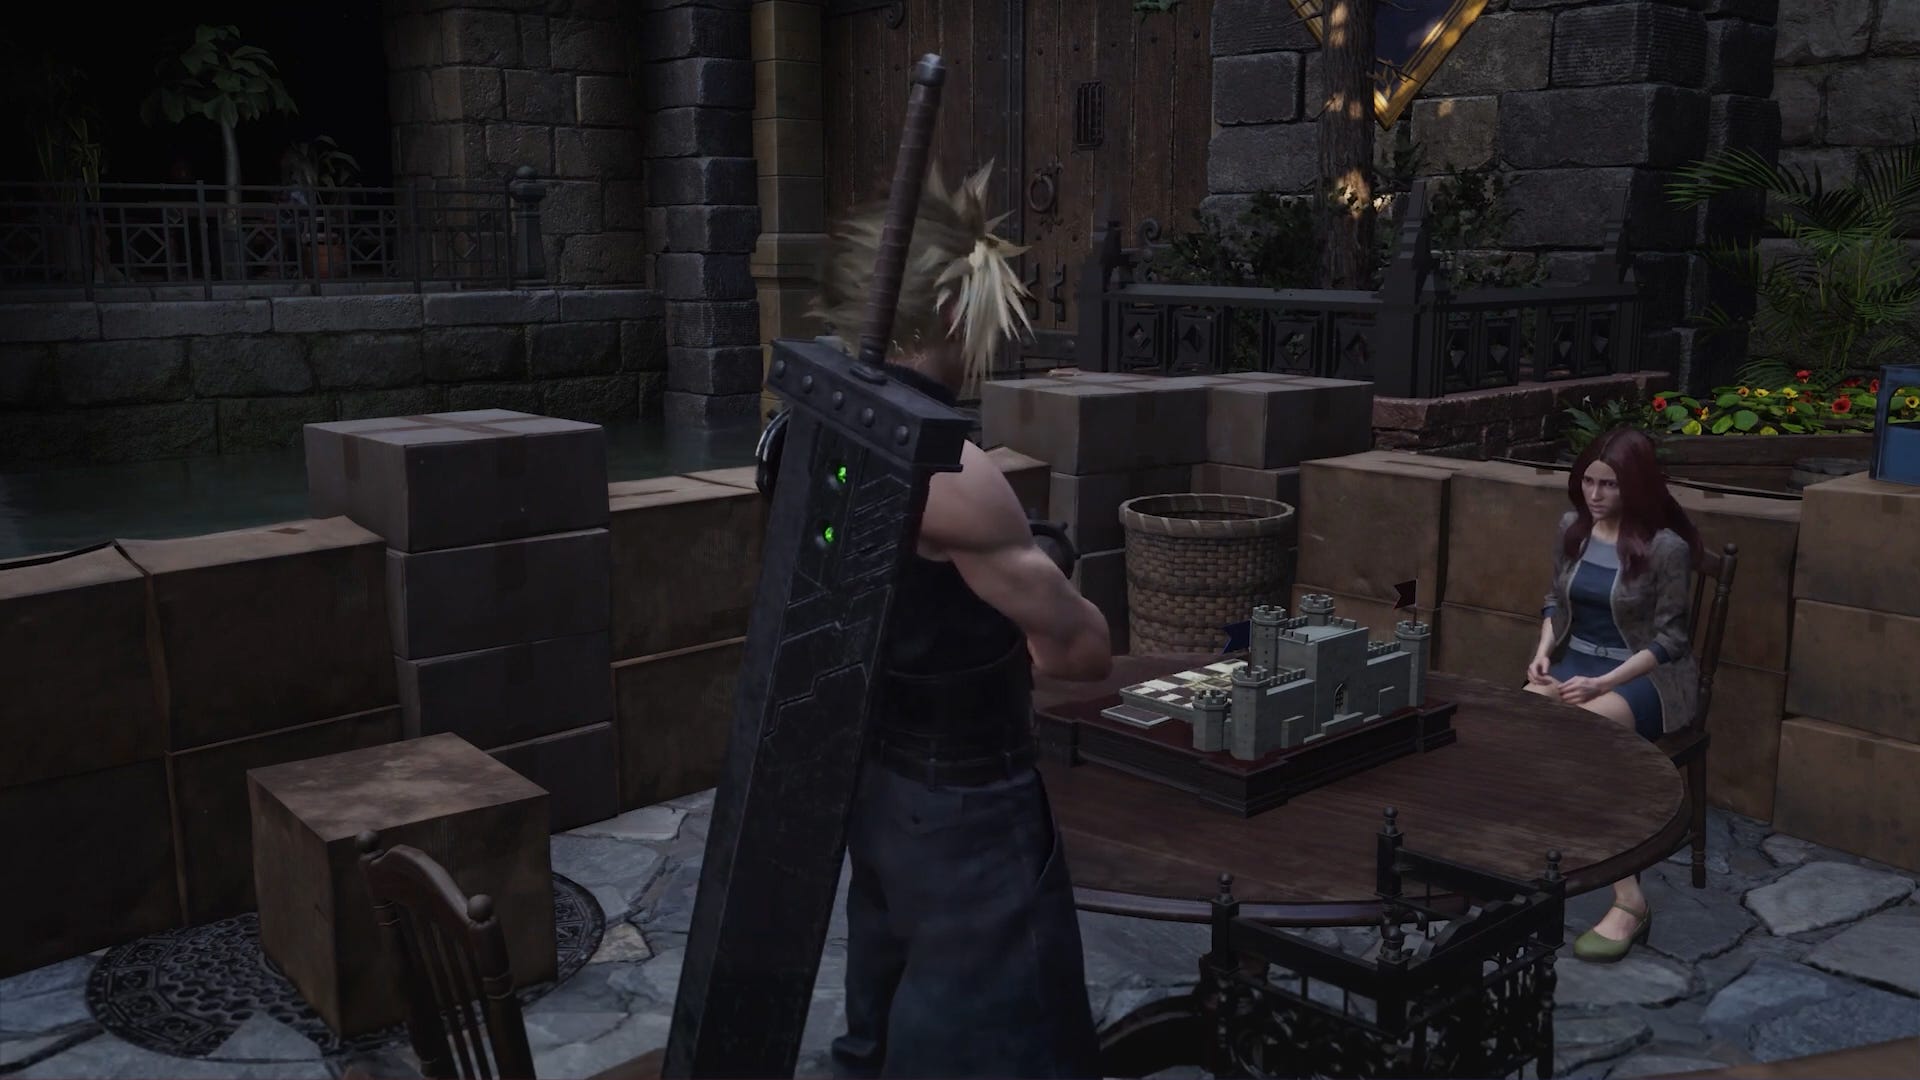
When starting up a game, the camera briefly pans over said castle front, setting scene and mood for the coming showdown, before resting on the main piece, the game board and battleground.
Game Elements
And this is where we get into analysis territory. Let’s start with the foundation, the game board. It contains 15 dark and light checkered fields—five columns and three lanes—on which player and rival place their cards.

On either side of the battlefield, an additional column of inset fields act as lane power indicators and represent the sum of power numbers of all allied card in a respective lane. Let’s break this down.
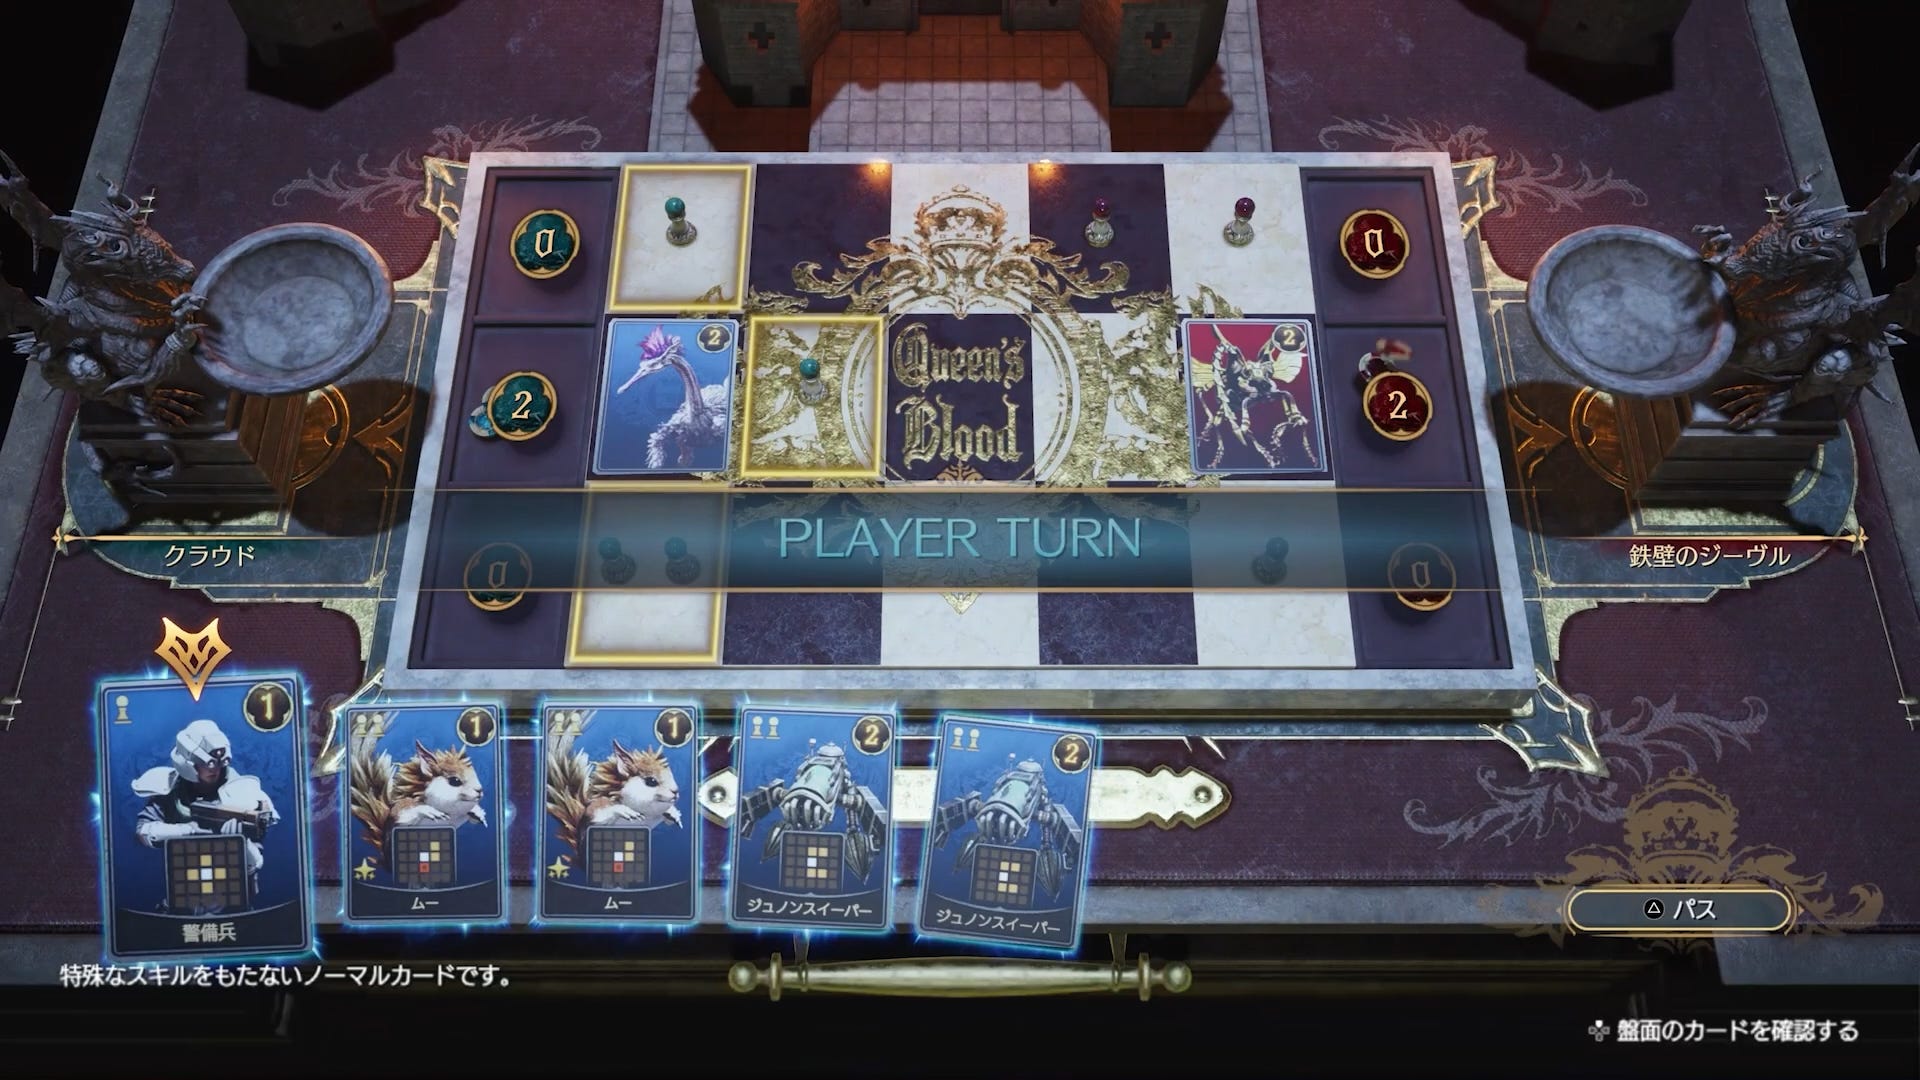
Each card bears a number in its top right corner. This represents the card’s power value. If the player places a card on a valid field, its power value is added to the power indicator in the lane’s inset field on the player’s side to the left. The same goes for the rival, just on the right side. In the screenshot above, each opponent has one card placed on the battlefield, each bearing a power value of 2. This sets the lane power indicator on each side to 2 as well. And if you look closely, the lane power inlet fields on each side also contain two chips each, the physical representation of a lane’s power value.
Besides this power value, a card has a few more elements to it, namely the pawn requirement, the card’s reach, and affiliation.
Affiliation
The player’s cards have a blue background while the rival’s cards are tinted in deep crimson. Those colors thus distinguish between player and rival affiliation.
Pawn Requirement
As seen on the game board, some fields are occupied by one or even two pawns, some of them with a green and some with a crimson head, signifying their affiliation—green for the player and crimson for the rival. Wait, isn’t the player’s color meant to be blue? We’ll get to that later.
Reach
In the lower half, the card’s reach is displayed in a five by five grid to possibly accommodate for two fields into each cardinal direction. The white square in the center signifies the card’s position when placed on the game board and the yellow squares define fields affected by the card. The Mu card also boasts a square with a red outline below the white center. This is a special effect field.
Ability
Most cards have no abilities, as the Levrikon card’s description in the English screenshot suggests: “This card has no abilities.“ However, in the Japanese-only Tokyo Game Show trailer, the Mu card’s description says the following: “While this card is dealt, the power of the allied card in the special effect square is increased by 1!“24 Which means that when placed on the game board, the power value of the card below Mu will increase by 1. Besides the red-bordered square, that 3-star icon to the left of the Mu’s range indicator might describe this specific ability. Meaning, each card ability might be represented by a different icon.

The last element to talk about is the bowl in each dragon’s hand. While its use is neither confirmed nor visible in the trailer, I can only see a single possibility. When all fields of a lane are occupied by cards, the chips lying in the inset field of the completed lane are dropped into the dragon’s bowl on each side. But how many and which ones exactly? Let’s cover that in the next segment.
Game Rules
With the basic elements of the game established above and the chain of events shown in the trailer, we can establish a nigh complete set of rules for this game.

Scoring System
We already know that each card placed on the game board increases the power value of a lane, which contributes to the player’s or rival’s total score. Thanks to the presence of the chips and dragon bowls, we can assume that all chips collected from a lane move into the dragon bowl on the respective side once a lane is completely occupied. Once all three lanes are completed, the total amount of chips in each bowl are counted and the one with the higher value wins.
At least this is the simplest conclusion I can come up with given the elements on screen and making the least amount of assumptions. It’s possible that only the one with the highest power value on a lane can collect the chips into the bowl or that the lane “winner” receives all chips placed on either side of that lane. However, the latter two possibilities would throw off balancing by receiving either none or too many chips for a full lane. Only receiving what’s placed on your own side will keep the game undecided and interesting until the final lane is completed.
That’s why there are 5 columns, an odd number, to force an imbalance of card affiliation on each lane. Thus making the power value of each placed card essential to ones strategy.
Placing Cards
Speaking of, lets go into exactly that. Cards cannot be placed willy-nilly. As seen on the screenshot further above, the Security Officer (警備兵) can be placed on all fields bordering on the Levrikon card as those are highlighted by a yellow border. Why? Because all of those fields have at least one green pawn placed on them and the Security Officer card’s pawn requirement is 1 as indicated in its top left.
In the screenshots below on the left, the Mu card (ムー) is selected, which has a pawn requirement of 2. Thus, it can only be placed on the field below the Levrikon card which contains 2 green pawns, as indicated by the yellow border around the valid field. The center screenshot shows that the Mu card cannot be placed on the single-pawn field, as indicated by the red “invalid” symbol on the card. Same goes for attempting to place it on another card already on the board as seen in the right screenshot.


So much for the requirement for placing cards. What happens when you actually do place a card on a valid field? This is where the card’s range comes into play. While hovering over a valid field to place the selected card on, green fields (for the player) are highlighted, as shown in the screenshot below, which directly coincide with the yellow squares on the card relative to the white center. In the case of our Mu card, its range covers one field to the right and one diagonally to the top right. When comparing the screenshots above to the one below, we can also see that those two highlighted target fields each contain an additional green pawn. This is how we prepare empty fields to increase the number of valid fields for further cards to place on.
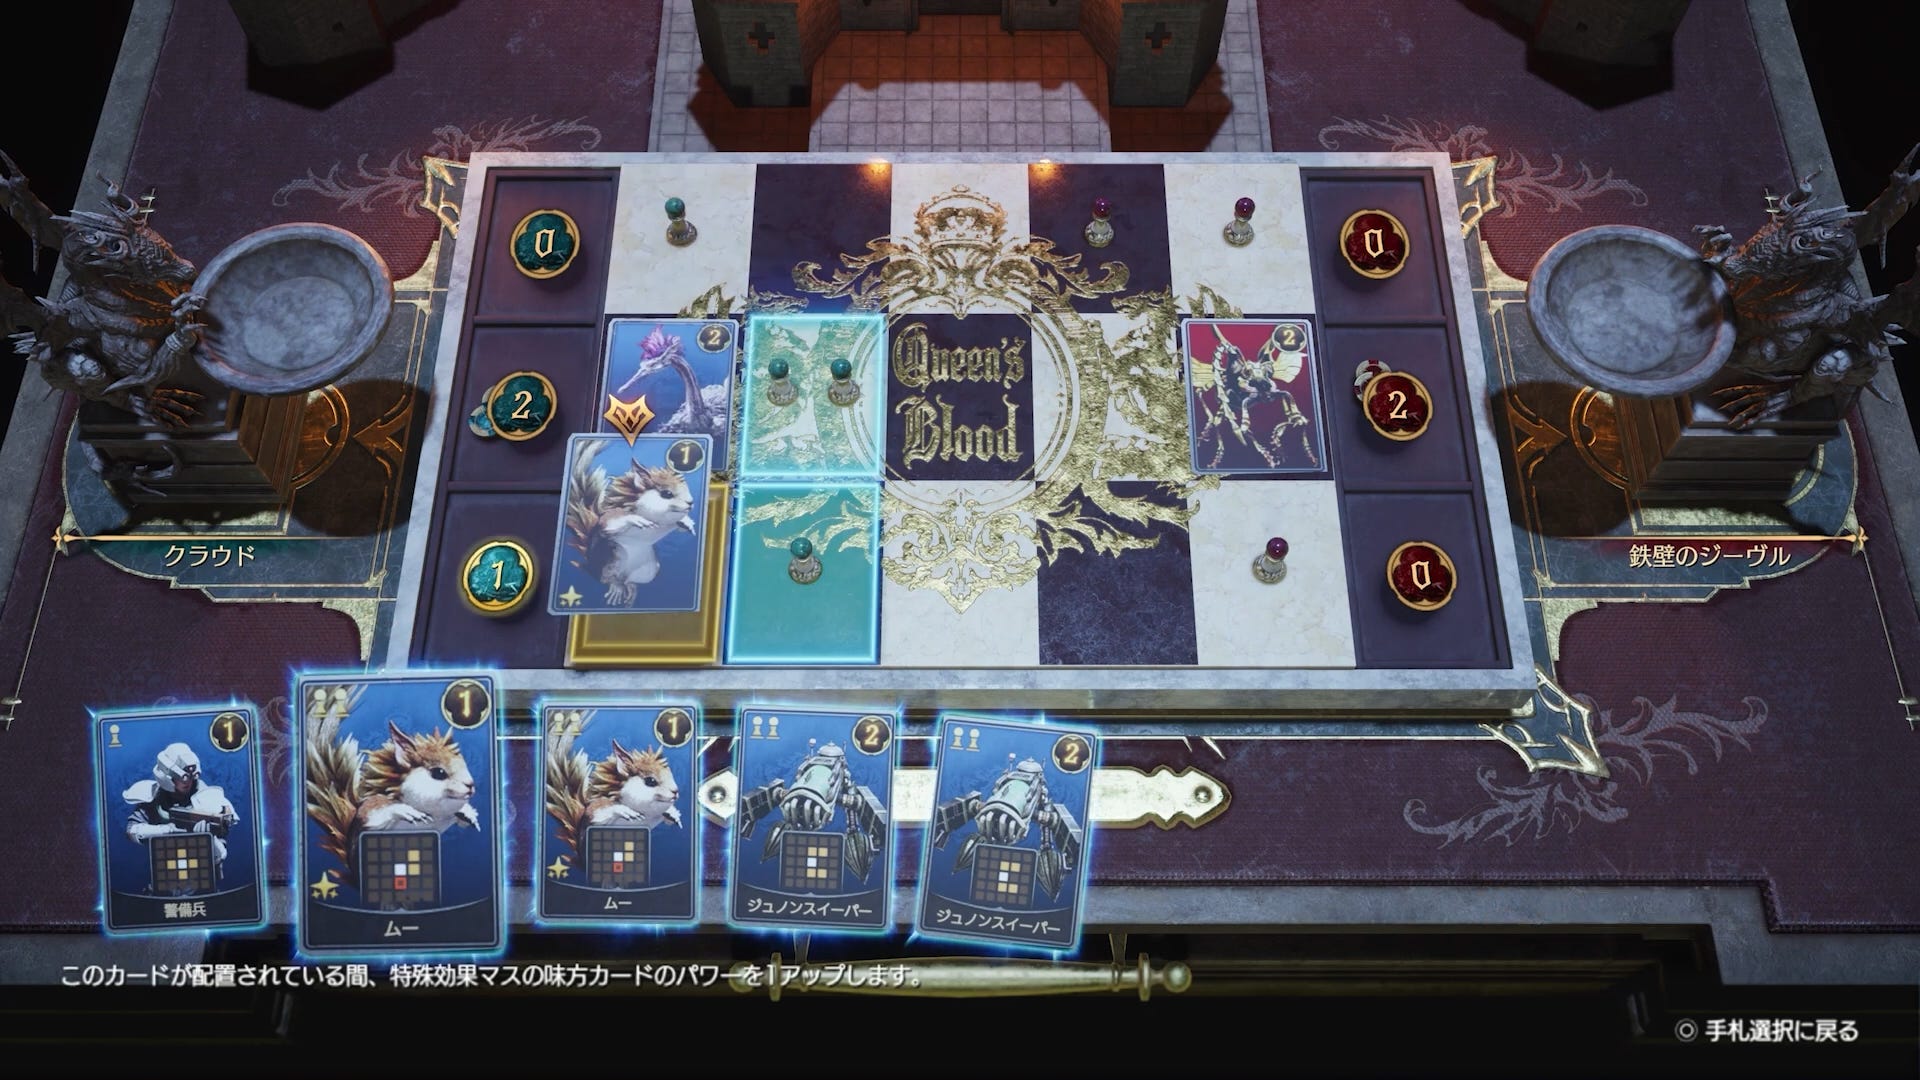
Luckily, the game already shows us the effect of our action before we perform it. Which is why the additional pawns are already displayed and the lane power indicator updated. When actually placing the card, pawn and lane power indicator become set in stone, as seen below.

Side note: the Mu’s ability field—the red-bordered square below the white center—has no effect here because there’s no allied card below it to power up.
It’s not only the number of pawns on a field that define whether or not a card can be placed on the field but also their affiliation color. As seen below, the rival cannot place the Grasslands Wolf card on the top left-most field even though the pawn number requirement is met. This implies that, if a field were to contain two green pawns and one crimson pawn, the rival would not be able to place a 2-pawn card on that field.

But how do we know that the Grasslands Wolf has a pawn requirement of 1? The English screenshot below provides us with the answer. The rival has placed a single card on the bottom right-most field which certainly does not already contain 2 pawns. While we don’t see the Grassland Wolf’s range anywhere, it at least has a yellow field to the left and one to the top as seen on the screenshot below. The field to its left now has one crimson pawn and the field above it contains now two.

How can we deduce this? Looking at any other game state, each field on the left-most and right-most column each contains always at least a single pawn of the opponent’s affiliation color. And in the screenshot above, we can see that the Levrikon card—the selected one—has a pawn requirement of 1, too. Going back to an earlier screenshot shown below for clarity, we can see that the player has placed a Levrikon card and the rival an Insectoid Chimera card, which must consequently have a pawn requirement of 1, too. In the screenshot above, the Levrikon’s range is visible and coincides with the additional green pawns seen in the screenshot below: an additional pawn on the field below and the first one to the field to its right.
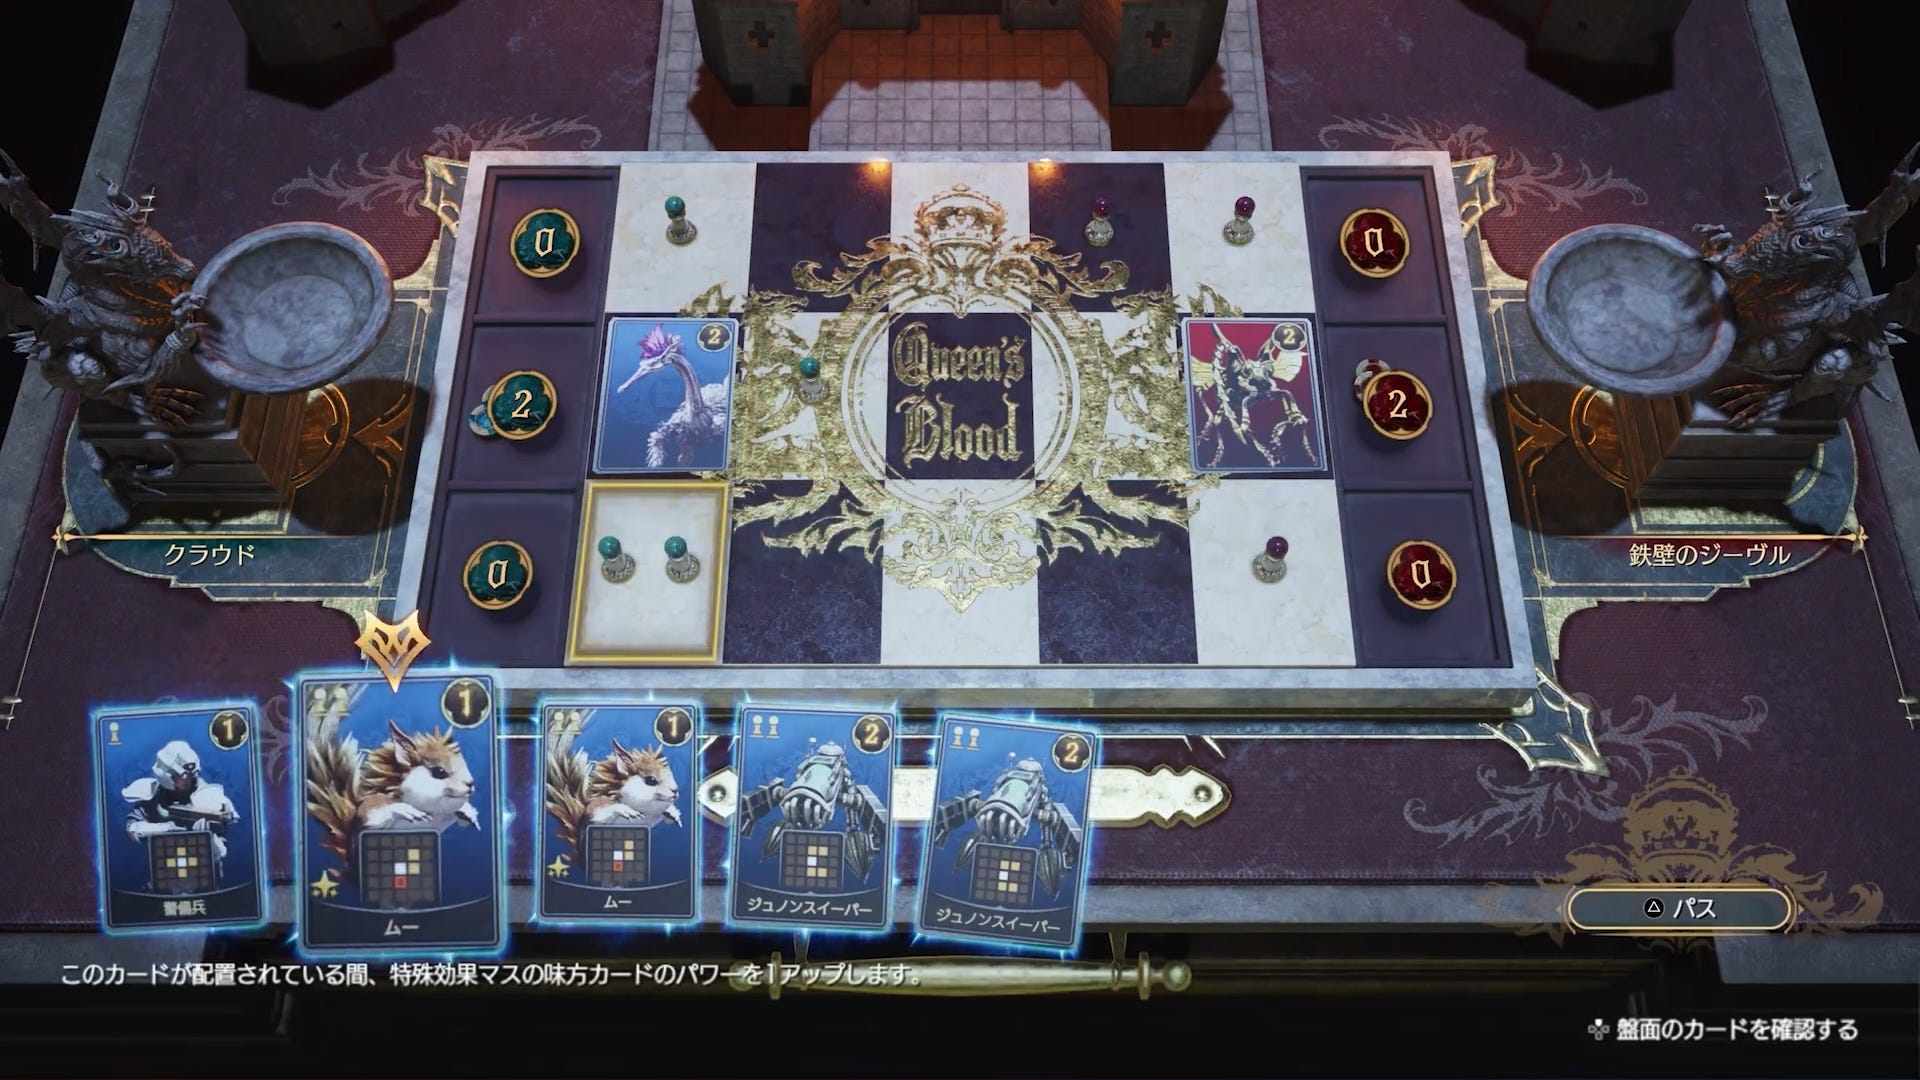
To summarize: On their respective first turn, each opponent can place a card with a 1-pawn requirement on any field in the column closest to them. Each placed card increases the number of allied pawns on the fields in range by 1. This in turn means that foresight is key as each card acts as a building block for your advances towards enemy territory and increasing your lane power value as far as possible.
Game Loop
And that’s basically it. Each turn, you need to assess which cards you can currently play and whether their range will beneficially prepare adjacent fields for your upcoming cards. The Sweeper card—called Junon Sweeper (ジュノースイーパー) in Japanese, by the way—for example is best placed in the center as it will only affect fields in the lanes above and below. The Elfadunk card on the other hand, while having a high power value of 4, can only affect the fields above, below, and behind it. Meaning, it cannot prepare advancement as other cards. And as already covered, abilities and ability fields—like the one from the Mu card—increase the factors to consider in one’s strategy dramatically.
In essence, this minigame has just a few simple rules, yet seems to be highly strategical. Easy to learn, hard to master, so to speak.
Connections to the Main Story
This covers the rules for and how to play this very enticing and intriguing looking card game. But that’s not all I want to talk about. I already alluded to something strange earlier: the player’s color scheme. Pawn heads and the lane power indicators on the game board bear the color green and remind of the Lifestream or even a green starry sky, but the card backgrounds are held in sky blue. Why is that? The rival’s color scheme is limited to a single color: deep crimson. No duality there.
Then we have the castle, the two dragons, and the game’s name to consider as well. Not to mention the whole side-story arc tied to this card game which spans the entirety of Rebirth.
Anyway, enough teasing. Let’s get into it.
Mako, blue sky, and Meteor
What if the different colors on the player side actually represent two different entities while the single-colored rival represents only one? Rebirth’s main key art—which also made its way onto the game box—could be the key in understanding the purpose of Queen’s Blood.


In the key art above, we see the same colors as represented on the game board of Queen’s Blood. Green for Cloud, sky blue for Zack, and crimson for Sephiroth.
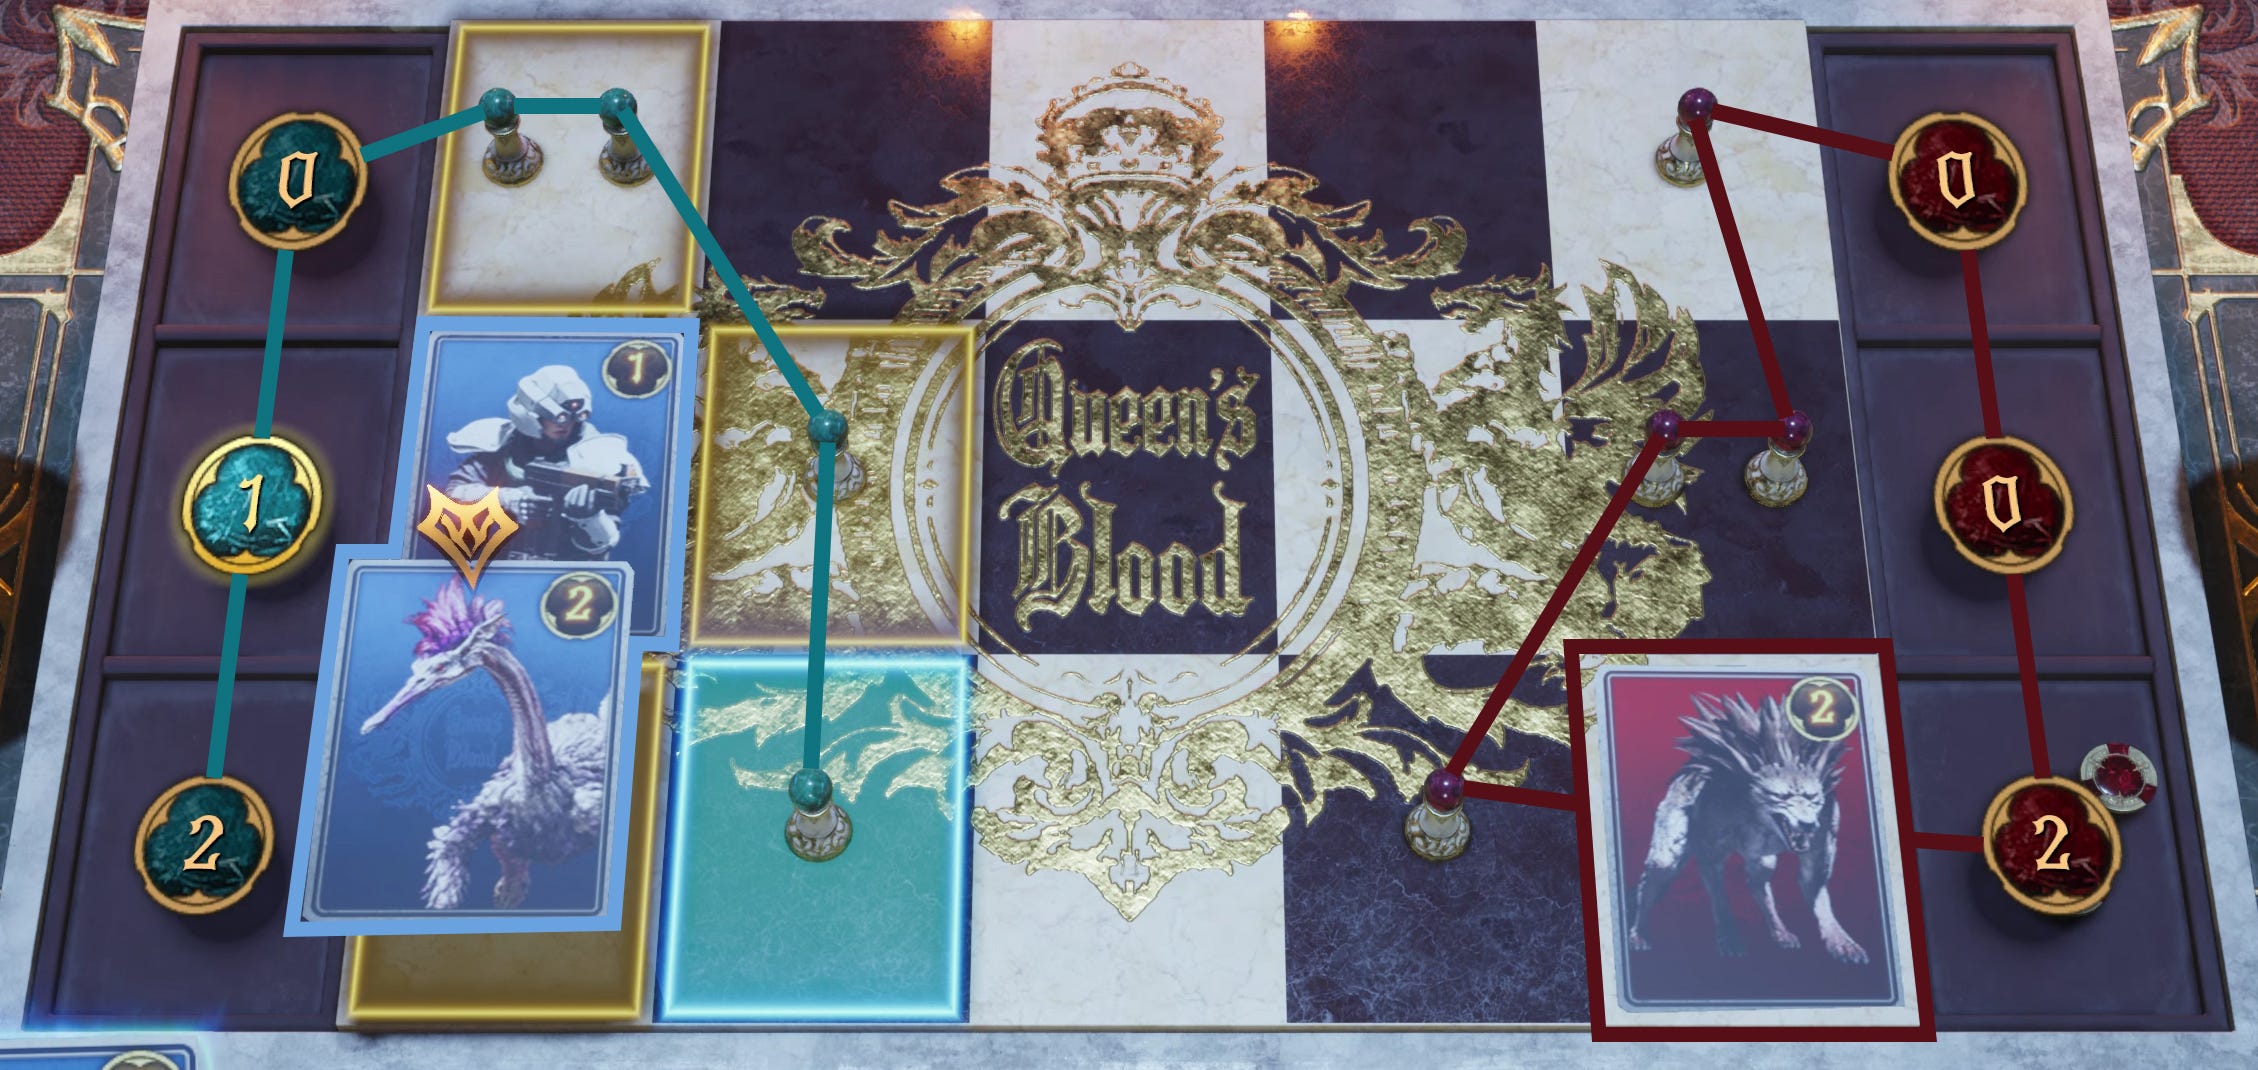
Cloud had to undergo Mako treatment which resulted in Mako poisoning. Mako is the equivalent to the Lifestream which is where he falls into after the events at the northern crater. Both the starry sky above the water tower during The Promise scene as well as Remake’s box key art are presented in a green tinge. Furthermore, Lifestream is made of memories which are the combined experiences of all lifeforms that have ever lived on the planet. Cloud’s main story arc revolves around false memories, which are caused by Mako poisoning, the trauma of Zack dying in his arms, and Jenova cells.


Zack has always been connected to the blue sky as described in the Crisis Core Complete Guide Keyword Collection,
“The blue sky symbolises Zack, the white feather Angeal, and the water Aerith.“
“As with its use in the logo of ‘CC’, the blue sky symbolises Zack, the ideal SOLDIER 1st class envisioned in “FFVII”. This is the image of Zack at his best and complete. If you pull back a bit, you could say it symbolises ideals, goals, dreams.“
and as depicted in Crisis Core’s logo, key art, and PSP box art.


Lastly, Sephiroth is an embodiment of Fire and flames, Meteor, destruction, and hatred, entities and concepts connected to the color red—or crimson. He also keeps stabbing and killing people,25 shedding their blood, which also bears the crimson color.
Key art pieces of him from the original game, Remake, and now Rebirth show Sephiroth among flames. Setting Nibelheim ablaze was the moment he turned into a Monster.


That’s it for the color references. But there’s more!
Why are pawns and lane power indicators bearing the green color and not the cards? Plus, the “PLAYER TURN” cut-in is also presented in blue, as is the “RIVAL TURN“ tinged in the same crimson color as the rival’s pawns, cards, and lane power indicators.


I have a nice theory for you and it fits rather well to the roles of Cloud, Zack, and Sephiroth.
Cloud is Sephiroth’s pawn in the latter’s schemes. After all, he calls Cloud his everything—or “master,” as he puts it in the Japanese version (おまえの "主人"だ).


Plus, Sephiroth needs Cloud’s strength—his infinite potential, as Chadley puts it.


Chadley: “But when we met, Cloud, I sensed something within you—something I knew would allow me to break free of my chains. By identifying and studying a subject with infinite potential such as yourself…“
Zack on the other hand is his own person. The main protagonist—or player—of his story. He’s actually fighting for something, to fulfill his dreams. He’s not merely following Sephiroth’s call as Cloud does for the majority of the original story. However, Zack’s story did not end in Remake. It continued, and still does in Rebirth. If my assessment of the parallels between the player cards and pawns and Zack and Cloud is correct, Zack is only able to advance towards his goal if Cloud paves the way for him, according to the card game’s rules.
As for the rival’s side, Sephiroth is literally Cloud’s and Zack’s rival. Furthermore, he can control his other pawns, the black-robed people, which he requires for the Reunion. Just like Cloud for Zack, they pave the way for Sephiroth to advance towards his goal.
But, what is their goal?
The Meaning of Queen’s Blood
Let’s turn our focus on this card minigame’s name: Queen’s Blood. It came quite out of left field as it contains very specific terms but does not seem to have any connection to Final Fantasy VII, like Fort Condor does in Episode INTERmission, which functions similarly in terms of progression and challenging opponents.
Granted, names like Tripe Triad and Tetra Master in Final Fantasy VIII and IX respectively also don’t seem to have any connection to their game’s lore. Or do they?
⚠️ Spoilers for Final Fantasy VIII and IX ahead! ⚠️
In Final Fantasy VIII, there are 3 witches that we need to fight at some point: Edea, Adel, and Ultimecia. The succession of witches across time and space is a huge part of its story. Triple Triad could therefore be a reference to them. It might also be a neat reference to the Warring Triad from Final Fantasy VI which consist of three magi, which in turn are also pivotal to its plot.
In Final Fantasy IX’s case, Tetra Master—meaning master of four—could refer to the 4 elemental guardians we have to fight in Memoria, the penultimate dungeon in the game—Kraken, Marilith, Lich, and Tiamat—which themselves are a reference to the four fiends in the very first Final Fantasy. Earlier in the game, the party splits up to visit the four elemental temples and defeat each temple’s guardian—the ones listed above—to retrieve the seal of each, which are needed to access the world of Terra. Unfortunately, most likely due to time and budget constraints, the developers had to turn that section of the game into a sequence of cutscenes instead of turning each temple into a dungeon with each temple’s guardian as its boss encounter, which might be the reason for why they opted to move those encounters to a later point in the game.
✅ End of spoiler territory. ✅
This being said, it’s entirely possible that Queen’s Blood has a deeper meaning than just being a fitting name for the card game’s medieval setting—the castle and the dragons. But what could it refer to?
The Lifestream is also called the lifeblood of the planet, which means that the term blood in the title could refer to exactly that, the Lifestream—the planet’s memories. Sephiroth wants to gain complete control over it to rule over the cycle of life himself so he does not vanish when the planet dies or alternatively keep the planet from dying, basically keeping it on life support. On the other side, Zack and Cloud are opposing Sephiroth and thus implicitly fight for the preservation of the Lifestream and the natural cycle of life.
If “Blood” stands for the Lifestream, “Queen” may refer to either the planet or even Minerva, who follows the intentions of the Lifestream, according to Crisis Core’s Complete Guide’s Keyword Collection.
“…it seems that the purpose behind her actions is to follow the intentions of the Lifestream.“
Going further with this idea, at the end of the State of Play trailer from September 14th 2023, Sephiroth says the following: “Reunion… when worlds merge.” We will cover this and so much more in a future article, but for the sake of this minigame analysis, let’s focus on the very surface part of this. Ever since Zack’s survival in Remake, we are dealing with two worlds. One that resembles the original storyline and which we play through with Cloud and the others, and one where Zack lives and Cloud is still catatonic, suffering from the effects of Mako poisoning. It seems that Sephiroth wants to merge both “worlds” in some way and I believe that’s what will inevitably happen. It’s just a question of which continuity or which world will prevail. and that’s what those two dragons holding a bowl on each side might represent. Two potential outcomes battling each other until only one of them prevails and claims the crown, which is beautifully represented in the card game’s logo on the game board.

But there is another possibility. We already established that the player’s and rival’s card and pawn colors could refer to Cloud, Zack, and Sephiroth. It is therefore not at all far-fetched to think of Aerith as she’s connected to all three. Zack is her first love and she wants to find the real Cloud within. Plus, she’s the last Cetra and thus a major wrench in Sephiroth’s plans given her abilities to commune with the planet. If Sephiroth kills her and somehow makes sure that she cannot call forth the Lifestream as she did in the original game, he not only gains free reign, he also prevents her to find the real Cloud in one continuity and takes away the last person the now alive Zack cares about in the other. In the context of this minigame, he would win the crown by slaying the Queen, which would represent Aerith in this case. Being the last Cetra essentially makes her automatically Queen of the Cetra as there’s nobody else around.
That’s it for the “Queen” part. What about “Blood?” It could refer to three things:
The Lifestream within Aerith,26
Her heritage, the blood of the Cetra,
Or her literal blood that’s spilled on the fated altar at the Forgotten Capital.
Possibility number three holds some weight considering Rebirth’s story going up to exactly that location and event as confirmed by the developers multiple times.
Hamaguchi-san: “I’ll say that the locations covered in this game go up to the Forgotten Capital.”27
Yoshinori Kitase: “one point being that the order of certain events of the storyline may differ from the original, some may appear or some way, then what happens in the original, but overall, Rebirth will tell the story to the Forgotten Capital sequence, and overall, follow the original story.“28
When I asked what Rebirth’s stopping point will be, Tetsuya Nomura confirmed the story runs up to the end of the Forgotten Capital (a.k.a. The City of the Ancients). However, as anyone who finished Remake should know, Nomura stresses that Rebirth will not follow events in the same order or manner as the original game.29
Naoki Hamaguchi: “As you know, in Rebirth, the characters are leaving Midgar and going on a journey that eventually leads to the Forgotten Capital.“30
Naoki Hamaguchi: “The section of the original Final Fantasy VII story that Rebirth tells goes up to the Forgotten Capital…“31
Although there are some changes in the order of the locations, the locations depicted in this title extend up to “The Forgotten Capital,” where the greatest fate of Final Fantasy VII awaits you.32
And then there’s this segment from the official press release announcing the game’s release date on February 29:
The story will unfold more dramatically than ever before, with a rapid pace of major twists and turns. We know fans are dying to see one scene in particular…
If that’s not a reference to Aerith’s iconic video game death, I don’t know what is.
To summarize: Queen’s Blood either refers to the planet’s Lifestream and possibly Minerva, or the heritage and eventual death of Aerith. Or both.
But there’s more. Remember this variant of Rebirth’s key art which is shown upon completing the Junon segment of the Tokyo Game Show demo?
What if Queen’s Blood refers to two individuals? Just as the player side is represented by two colors which we deduced could refer to Zack and Cloud, “Queen” may in turn refer to two entities as well: Aerith and Tifa. How can Sephiroth permanently break Cloud? By removing Tifa from the equation. After all, it’s her helps Cloud revert to his true self and thus breaks Sephiroth’s hold over him. For a now alive Zack, Aerith is the last friend he still has left after Sephiroth, Genesis and especially his mentor Angeal have died. Yes, Cloud is still alive in Zack’s continuity, but he’s still catatonic and will most likely turn into yet another black-robed Sephiroth puppet.
In short: Sephiroth aims to break both Cloud and Zack and thus needs to get rid of Aerith in Zack’s and Tifa in Cloud’s continuity to achieve that in order to grab the crown and win. Zack and Cloud on the other hand only need to oppose and defeat Sephiroth, their rival, to avert the end of their world.
An Allegory
All this crazy theorizing and pondering over possible connections to the main story sounds good and intriguing and all, but what about the minigame’s presentation? Why the castle and the dragons? Final Fantasy VII contains neither element outside of the medieval theater play and Ghost Square at the Gold Saucer, a few dragon enemies, and Kalm’s architecture reminding of a castle.
I don’t think we can draw direct parallels to Final Fantasy VII’s world as this game’s presentation might just be of allegorical nature. The castle may represent the Forgotten Capital and the two dragons on both sides vying for the Queen. One wants her blood, the others want to save her. Although, when reading that last sentence of the official description again, it seems like both sides are out for blood and want to claim the queen’s crown…
Collect cards and utilize their abilities to claim the crown as QB royalty.
I generally think that this minigame has the role of an allegory. Remember it being a part of a side-story which we uncover as we play and win against more and more rivals? That side-story could mirror Rebirth’s main narrative but told in a completely separate story that in itself has nothing to do with Rebirth’s plot. Unconnected, yet full of parallels and neat details if you know where to look.
That’s my prediction anyway.
It’s Just a Minigame
“It’s just a minigame, bro! Chill and touch grass.” I hear some of you say.
True, I may be reading way too much into this, as always, and just wasted hours of my and about 20 minutes of your time, and Queen’s Blood is merely a cool looking minigame that enriches the experience of Rebirth. Nothing more. However, those curious details mentioned further above, like the player having differently colored cards and pawns compared to the unified color scheme of the rival, are too compelling to withhold my findings and theories, especially when there’s a chance that I’m onto something.
Final point, Queen’s Blood is effectively on the same level of importance as side quests since the world map shows how many rivals you’ve already beat in the region right next to the number of available and completed side quests. Plus, the Grasslands demo contains a more complete main menu where we can spot a separate entry for this minigame.
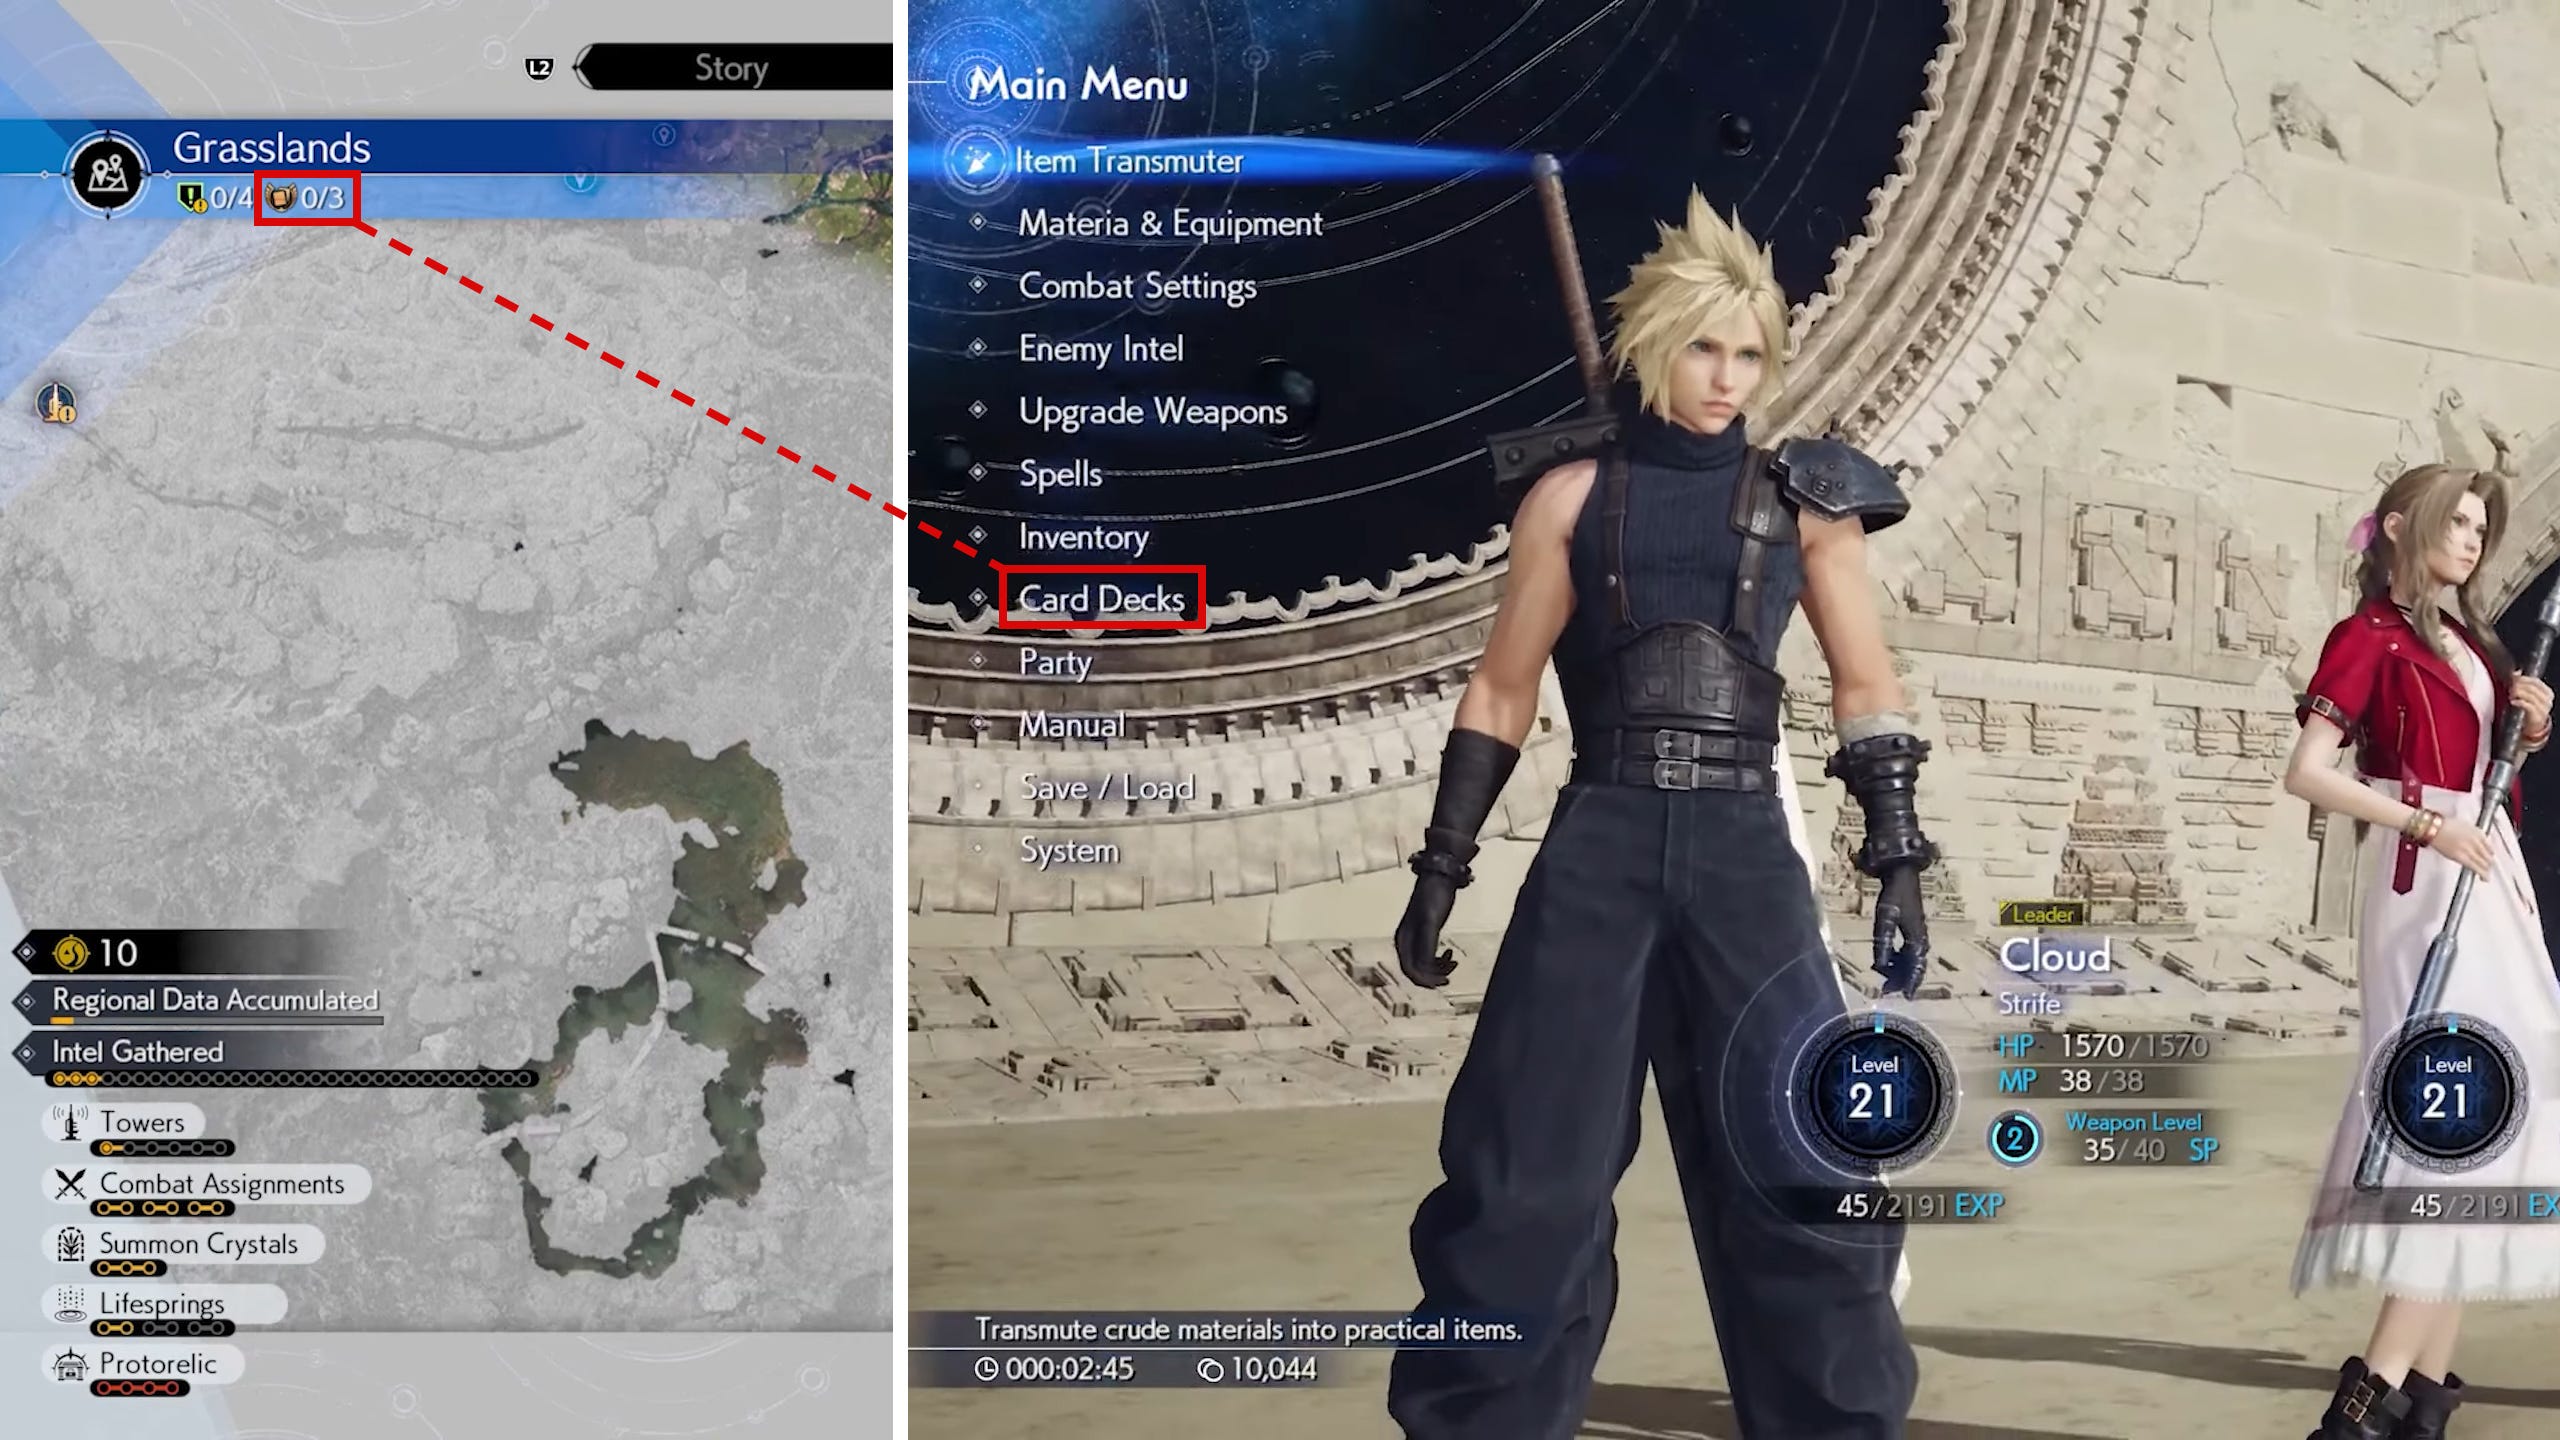
It is therefore heavily integrated into the main game and its progression, maybe even the story to some extent, much more so compared to any other minigame we’ve covered so far.
Is it February 29th yet?
Final Thoughts
This was a very long article but I wanted to have everything in one place instead of scattered across multiple smaller articles. I hope it was not too daunting and overwhelming. I’m sure there will be even more minigames to analyze before the game drops and if not, I can always do so afterwards if needed.
If Rebirth really does cover everything up to the summoning of Meteor in terms of the original storyline (more on that in another article) we can expect the following minigames to make an appearance as well:
CPR: This is one I expect to be cut, but we’ve already seen in the Junon area preview demo that Yuffie is the one losing consciousness instead of Priscilla, so I can see a scenario where Cloud has do something to bring Yuffie back from limbo.
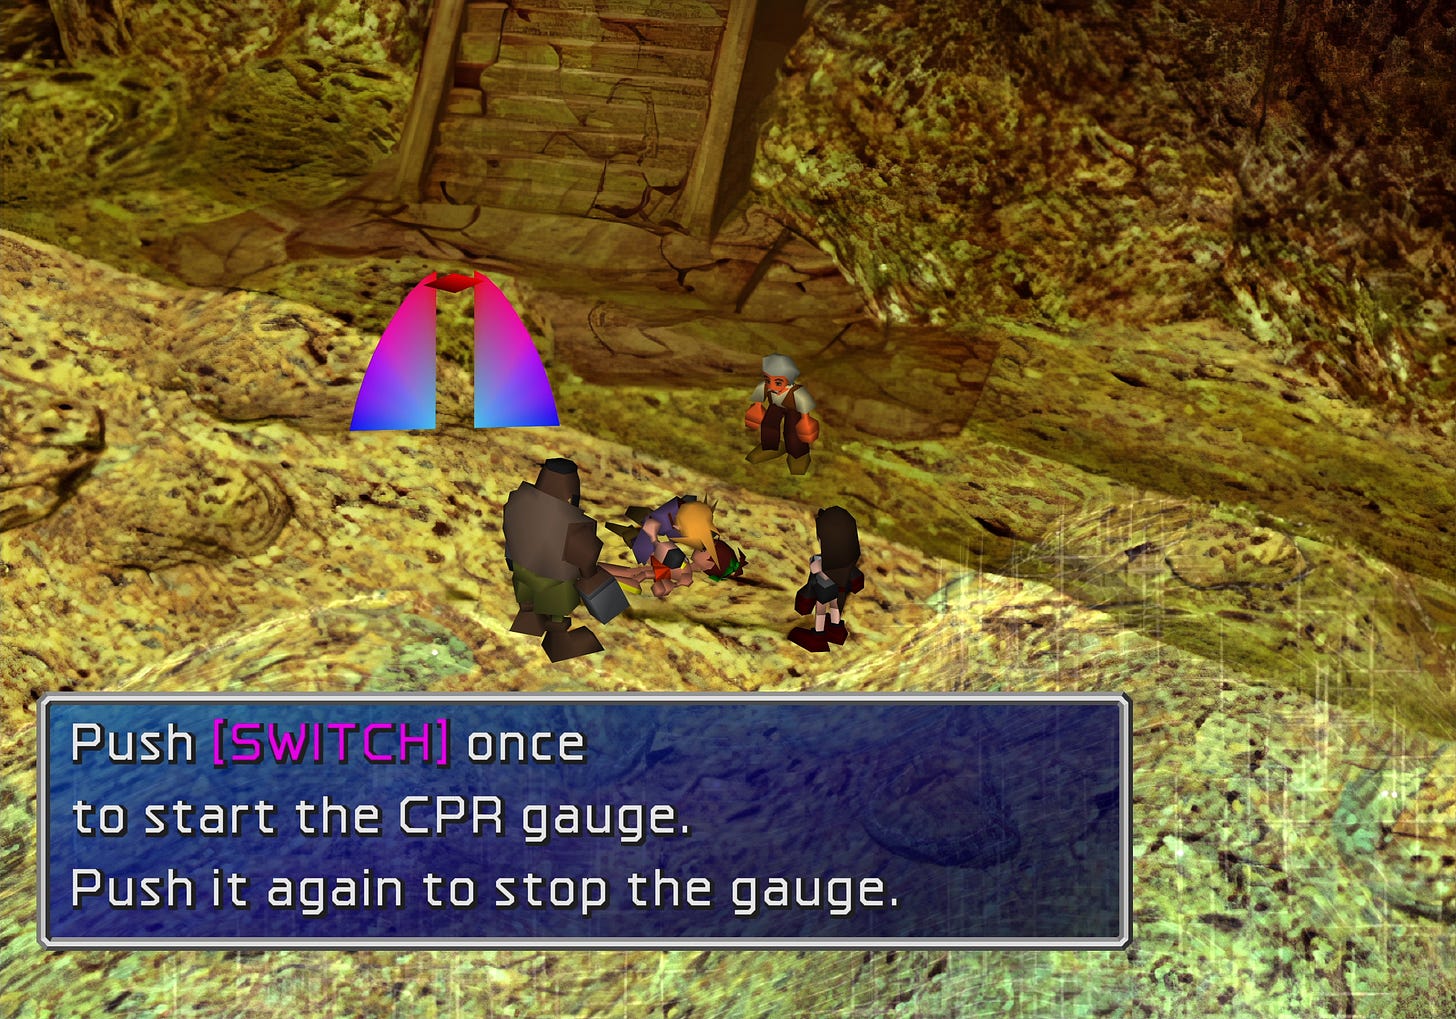
Train Track Treasure: Not quite a minigame but when running across the sine and cosine wave inspired train tracks leading to Corel and you don’t jump off in time when the tracks crumble beneath your feet, you fall down along the construction and have to climb up again. While falling, you are able to mash the confirmation button and move left or right. This last part is important as you can land on the left, the right, or in the center of the screen and then can only climb upwards, unable to change “lanes.” The left and right side each harbor a treasure. A Wizard Staff for Aerith on the left and a the Star Pendant accessory on the right. If you do not move at all, you will end up in the center and end up empty handed. You can also only fall down three times, so you better move to the left on one occasion and to the right on another.
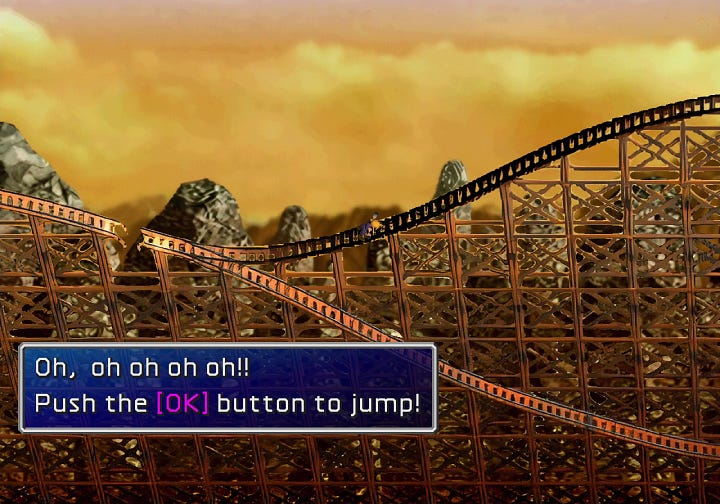
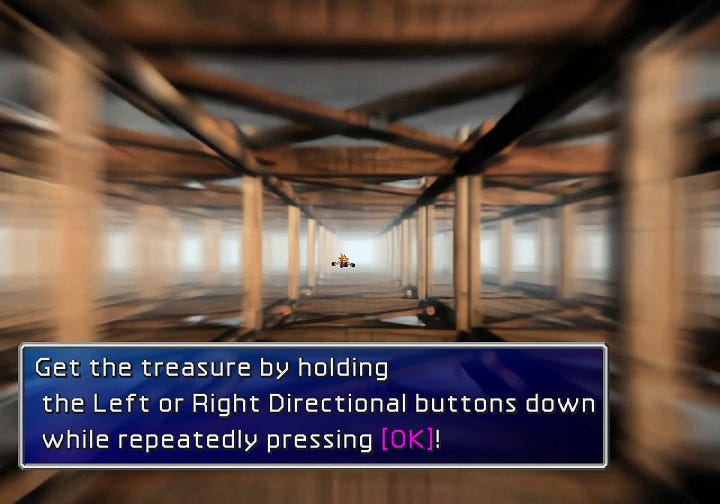

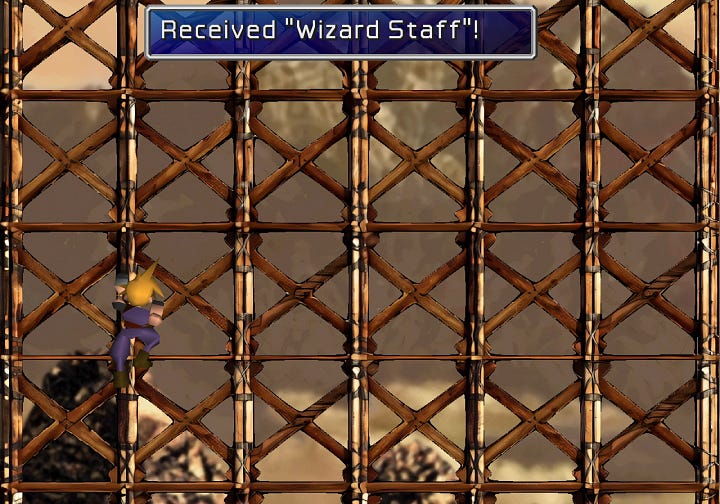
More at Gold Saucer: Wonder Square offers even more minigames such as Arm Wrestling, Basketball, Wonder Catcher (basically a claw machine), and Fortune Telling. It’s also possible that Rebirth offers entirely new minigames in this area.
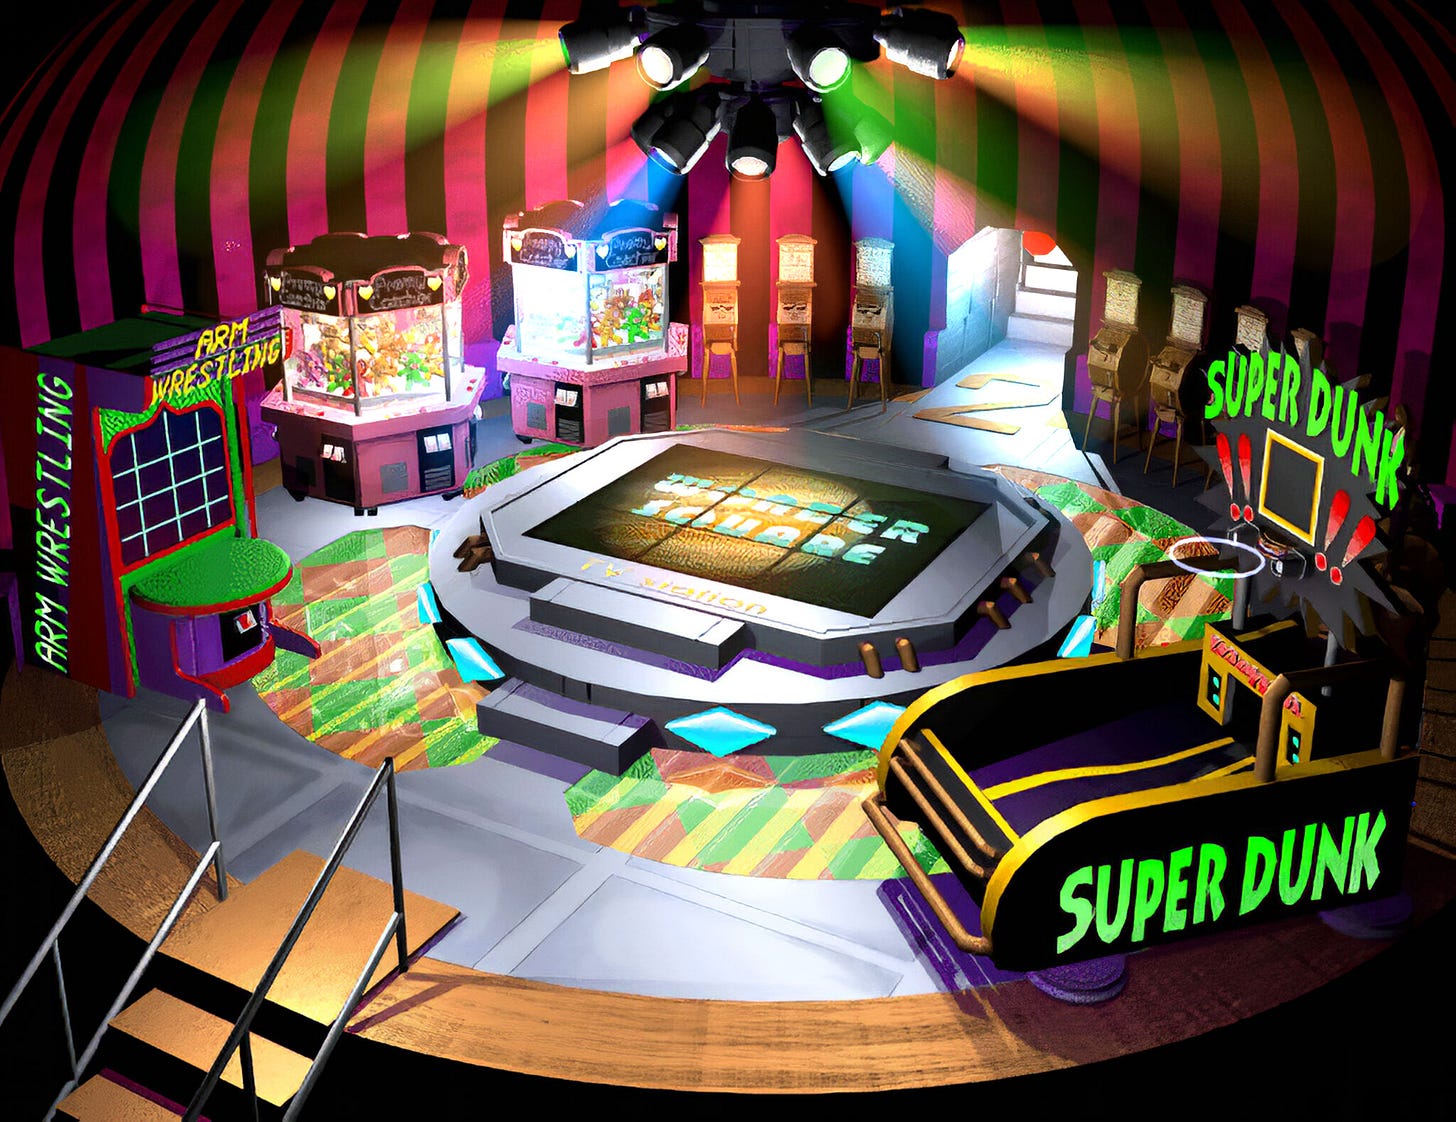
We also should not forget about the Battle Square where we fight against at most eight groups of enemies while slot machine wheels add a handicap—or healing if we’re lucky—each round to make upcoming battles harder and harder. Winning all eight battles or bowing out early rewards us with battle points which we can then use to exchange for unique rewards such as Enemy Lure, Pre-Emptive, Speed Plus, or W-Summon Materia. The instruction manual for Cloud’s level 4 Limit Break Omnislash is also exclusively obtained here.
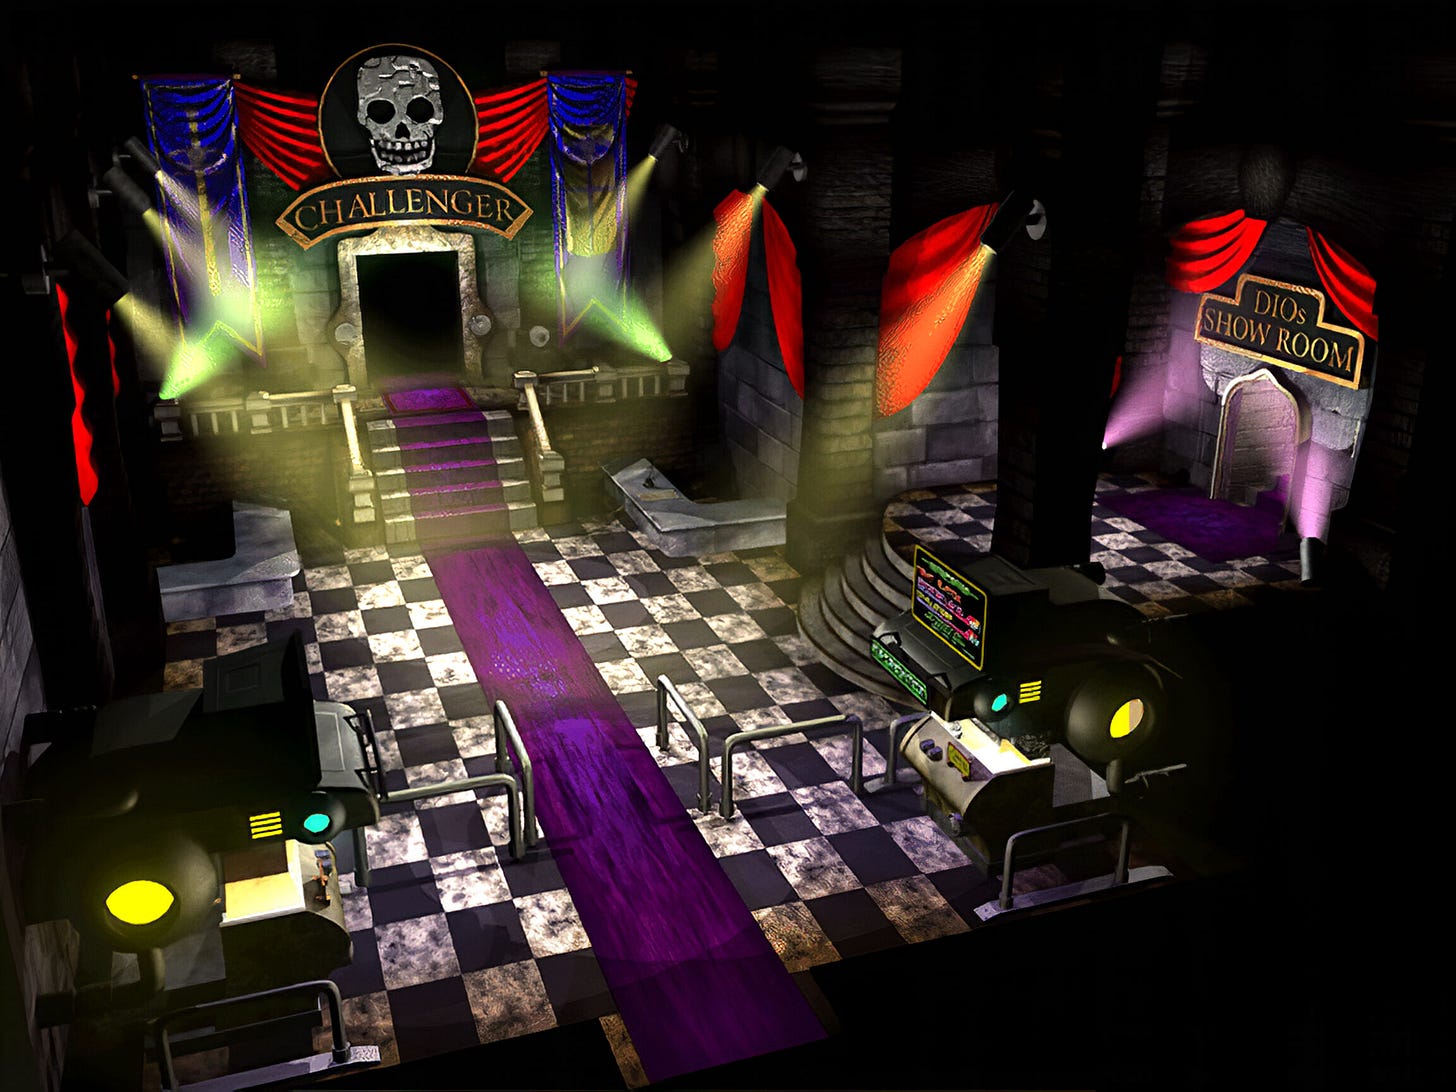
Speed Square houses another attraction at Gold Saucer called Shooting Coaster where we ride along a roller coaster while shooting down everything that either moves or doesn’t constitute as a wall.

Bone Village: We most likely still need to dig up the Lunar Harp to wake up and find our way through the Sleeping Forest. In this minigame, we need to employ at least one worker and place them at random points on the map. After detonating the bomb, they measure the shock waves and then turn towards the spot where the item to dig up is located. We then need to tell them where to dig and hopefully obtain the unearthed item afterwards.
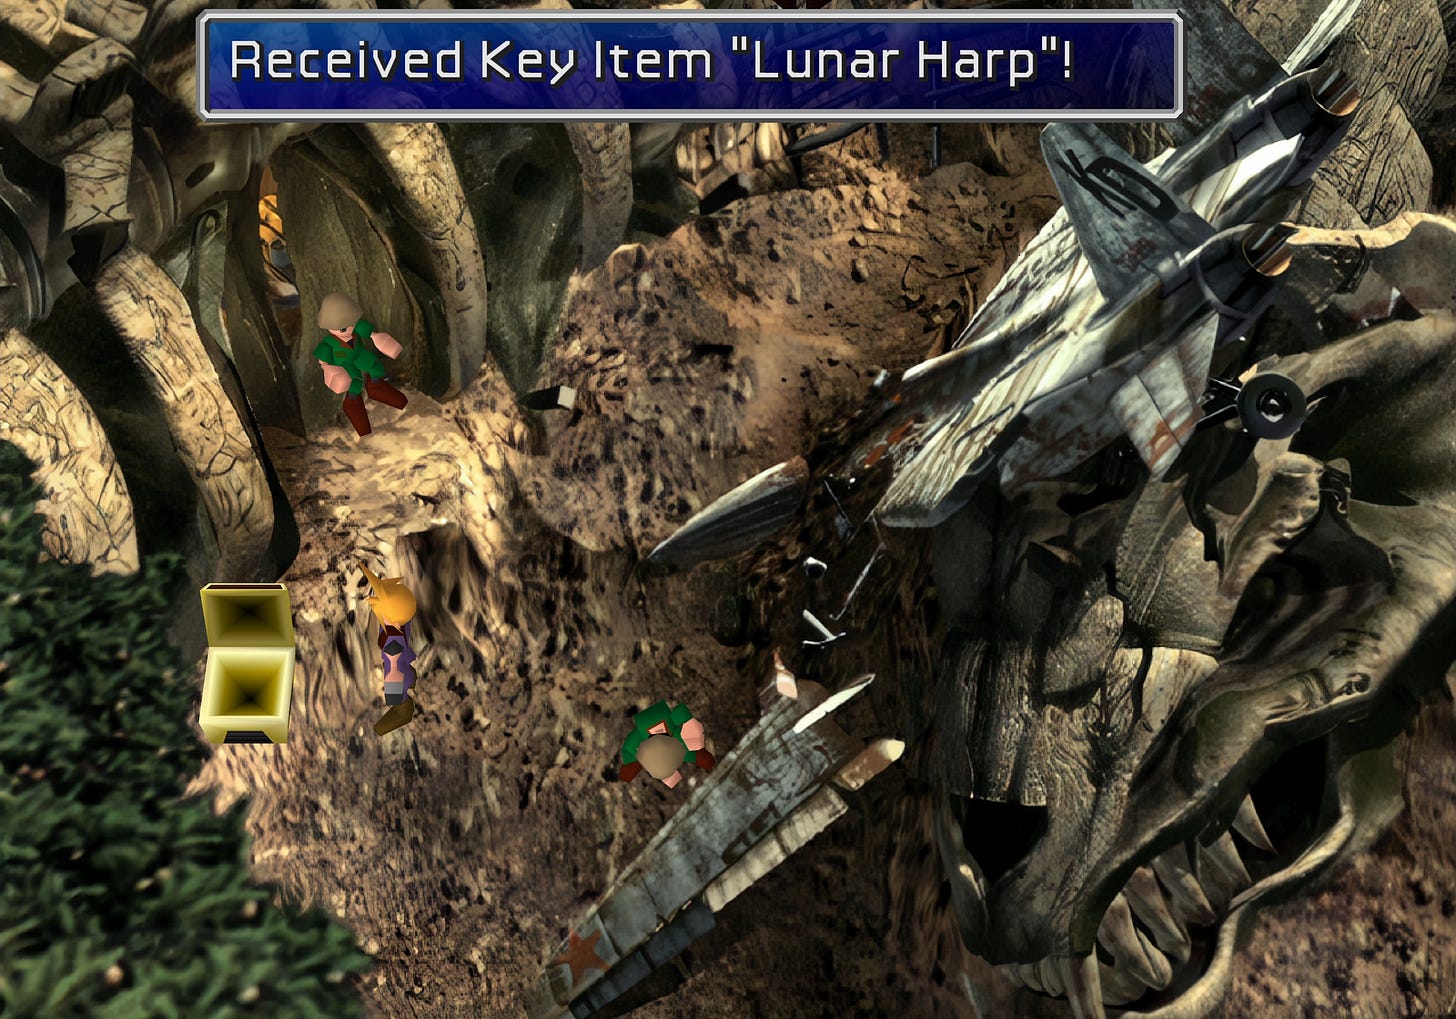
Snowboarding: Last but not least, the snowboarding minigame is too famous for not being included somehow33 and I’m personally looking forward to playing it very much, especially in game three where we will most likely be able to play it again at Gold Saucer’s Wonder Square with more tracks, different challenges, and maybe even a time attack mode. We’ll have to wait and see.
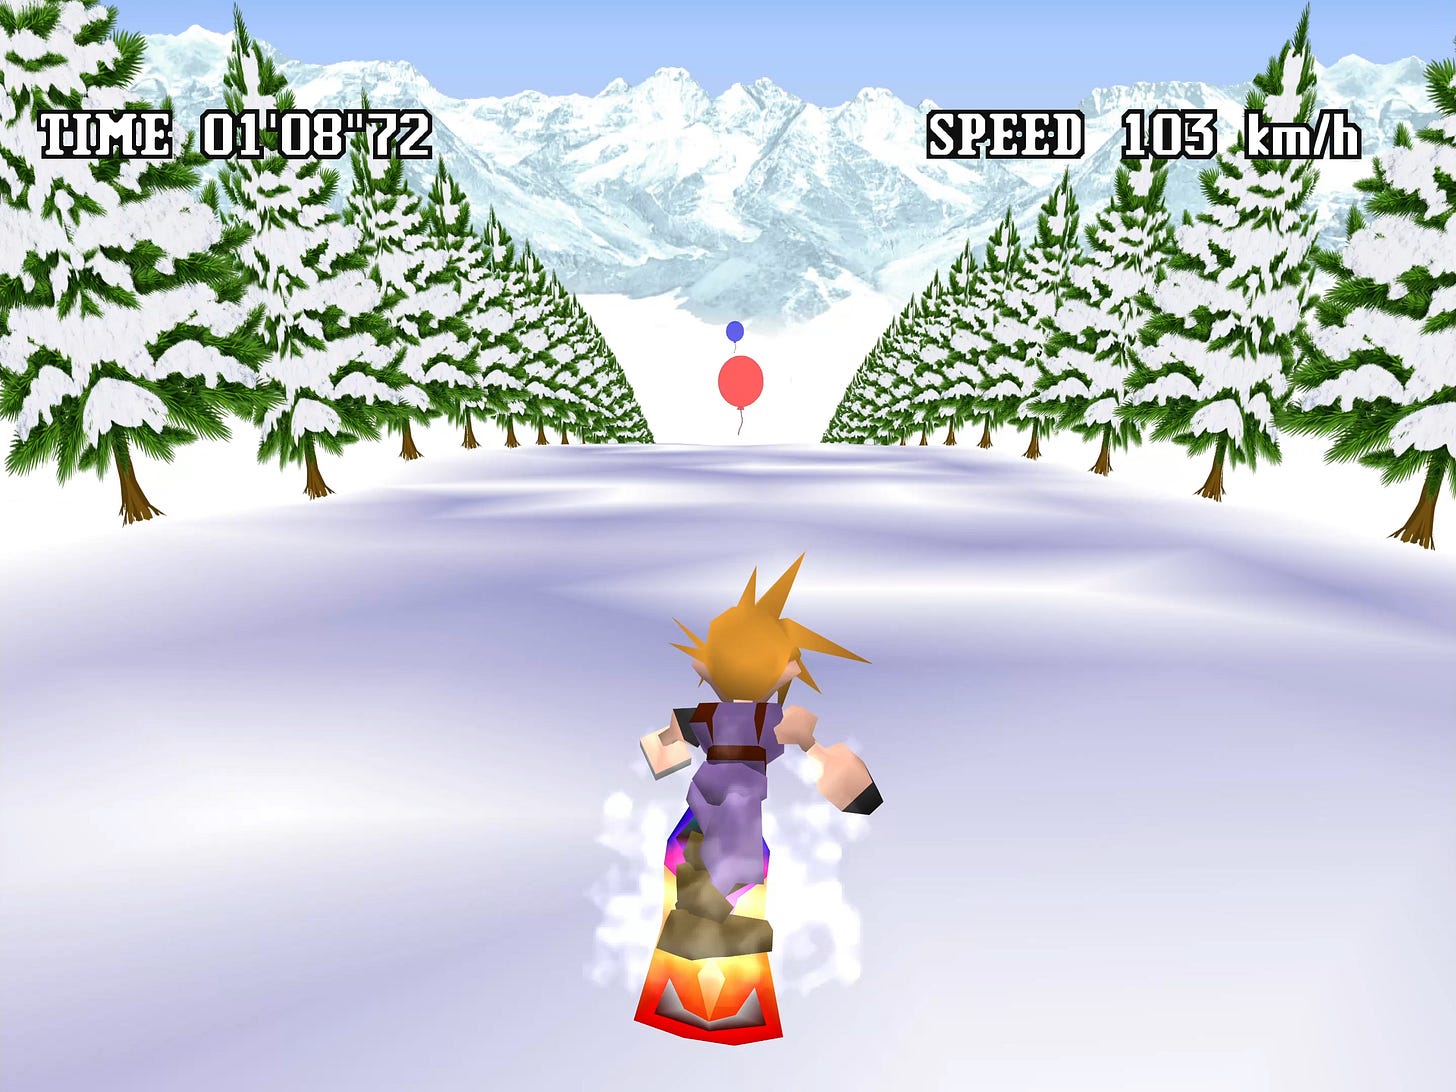


And that’s it for this humongous Rebirth minigame analysis. Thank you so much for reading all the way to the end! It took a while to finish this one but I’m glad I went through all the trouble as I love analyzing gameplay systems and by looking into those minigames this closely has me hyped up and looking forward even more to February 29th 2024 when we finally can get our hands on this highly anticipated game.
What are your thoughts about those minigames? Which ones are you looking forward to the most? Did we miss or misinterpret something? Do you have additional thoughts you’d like to share? If so, please leave a comment here or even better, let’s have a discussion on our CCO Discord server.
Sincerely,
Vyzzuvazzadth
A separate and recorded presentation of the same material can be found here. It fills out the screen and is shown in better quality. Downside: gigantic Chinese subtitles.
At least I think you can call Cloud’s group a platoon. I’m not well versed in military terms so I consulted this reference on the US Department of Defense webpage.
Final Fantasy VII released on January 31st 1997 in Japan for the Sony PlayStation. The North-American release date was September 7th and Europe followed on November 17th in the same year.
I calculated this number by rotating the Limit gauge until its top border was aligned perfectly horizontally, then measured the length of the yellow segment and the whole gauge, and then put both into relation to one another. This resulted in the following calculation: 100% / (62px / 315px) = 19.68%. Which we can round up to 20% since pixel measurement is never 100% accurate.

The other two would be snowboarding and the submarine minigame. The former might make it into Rebirth depending on whether it includes the Great Glacier segment and the latter is certain to be contained in the third game of the remake trilogy.
GP stands for Gold Points and represents Gold Saucer’s currency used to purchase unique rewards, enter attractions, or even staying at the Ghost Square inn.
mph stands for miles per hour. The conversion factor from mile to kilometers is 1.609344. If the speed meter shows 160, it’s either 160 mph and thus 257.495 km/h (kilometers per hour) or 160 km/h and thus 99.41939 mph. Since the distance indicator on the compass line during normal gameplay shows m for meters, I assume that all units in FFVII Rebirth follow the metric standard, which means that the speed in G-Bike is most likely shown in km/h.
DMW stands for Digital Mind Wave and is represented by a slot machine mechanic which runs automatically and in parallel to the player’s actions during combat and is responsible for occasionally deploying effects upon hitting certain number and icon combinations, which includes granting Summons, Limit Breaks that are accompanied by short scenes with memories of Zack’s past, or even level-ups for Zack and equipped Materia, among other bonuses like temporary no MP or AP consumption.
PSP stands for PlayStation Portable, a Sony handheld console with a lifespan of 10 years from 2004 to 2014. The original Crisis Core -Final Fantasy VII- was released on the PSP in 2007 in Japan and in 2008 in the rest of the world.
The hexagonal pattern is a very strong, efficient, and durable compound of elements as seen in molecules, carbon sheets and nanotubes, leaves, insect eyes, and bigger structures like beehives or even rock formations.
I will post some quotes or references here once I find them.
Japanese line in text form for reference: 「モーグリショップに ようこそクポ!」
Japanese line in text form for reference: 「遊んでいる子供たちをこのモーグリハウスに連れ戻してほしいクポ」— Translated using DeepL
The image of the original version (right) has been upscaled using AI and fixed up with manual touch-ups by Satsuki Yatoshi for the famous SYW mod for Final Fantasy VII’s PC version.
Our Cosmo Canyon Observatory YouTube channel contains quite a high amount of Guitar Hero videos from before 2015, many of them created by me using GH Studio and most of those related to Final Fantasy. Feel free to check out the Final Fantasy Madness playlist for some nostalgia fodder.
You can hear the Costa Del Sol theme in the background before Noda-san begins his attempt at Aerith’s Theme in the Piano Performance minigame. Jump to this timestamp in the YouTube video recording of the event.
In case you’re not familiar with major and minor chords, a simple major chord consist of a major third and a minor third. A major third consists of two whole tones and a minor third of a whole tone and a semitone. A minor chord is made up the other way around: a minor third first, followed by a major third. Effectively, only the second of three notes changes. A major chord sounds cheerful while a minor chord has a more melancholic feel to it. For more information, check out this site.
Two examples: The C (major) chord consists of the notes C, E, and G, whereas the Am (minor) chord is made up of the notes A, C, and E.
In a suspended second or fourth chord, the second note of the triad is either moved down (sus2) or up (sus4) one position on the scale. Example: C-F-G instead of C-E-G (C sus4) or C-D-G (C sus2).
A diminished chord is basically a minor triad chord but with its 3rd note (the fifth note on the scale) decreased by a semitone, e.g. C-E-G♭.
Similar to a diminished chord but with two major thirds making up the triad. Essentially a major triad chord with the third note (fifth on the scale) increased by a semitone, e.g. C-E-G#.
President Shinra, Cloud’s mother and other residents of Nibelheim, Cloud in Nibelheim and towards the end of Advent Children, and last but not least: Aerith.
Not just the planet contains this cycle of life called Lifestream. Each living organism on it also harbors its own little Lifestream, as seen by killed enemies that dissipate into thousands of Lifestream particle to return to the planet.

There’s also the Cosmic Lifestream where a planet’s Lifestream returns to upon death, as described in Dirge of Cerberus chapter 7.


This minigame has since been confirmed to not be included in Rebirth as part of a 129 rapid-fire question session conducted by Game Informer.
I heard on a YouTube article (struggling to find the source unfortunately!) that the poster in Tifa’s room is a silhouette of Zell from FF VIII, doing his dolphin blow move, which is a nice Easter egg :)